
Today, building technology allows you to erect high-rise buildings, as well as create real masterpieces of architecture that can compare with the legendary monuments of architecture of the past, but until recently it was impossible to get rid of such a problem as ice on the roof. No, there were methods, and many of them were quite effective, but there was no universal solution. Today it is and this technology lies in the fact that the gutters and roof are heated.
The modern solution is quite original, because it fights not with the consequences, but with the cause. The fact is that the technology developed by European experts, and then implemented in the Russian Federation, is designed to prevent the formation of ice in places where melt water flows. Obviously, you should avoid clogging the gutters and freezing ice plugs, as the thaw itself will allow the ice to quickly disappear.

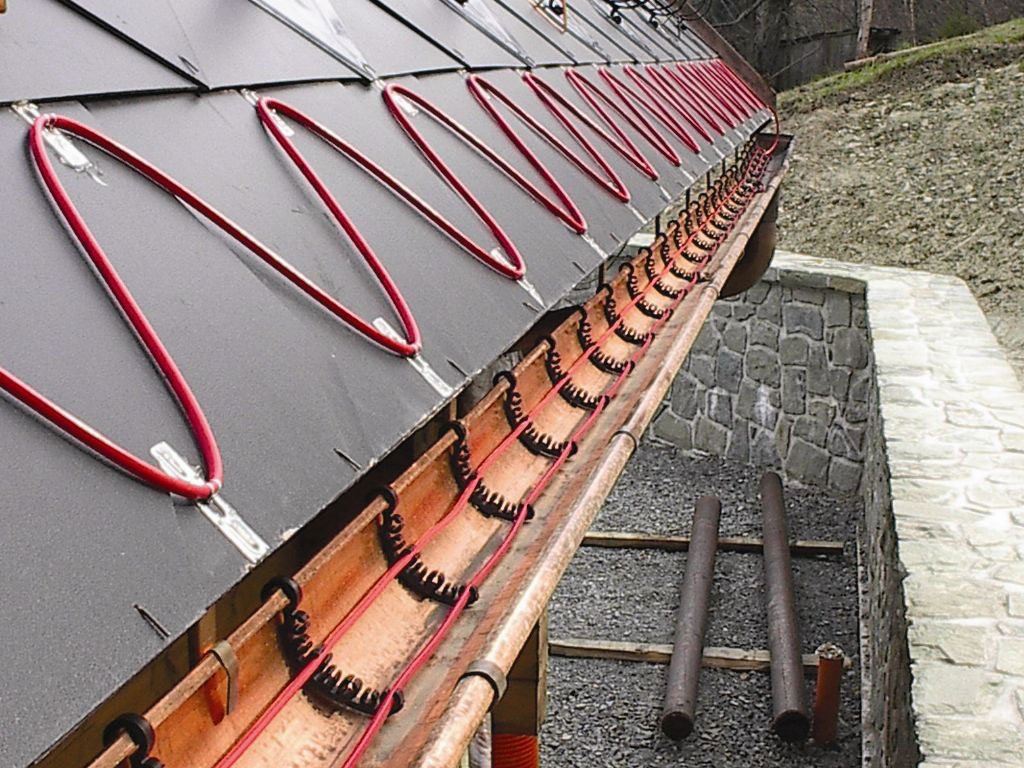
If we consider a typical residential building, which has several floors in height, it becomes obvious, then not so many heating elements are required. They should protect only a few areas. The first of these sections is a drip, which allows melted water to drain from the roof. Here, icicles can form, since the temperature of a constantly moistened dropper will be lower than that of a metal slope heated by the sun. A special cable is laid right along the drip, which acts as a heating element.
Gutters are the second problem area. Here you also need to take care of protection against the formation of ice. The drain itself is protected by laying the cable directly through the pipe. This approach will not heat up the pipe much, but there will be no more congestion. In addition, it is necessary to place the cable in the funnels, which are necessary so that all the water gets to its destination, as well as in places used to drain melt water to the sewer.
Another element is guttersby which water gets to drains. They collect water from the slopes, so often ice begins to freeze in front of them or in them, which is easily prevented by using a heating system.
Heating technology
Today, there are two varieties of heating cables - resistive and self-regulating. The former are attractive because their production technology is very simple, and expensive materials are not used here. The cable itself can have one or two conductors, through which electric current flows. Heating begins because of the presence of ohmic resistance to the current, therefore, with its growth, the amount of released heat also increases. Obviously, due to the complexity of the calculations, such cables are used only from a certain set of lengths.
The design of such a heating element is two current-carrying conductors, which in fact are stranded wires, and a layer of heat-resistant insulation is applied on top of them. Around the insulating material is a shielding braid, and it is surrounded by a sheath. Usually, a similar cable is closed at the factory on one side by a sleeve, and on the other it receives a connector for connection.

Today, the second heating option is increasingly being used, since the resistive cable cannot be used where a heating element of arbitrary length is required, and other problems occur when it is used on the roof.
Such a heater always works at full power.Obviously, the savings achieved through the use of this type of cable will result in quite impressive bills for the energy spent. It must also be said that, in terms of efficiency, this system is much inferior to another type of heating cable having the same power.
The heating of the roof and gutters is easiest to carry out using a self-regulating heating element. The principle of its action is somewhat different, therefore, production is more expensive. On average, the difference in cost between the first and second options can be 5-6 times.
What is a self-regulating cable

This is a flexible heating element that works thanks to the flow of electric current. Under the influence of current, heat is released through a special matrix.
The matrix is the main difference between the second type of cable from the first. In the case of resistive technology, the wires are heated, and with self-regulating - plastic. This difference is not entirely clear the first time, so below we describe the cable in more detail.
The matrix plastic, located between the power wires, is nothing more than a resistive element, depending on the temperature. Those. as the temperature changes, the resistance of the material changes, which means the amount of heat released by it. An example is the technology where finely dispersed graphite contained in plastic is used. When the temperature rises, the matrix expands, which leads to the removal of graphite grains from each other. The number of microcontacts in the volume of the conductor decreases, therefore, the cable resistance increases. This leads to a decrease in the power of the heating element, but with a decrease in temperature the picture is strictly opposite. The material itself begins to decrease in volume, so its particles are getting closer and closer to each other. The effect described above gave the name to the cable, since its properties and the amount of heat generated directly depend on the temperature in each section.
Those. if somewhere the cable is located on a site without snow and ice, then its heat dissipation will be minimal, and when ice begins to form from the flowing water over the heating element, it will begin to generate more heat. Since the cable itself reacts to temperature changes at each specific point, the danger of overheating of individual sections tend to a very small value. It must also be said that the supply voltage for a cable of any length is 220 V. The second important point is that the length of its heater can be any and depends on the maximum current and the maximum allowable starting current, which will not cause the destruction of the contact between the metal and the matrix of plastic.
Cable mounting technology
The installation itself is carried out taking into account the conditions in each specific situation, therefore, in this article we will consider the preparation of an individual cable element for work.
For work with such cables, ready-made installation kits are available, however, you must remember that the kit and cable must be from the same manufacturer. It has everything you need for training, with the exception of special tools, but in this case, you can do it with improvised tools.
For work, you will need a knife, side cutters, tape measure and pliers. Since the cable is usually wound for sealing in a junction box or shield, it is necessary to use a special gland that fits snugly against the outer braid. First of all, a sleeve is put on the end of the heater, and then an oil seal. This must be done before starting work, because otherwise there will be certain difficulties. Even on an insulated cable, the gland is very tight, however, it must be taken away from the end by 30-50 cm so that it does not interfere during operation, and then it can be returned to the right place.
- First, remove the top insulation from the cable. This can be done using a conventional mounting knife by carefully cutting the plastic around the perimeter. The distance from the edge of the cable should be from 100 to 180 mm and depends on which connection method will be used. After a preliminary incision, a longitudinal incision is made towards the nearest end and the plastic is removed.
- The next step is the removal of the grounding braid. It is necessary for connecting to the ground terminal, however, it is required to twist it into a single bundle starting from the edge of the first insulation layer. Those. it turns out twisted wiring up to 180 cm long.
- The third stage is the removal of the next insulating layer. An incision is made at a distance of 2-3 cm from the metal branch connected to ground. After removing the insulation, it remains to remove the wires from the matrix. It is better not to make deep cuts in the matrix, since it is possible to damage the wires, and the material itself is not very convenient to cut with a knife.
For simplicity, it is best not to cut, but to peel off the material at the edges, since it is too dense. As soon as the wires appear, they are pulled out, holding by the ends, and the plastic gap itself is cut off.
Two wires are threaded into a special separator, which is then filled with silicone sealant. The kit includes an insulator tube worn on each wire and cut to length. Its second edge should go inside the separation element through which the wires are passed. To isolate the ground wire, another tube.
All stranded wires are crimped with special terminals, after which they can already be connected to the contacts in the shield or in the box. Then the gland returns to its place, and after it the sleeve, which allows you to insert the cable into any shield and ensure tightness.
The second end of the cable does not connect anywhere, but you still need to isolate it. In this case, 25 mm of insulation is removed on the cable surface, and the shielding braid is cut so that no more than 5 mm remains. The wires themselves, through which current flows, should not be shorted, so one of them must be cut using side cutters. The easiest way is to remove the wire with half the matrix, after which the end of the cable will be a step. After performing all these operations, heat shrinkage of the appropriate diameter is worn, however, it should cover only an uninsulated area. The tube is treated with a hairdryer, so it reliably protects the wires, but do not stop there.
The free end of the compressed tube is cut off, and the contact point with the cable insulation is coated with sealant. The end of the cable is placed inside the rubberized plug and treated with sealant, after which the entire structure is placed in a heat-shrinkable tube of a larger diameter. It is positioned so that it also covers part of the main insulation, and the free edge is clamped with pliers or side cutters.
In this article, we described how roof and gutter heating, cable installation and sealing using silicone sealant and a special mounting kit. At the moment, this technology is one of the simplest, therefore it is widely used. All of the above steps are mandatory, because otherwise the tightness may be broken and a short circuit will occur.
Alas, no comments yet. Be the first!