

When building a house, a significant part of the attention is paid not only to its appearance, but also to its functionality. It is unlikely that someone will want to lose the internal space, because funds are also spent on its construction. When installing a roof with two slopes, it is definitely possible to equip the attic floor, but even more additional space will appear if you follow the instructions for making a broken gable roof with your own hands, although such a design will be more difficult to erect.
Content
Roof design
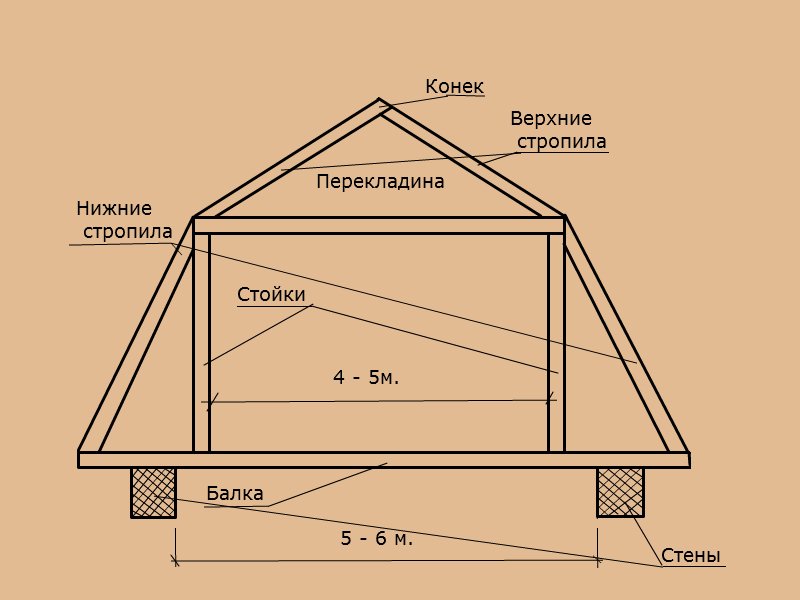
So that the space formed under the roof can be comfortably used for living space, the minimum recommended width of the house is six meters.
A sloping roof must be provided for at the design stage of a house, because it will require additional wall strengthening. So, a brick, gas silicate blocks or foam concrete will require the filling of a reinforcing belt, into which threaded rods are previously laid. Their step is one and a half to two meters.
Before starting work, you need to decide on two questions:
- What is the ratio of the parts of the rays? This parameter will affect the height of the internal space.
- Will skylights be installed and if so, what is the location? With a large number of rooms, they will help to organize the correct natural lighting..
After that, you can proceed to the calculations:
- Amounts of material for the roof.
- Thickness and volume of insulation.
- Waterproofing (determined by the dimensions of the roof).
- The required amount of wood for the rafters.
- Fasteners.
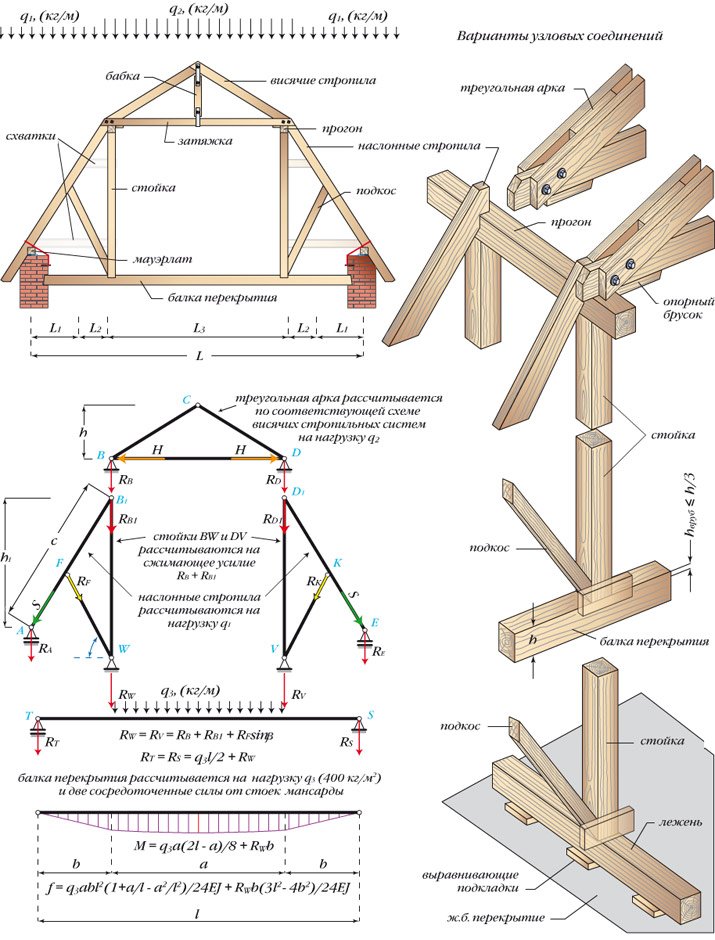
To facilitate the task, you can use the found typical roof design. If you have the skills of a designer, then you can independently make a detailed drawing. In the calculation of the rafter system, namely the step and section of the beams, specially designed programs will help. They are based on what kind of roofing material you are going to use, what loads will be on the roof, which construction area and others.
Materials for work
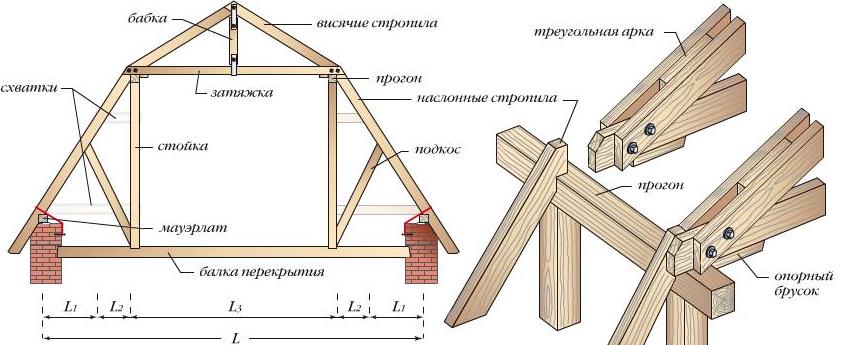
- Rafters - the main structural element. As legs and braces, it is recommended to use a high-quality timber with a cross section of 5x10 cm. You will also need edged boards with a minimum thickness of 3 cm.
- Mauerlat - support for rafters. It will be good to use a bar with a cross section of 25x25 cm.
Coniferous wood is well suited for the organization of the rafter system. But it should be dried to a moisture content of not more than 22 percent. A sloping roof is different from a simple gable roof with a large weight. Due to this, the material will need more massive.
- Fixing materials. Bars and boards will be connected using steel brackets and studs (size 8-12 mm.). And of course, you can not do without bolts, screws, nails and metal staples.
- Lathing and counter lathing are needed for laying roofing material. For these purposes, wooden slats with a cross section of 50x25 mm are suitable. Connecting elements will be parts that are cut from thick plywood.
- Insulation to create a comfortable environment in the roof space.
- Steam and waterproofing films to protect the rafter system from moisture, which will render it unusable.
- Roofing material. It is recommended to use not too heavy ones: for example, metal tiles or metal profiles, as well as ondulin and bituminous tiles.
Instructions for the construction of the rafter system
Tools are used standard, as for any carpentry. A ladder and safety equipment are also useful.
Before starting the assembly, it is necessary to treat all the wood with special antiseptics, as well as to impregnate with a fire-fighting solution. These works are carried out in accordance with the instructions on the packaging. And in order to provide a deeper penetration of solutions into the material, it is better to process all elements of the rafter system twice. Next, let the wood dry before starting further assembly. It is also necessary to process the battens of the crates and counter-crates. Another preparatory work is drilling holes in Mauerlat bars. Their step should correspond to the step of the studs mounted on the walls.
In principle, the rafter system can be considered as modularly connected sections, which it is advisable to assemble on the ground, and only then lift it to the roof and carry out further installation according to the drawing. This will simplify the work. The upper and lower rafter legs are connected to each other at a selected angle. In order not to violate the general geometry of the roof, it is necessary to monitor their precise cut, as well as observe the dimensions of all parts. This will affect the safe installation of the roofing cake. To simplify the work, you can prepare templates. They are performed using metal or plywood, in accordance with the project.
Work stages
- It is necessary to lay roofing material in one or two layers on the bearing walls of the building. He will perform waterproofing protection.
- Then proceed to the installation of the Mauerlat. Fastening the beams to the studs is carried out using nuts.
The installation of Mauerlat beams must be carried out observing strict parallelism between them.
- The inner part of the Mauerlat is mounted in such a way as to ensure its coincidence with the inner part of the wall. Under the condition of a large wall thickness, a protective row can be laid out. It is located on the outside. For work, use a brick.
If the house is made of wood, the upper beam or log, according to the material of the building, will serve as a Mauerlat.
- After the Mauerlat is installed, they proceed to the fastening of the uprights. To do this, use temporary struts. Start the installation from the extreme racks in a row, after which it is necessary to pull a rope between them. It will serve as a level for installing the remaining racks.
- Racks are installed in increments of 2.5-3 meters. It will be optimal. Their height is determined in accordance with the expected level of the ceiling, adding 10-15 cm to this parameter.
- After that proceed to the installation of the upper sections. They are attached to the uprights, and connected at the top.
- The resulting joints must be secured with plywood linings. Their fixation on the beam is carried out with self-tapping screws.
- Girders are installed on racks from boards. After that, the crossbars are mounted, which must be fixed with a temporary support. Then they are fixed using boards.
- The beam run is mounted in the upper part of the structure.
- The last step will be the installation and fixing of the braces.
- A counter-lattice is stuffed on the rafters using nails and a hammer.
When all work with the installation of the rafter system is completed, you can proceed to the next step in the formation of the roofing cake - laying heat, steam and waterproofing.
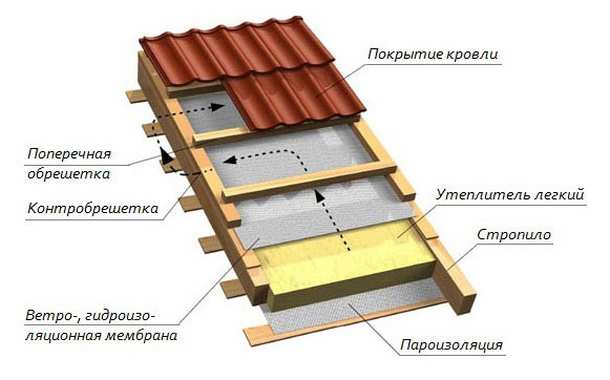
- The vapor barrier film is attached from the inside of the room. Metal staples are well suited for this. It is important to maintain uniform material tension.
- As a heater, you can use mineral wool or expanded polystyrene. Their installation is made between the rafter legs.
- Laying waterproofing - the final stage, carry out its overlap in several layers. This will help minimize leakage risks.
The waterproofing material may sag, but not more than two centimeters.
- Fixing of the material is provided by counter-rails, which are mounted from the bottom up, starting from the cornice and moving to the ridge.
- Counterrays provide ventilation of the roofing cake, and also help maintain the integrity of the waterproofing film.
Further work can be described as roofing: - When the waterproofing film is laid, proceed with the installation of the crate. The determination of the pitch of the rails depends on the type of roofing used in construction. For the convenience of work, it is made in 30-35 cm. Subject to the use of rigid materials. But for a soft roofing, a continuous crate of plywood sheets or OSB plates is better.
- The slats must be positioned in a straight line so that, when laying the roofing material, there are no problems.
- There are no peculiarities of laying a roofing for a broken gable roof, so the work is carried out in accordance with the selected material.
Some tips
- Building experience should be decisive when creating a broken gable roof with your own hands. Its design can be quite complicated for a beginner.
- Roofing material of a large weight is better not to use for an already heavy construction. Because of this requirement, tiles will have to be abandoned in favor of existing alternatives - for example, bitumen or metal tiles.
- Ventilation of a roofing cake is a prerequisite for proper installation. Blowers are installed in the roof and in the ridge part.
- The resulting under-roof space is perfect for organizing an attic. And if you plan to place residential premises there, then it is especially necessary to approach the issue of its insulation. The thickness of the material should be selected in accordance with the requirements of the joint venture. This parameter is selected depending on the area of construction.
- Also, do not save on vapor barrier material. High-quality products will help create a comfortable environment in the living room.
Alas, no comments yet. Be the first!