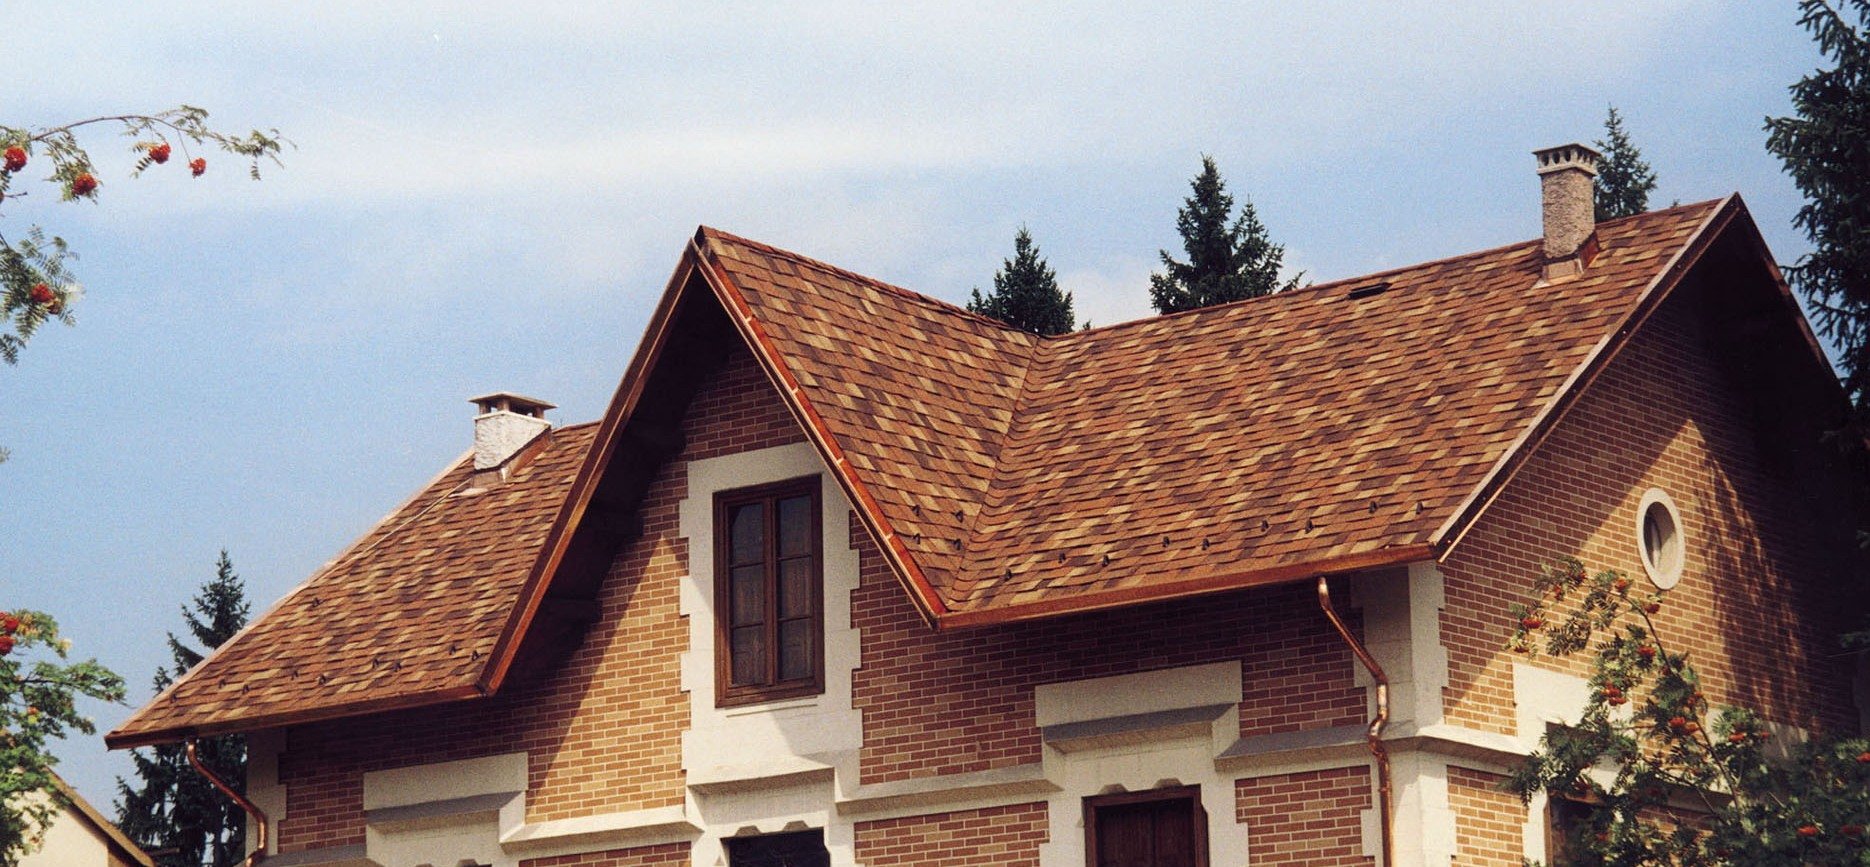
Surely you saw that many buildings use soft tiles as piece roofing - piece material that gives the building a unique look: modern, noble and outwardly attractive. Of course, this is the task of installing the tiles, since only the correct installation, taking into account the manufacturer's recommendations, will enable the coating to last a long time, reliably protecting the building from the negative environmental influences, giving it a presentable appearance. Naturally, this is the task of specialists, roofing professionals successfully cope with it.
But what to do if there is a need to carry out work on your own, without the involvement of specialists? For this case, we offer you an article, upon familiarization with which you will have knowledge about how to install flexible tiles in practice.
Content
General Installation Information

The story of how to install flexible Shinglas tiles is worth starting with a description of the general structure of the roof. In most cases, the insulated roof is a multilayer structure, and the tile is only the top layer.
The quality of the roof consists of several components. As can be seen from the figure, the following are necessary: an air element on the ridge, thermal insulation, vapor barrier, a drainage system and wind protection.

To achieve compliance with the desired temperature and humidity regime, which is necessary for any warm roof, it is possible only with the use of continuous vapor barrier and heat-insulating material of a certain thickness.
To simplify the perception of the material below, the appropriate terminology will first be given.
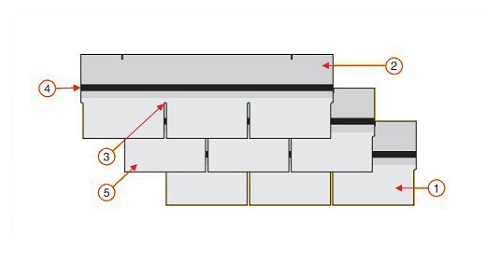
Top picture:
- The visible part.
- The overlapping fragment.
- Cutout.
- Adhesive layer.
- Tab, petal, tile.
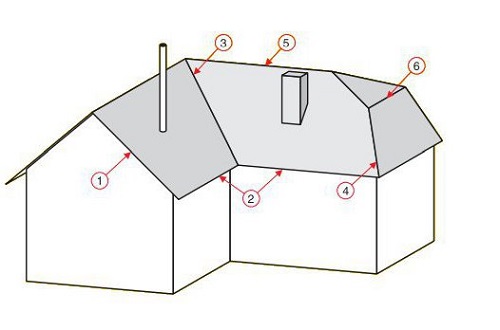
Bottom picture:
- Frontal overhang.
- Eaves overhang.
- Endova.
- Ridge, rib.
- The skate of the roof.
- Stingray fracture.
In general, all the measures necessary for the installation of the roof are as follows:
- foundation creation;
- ventilation performance;
- installation of lining material;
- cornice and valley protection;
- installation of tiles.
Foundation creation
The base is a design that performs several functions at once. The main one is the supporting role, because it is this element that holds the weight of the layers of the roofing pie lying above. The lowest layer is the counter-lattice, which is designed to create a ventilated space and hold the elements of the crate. Installation instructions Shinglas involves the use of crates, made of edged boards. Coniferous wood with a thickness of more than 3 cm is perfect here. Fastening is best done with self-tapping screws or using ragged nails.
The role of the supporting structure in the roof device is played by rafters, which can be at a distance of 600 to 1500 mm. The thickness of the wooden flooring can be selected taking into account the step of the rafters and the lathing (in the table below).


During operation, wood may expand from exposure to water vapor, moisture, or temperature changes; therefore, a compensation gap is required. For boards it is up to 5 mm, and for OSB boards 3 mm.
To create a continuous flooring, it is best to use OSP-3, FSF or boards having a moisture content of less than 20%.
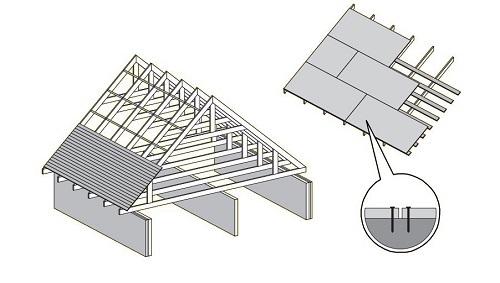
When installing a soft roof with your own hands using a large-panel flooring, it is best to fasten the sheets with a spacing of the seams. All wooden elements must be treated with antiseptics and flame retardants.
During the installation of wooden flooring, it is necessary to ensure that fragments of the annual rings of wood, visible at the ends of the boards, are oriented with the convex side up. If the foundation is created using wet wood, then the ends of the edged or grooved boards must be fastened with two screws.
Ventilation device
For the subroofing to last for a long time, proper ventilation will be required. Of particular importance is a similar system over a residential attic. For normal ventilation of the pitched roof, holes will be required for the influx of external air, channels for its circulation over the layer of heat-insulating material and a hood, which is usually located in the upper part of the roof.
Installation of a soft roof Shinglas is usually performed with supply and exhaust ventilation systems having a cross section from 1/300 to 1/500 of the total insulation area. In order for the reduced pressure to be created in the attic, the number of exhaust openings should be 10 percent more than those through which air is supplied. Compliance with this rule is a guarantee of constant air draft.
Sometimes it is difficult to use such a technology, since the cornices are hemmed by siding. In such cases, it is best to use soffit strips, which are special elements that ensure the flow of outside air.
When creating channels over thermal insulation, it should be borne in mind that their minimum height should exceed 5 cm at a 20-degree slope angle. If the angle is less, then the height should be increased to 8 cm. 
Do-it-yourself installation of a soft roof should be done in such a way that there are no areas where there is still air. The so-called air bags are easy to remove if you properly think through the scheme of air circulation.
Lining material installation
The technology for performing work provides for two possible options. The first of them is used if the angle of the roof is in the range from 12 to 18 degrees. A special waterproofing carpet is needed here, and bitumen-polymer self-adhesive material is installed in the valleys and on the eaves.
In the valley, it is laid on each slope of 50 cm, and on the eaves overhang, the width consists of the magnitude of the eaves and the addition of 60 cm in the direction from the plane of the facade. In the ideal case, one solid carpet without overlaps should be laid along the valley. If this does not work out, then the size of the longitudinal overlap should be more than 30 cm.
When installing Shinglas flexible tiles, a special lining carpet (for example, manufactured by TechnoNICOL) should be laid on the rest of the slope. Roll material is stacked from top to bottom. The overlaps in the transverse direction should be more than 10 cm, and in the longitudinal more than 15 cm. Fastening to the base is carried out using galvanized nails with a wide hat. Nails should be placed every 25 cm.
When the slope angle is more than 18 degrees, then it is necessary to protect those places where leaks will be most likely with a waterproofing carpet. This category includes cornice and pediment overhangs, slope ribs, valleys, roofing exits and skates.
Endov and eaves overhangs are protected with the help of a self-adhesive material of the bitumen-polymer type. Dimensions are chosen, as in the case with an inclination angle of less than 18 degrees. The roof exits are insulated using a 1 m wide lining carpet, fixed along the perimeter with nails. The remaining sections are closed with the same material, but with a width of 50 cm.

Lap joints should be coated with bitumen mastic (for example, FIXER mastic).
Cornices and valleys
The technology of laying Shinglas material, the installation of which can be done by yourself, provides for the strengthening of roof overhangs through the use of cornice and end plates. They are laid on top of the lining material with an overlap (3-5 cm), and are fixed with special nails in increments of up to 15 cm in a checkerboard pattern.
Installation of material in valleys can be done in an open way or using the undercut method. Most preferred is the first case where an end carpet is mounted on top of the backing material. On the reverse side, it is smeared on the “sidir” with bitumen mastic around the perimeter.

In construction, the proverb for porridge and oil is not always appropriate, and the technology of creating a roof is one example of this. It is worth saying that there is no need to zealous and waste mastic in vain, as this will not have any effect.
Tile Installation
This procedure begins with the marking of the ramp.
Professionals advise applying marking lines to the ramp to make it easier to level the finish. The step of vertical marking is selected in accordance with the width of the ordinary tiles, and the distance between the vertical lines is selected equal to the width of 5 rows.

Marking lines are just guides. They should not be considered a guide and nail the tiles strictly according to the markup.
Installation instructions Shinglas involves the use of galvanized nails with a wide hat. Their number depends on the slope of the ramp, and the reliability of the fastening depends on how the nail was nailed. The correct version is shown in the figure below. Nail shingles should be at a distance of 2..3 cm from its edge, and the nail head should be in the same plane with the surface of the coating.
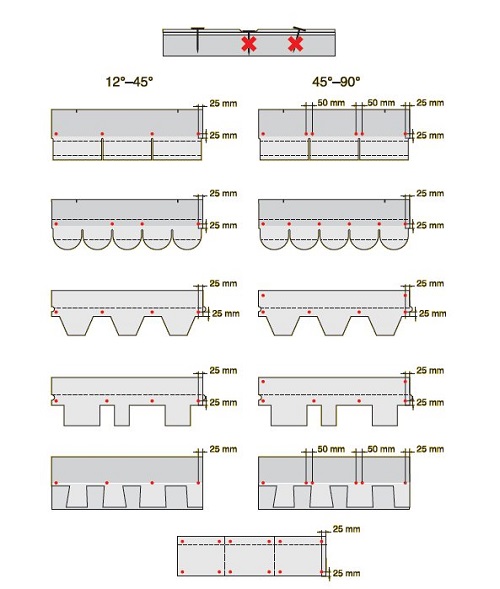
Laying the topcoat begins with the installation of the eaves tiles, however, this line can also be made in the form of patterns from ordinary ordinary tiles. When working on an extended ramp, installation is best started in the middle. The edge of the first row is aligned with the line of the middle of the slope, and the beginning of the second row is one way or the other half the lobe. The lower edge of the upper row should be at the same level with the upper cut line in the tile below. The third row fits along the second in the same way as the one on the first.
When installing the coating on the edges of the valley nails, it is allowed to use no closer than 30 cm from the central axis. Excess material is trimmed, and its lower part is coated with mastic.
The main points regarding the Shinglas tiles were discussed above, the installation of which is easy to do independently. In this material, methods for arranging adjacencies were omitted, since they differ little from other technologies for installing a soft roof.

Alas, no comments yet. Be the first!