
A reliable roof, including insulation on slopes and high-quality waterproofing, is the dream of any owner of a country house. Today such a dream is easily achievable if made installation of a roof from a metal tile. This procedure is performed in several stages. Before you block the roof with a metal tile, you need to consider the issue of removing the old roof. It all depends on the technology by which the roofing cake was made, and its condition.
Content
Carrying out control measurements
When the installation of the rafters is completed, it is necessary to re-measure the dimensions of the roof slopes, since during the construction some deviations could occur. It is necessary to pay attention to the rectangularity of the roof, since due to additional elements you can hide only small defects (no more than 10 mm).

Any specialist who knows how to cover a roof with a metal tile will confirm that using this technology is possible only if the roof slope is at least 14 degrees.
The main size that will determine the length of the sheets is the length of the slope. In fact, this is the distance from the eaves to the roof ridge, which is set taking into account the overhang of the sheet from the eaves of the roof (up to 40 mm). In the case when the slope is longer than 7 meters, the sheets are divided into two or more fragments, overlapped (at least 150 mm). The disadvantage of long sheets that have fewer joints is that working with them is not very convenient.
Tips for working with metal
Before you cover the roof with a metal tile, it does not hurt to get acquainted with a number of its features. This material is durable only when using the correct installation technology, and it is easy to deform during transportation. To avoid deformation, you need to very carefully load and unload, and transfer sheets is only over the edges in length.
In the process of carrying individual elements you need to work with gloves, since the edges of the metal are very sharp and can easily damage the skin.
During installation, metal chips are formed at the edges of the sheets, for the removal of which it is better to use a soft brush. In the case when the sheets got dirty during installation, only non-aggressive detergents can be used to clean them. Abrasive compounds for metal are contraindicated.
How to properly process sheets of metal
When the roof is covered with metal tiles, the cutting of sheets should be done only with a hacksaw, special scissors or a manual electric saw with carbide teeth. All places where bare metal remains must be treated with a special paint that protects the steel from corrosion. A popular grinder with an installed abrasive wheel for cutting sheets should not be used, since its application does not justify itself.
Installation of the lathing

The under-roof space must have good ventilation, therefore, a crate and a counter-crate are needed. Between the sheets of metal and the rafters, anti-condensation films must be placed.As a rule, when the roof is made of metal, the waterproofing material is spread parallel to the cornice.
The material itself should slightly sag between the rafters. On average, a rather small slack in tension of 1-2 cm is enough. On top of it, small bars with a cross section of 40 × 25 mm are nailed down along the rafters. This is a counter-lattice, on top of which the flat bars of the crate are attached. The distance between the latter is chosen equal to the wave step of the metal tile. The board that will go onto the ledge is selected 10-15 cm thicker than the others.
Bars for lathing, and other wooden elements, must be treated with an antiseptic. This will protect them from rot, and insects will not be able to enjoy such a tree.
Anti-condensation film - which one to choose?

Roof covering with metal tiles must be carried out using special waterproofing materials. There are two types of such products, so it’s important not to make a mistake. The first of them is designed to protect the insulation and rafters from the penetration of moisture vapor from the inside of the room.
The second type is waterproofing films that protect against condensation, moisture and wind. They are installed on top of the insulation and pass water vapor, so it does not accumulate in the insulation. The slope of the slopes does not allow water flowing from the metal tile to linger for a long time on the film.
Installation of a cornice strip and valley
Installation of a roof made of metal requires protection not only from condensation formed on the back of the metal sheets, but also from precipitation. As a rule, they pose a danger to the lower edge of the crate, therefore, a cornice strip is required here. It consists of several boards nailed to the crate overlapping each other. For installation, it is worth using galvanized nails in increments of no more than 30 cm.
Endovs are used where the ramps adjoin each other. The lower edge of the valley is laid on top of a cornice strip. To get rid of the gap between the lower plank of the valley and the roof covering, a porous sealant is used.
The overlay overlay allows you to give the roof structure a complete look and is installed after the installation of sheets. It is mounted in the upper part of the wave, and the step is 30..50 cm.
Installation of the end plate is carried out using self-tapping screws. The step between them is not more than 40 cm. The strips themselves are mounted with an overlap (10 cm) in length.
How to roof a roof with a metal tile - installation phase
Installation of the coating begins at the end of one of the slopes after the preparatory work is completed, including the installation of an anti-condensation film and the installation of a crate.
If installation starts from the left end, then the second sheet is installed under the last wave of the first, and when the right end of the roof is used to start work, a new sheet is laid on top of the last wave of the previous one. When the roof is hipped, installation should begin from the middle of the slope, after which the installation is made in both directions evenly.
Each sheet has a capillary groove located along its edge. This groove should be covered with the edge of the next sheet. The alignment of the coating sheets is carried out on the cornice strip.
It is impossible to trim the sheets that are used on one of the slopes on the other slope.
The right fasteners - which screws to take?
Obviously, it is not so difficult to cover the roof with metal tiles with your own hands, but there are some nuances that you need to know. For example, the self-tapping screws with which the sheets are fixed must be in the deflection of the wave. It is necessary to use only self-tapping screws having a special sealing washer, and screw them strictly perpendicular to the crate material. On average, the consumption of screws is not so large and amounts to 8 pcs. on 1 sq.m.
If you screw the self-tapping screw at an angle, then it will not be able to firmly press the sealing washer, so there is a potential leak in the roof.
How to move on the roof

Now, knowing how to properly cover the roof with metal, you need to understand how to move on it in the process. It is worth saying that movement on the finished roof is better to avoid at all, however, if a number of rules are followed, it will cause minimal problems. It is advisable to use shoes that have soft soles. You can only step on the deflection of the wave and only in the place where under the layer of metal there is a crate. You cannot step on the crest of a wave.
Mounting the ridge is the basis of good ventilation
A correctly executed skate is the key to good ventilation of the under-roof space. When installing a metal roof, this element needs to be given special attention.
The sheets should not converge, and there should be enough space between their edges under the ridge. The ridge is fixed using self-tapping screws screwed into the top of every second wave. The edges of the sheets themselves must be glued with sealing tape.
If you want to install a semicircular ridge on a tented roof, it is better to use special elements: tent caps, or Y-shaped covers.
Adjacent to a vertical surface

Even knowing how to cover the roof with a metal tile, you can make a mistake when making a joint with a vertical surface, for example with a wall or pipe. In this case, the contact area is insulated with an abutment strip and a self-adhesive seal. Additional sealing can be created through the use of sealant.
The lower abutment strips are installed in a groove prepared on the surface (wall or pipe). As a rule, gating is performed for this, after which the dust is removed, and the gating itself is washed. The adjacency bar is trimmed, after which it is installed and fixed with self-tapping screws.
After completion of the work, an internal apron is obtained, but water drainage is still necessary. For these purposes, a flat sheet of metal is used, the edges of which form the sides. The sheet itself, called a tie, takes water either to the valley or to the cornice.
In addition to the internal apron, an external one is also used, created from the upper abutment strips. It is installed almost the same as the internal one, but without performing the gating. The edges of the planks are simply attached to the wall.
Breaks in the roof - which elements to use?
When the roof of the roof is metal, some difficulties arise when working on fractures of the roof. Such elements may be external and internal. In the first case, a cornice strip is used. Between it and the top sheet you need to glue the seal. If we are talking about an internal fracture, then it is necessary to use the abutment bar, which is also mounted together with the seal.
Installation of a drainage system
Do-it-yourself metal roof is almost complete and it remains only to solve the problem of water drainage and snow melting. In the first case, rectangular or circular systems can be used. Their gutters should be mounted 2-3 cm below the edge of the roof, as this will protect them from snow. In general, snow arresters are best suited for protection against snow.
The lower edge of the cornice strip should overlap part of the gutter, and the waterproofing film is displayed on top of it so that condensate gets into the drain.
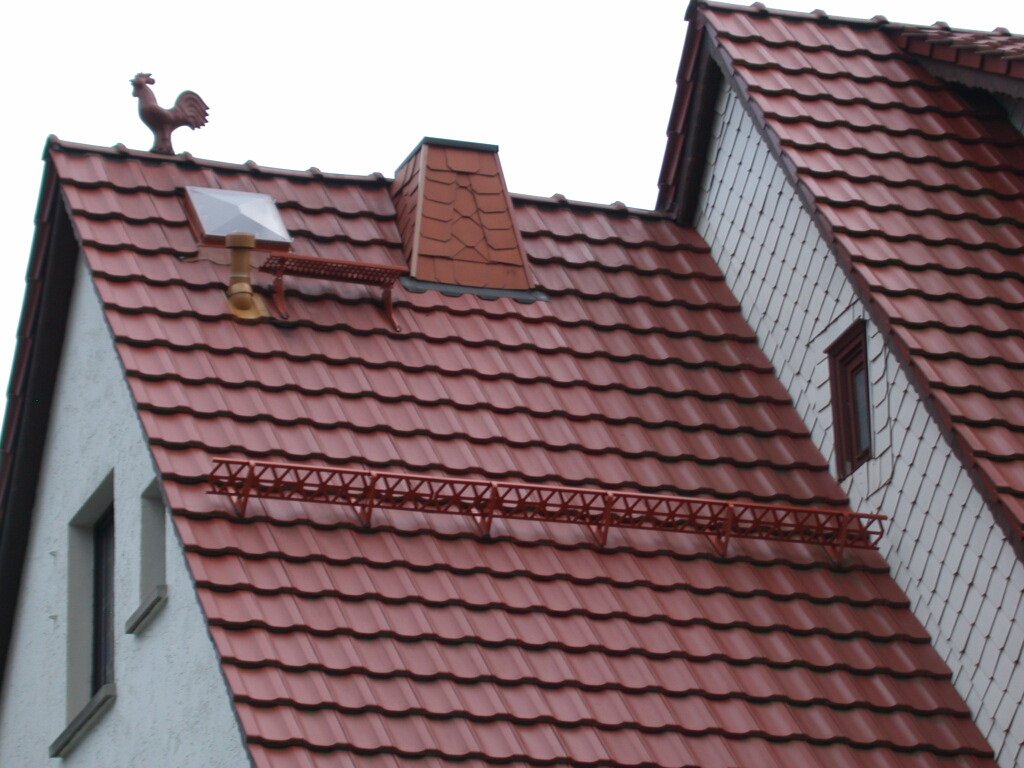
Installation of snow retainers

The task of such elements is to prevent snow from melting in certain places, for example, above the front door. They are also used to protect gutters. The installation of the snow retention bar must be performed on the second transverse step of the cover.
This element is installed on the mounting plate, which is located under its upper edge. Installation is carried out using long self-tapping screws reaching the crate. They are screwed into the top of every second wave.
Installation of a roof made of metal can also be performed using tubular snow retainers. In this case, follow the installation instructions for the product.
Summing up, it is worth saying that the most difficult moments were considered above, therefore this material can be used as a general guide for those who do not know how to cover the roof with metal tiles.
Alas, no comments yet. Be the first!