
The location of the stairs to the second floor, made of wood, with a rotation of 90 degrees along the wall saves living space in a country house. The construction is found where the “second light” is organized - a room (or part of it) in which, according to the design, there is no overlap between floors. Such a layout creates more room in the room due to the increased ceiling height. You can calculate and install a wooden structure yourself, if you take into account the necessary requirements.
Content
TOconstruction
The ladder, in addition to the direct fulfillment of its functions, is an important emphasis in the interior of the house. Each owner treats the choice of design, the material from which it will be made, and the location in the house with great attention. The task is complicated by the fact that the price of flight discourages making mistakes and redoing several times.
It seems better to make the stairs as compact as possible in order to leave room for the usable area of the room. However, if you make it not wide enough or too steep, you can find problems. They will not be visible from the outside, but when raising / lowering furniture, household appliances or when meeting people walking in opposite directions, they will show themselves.
Key Definitions
A wooden staircase is a technically complex construction consisting of many elements. To calculate it correctly, you need to understand what parts it consists of. This helps to spell things by their proper names to avoid confusion. Without going deeper into the terminology, we select the elements that make up the ladder:
- tread - a horizontal board serving as a support for the leg during ascent / descent;
- riser - a vertical board located between the treads;
- step - tread along with the riser located below;
- kosour - an inclined board with cutouts on the upper edge for steps;
- bowstring - an inclined board with grooves on the inside for steps;
- march - steps and risers along with the strings or braces connecting them;
- platform - a horizontal surface with which one or several marches are joined;
- span - the space between two staircases in which the march is installed;
- handrails - inclined bars parallel to a bowstring or kosour, for support by hands during ascent / descent;
- balusters - elements that fix the handrails on the march;
- handrail - handrails with balusters;
- cross-country - steps of variable width, changing the direction of movement;
- frieze - steps adjacent to the platforms on the same level with them.
Sometimes the extreme steps of any march are mistakenly considered frieze. However, if the former is located above the lower landing, and the latter is below the upper, these are ordinary steps.
Why with a twist
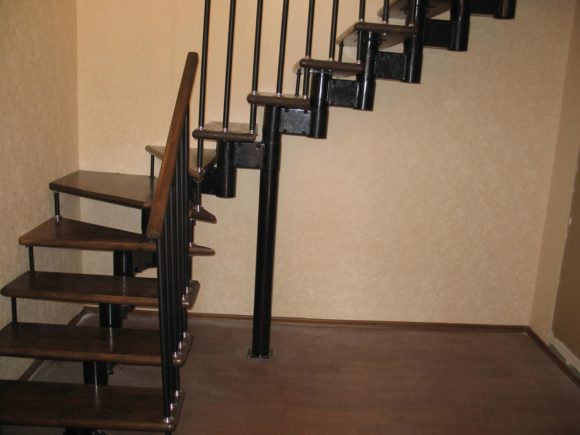
The simplest staircase is a straight one-march staircase. It is easiest to calculate, design, manufacture. It is the cheapest, easiest to install, it is most convenient to lift furniture and appliances from it. But such a scheme has a drawback - it must be used in rooms with a wall length of 6 meters or more. Not every house is designed with such facilities.
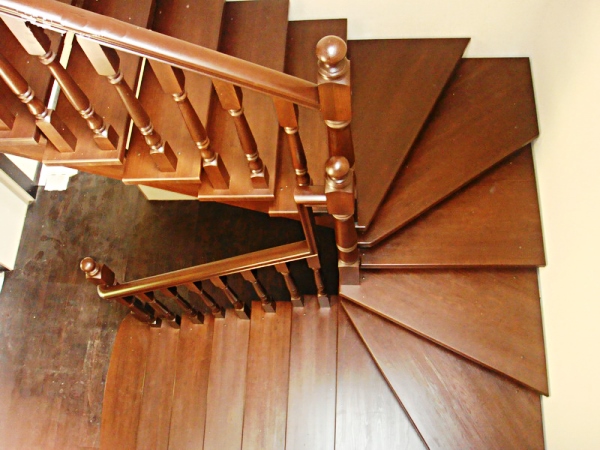
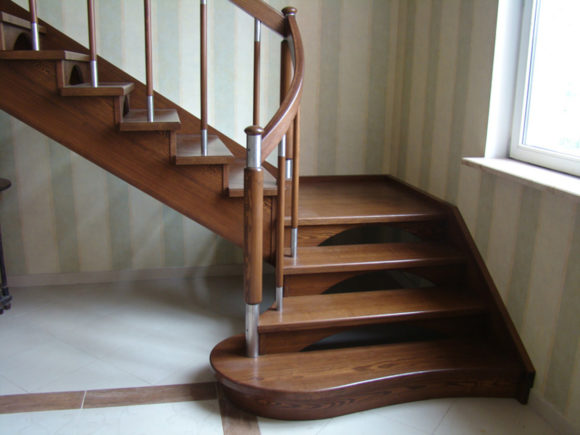
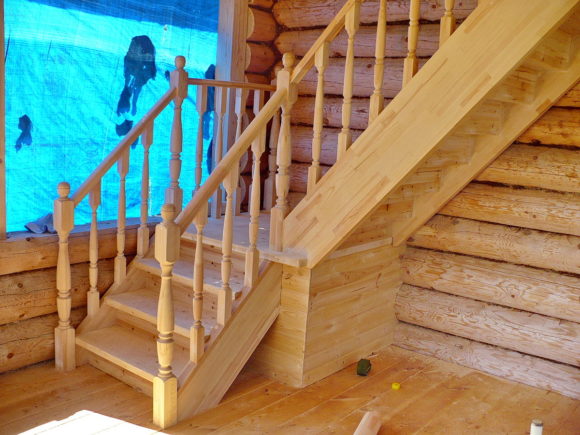
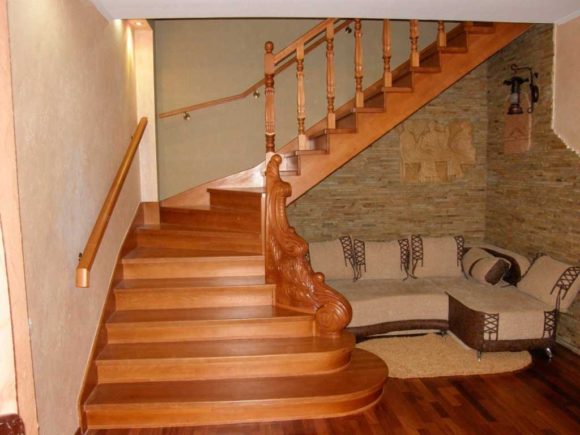
You can divide one march into 2 parts, add a pad between them and dock them at an angle of 90 degrees. By placing each span along a separate wall, it will become possible to fit the structure into a smaller space. If there is still not enough space, instead of the platform do cross-country steps.This is a popular solution in small country houses or multi-level apartments.
Playground and rungs
Installation of such treads has the only advantage - 3 steps instead of one give 30-40 cm of height in the same area. Sometimes this is the only solution to the problem, but often the choice is dictated by associations with the steps of the spiral staircase.
The interstorey landing is not so much done for connecting marches - it also performs a number of other important functions:
- a relaxation area when climbing stairs of elderly people / children who are not able to overcome the entire march in one go;
- a place where you can put furniture when carrying to deploy / intercept;
- reduces the height of the fall in case the person slipped or tripped.
If only adults full of energy live in the house, there may be an illusion that the landing is an extra waste of living space. However, in a few years the situation may change. Replacing the rungs on the site will be difficult, because along with this will have to redo at least one more march. The choice must be approached carefully so as not to deprive yourself of useful functions, if possible.
Bowstring and kosour solve the same problem, but in different ways. Both parts are the basis of the stairs; they carry the weight of the entire march with a railing, people walking along it and carrying loads. The safety of the structure and the amount of load that the staircase can withstand depend on their strength. The difference lies in the method of attaching the steps and in the external differences.
Bowstring
In a construction with a bowstring, the tread and riser are installed in grooves on the side surface. The grooves are selected in the middle of the cross-section of the beam, without violating the structure of the wood fibers at the edges (top and bottom). The extreme zones of the section bear the main load on compression and tension, and the middle of the beam is less loaded, therefore, in the case of a bowstring, the load-bearing capacity of the beam is more effective - you can use a smaller board.
Such a scheme makes the staircase more openwork with the same strength. As a blank for a bowstring, sometimes they even take a 50x200 board, available on any sawmill. The disadvantage of this method is the high complexity, because grooves must be selected with a milling cutter or a chisel on a pre-marked board. The second minus is that the total width of the march will increase by 2 thicknesses of the bowstring while the useful width of the steps will remain the same.
Kosour
Such a beam is easier to manufacture. All cutouts are made with a saw (electric or conventional hacksaw) and often even without preliminary marking. For this, a triangular template is made of plywood or OSB (oriented chipboard), to which a thrust block is attached to one side. The other two sides of the template repeat the design dimensions for the tread and riser. The angle between them is also determined from the project.
The stop edge of the template is pressed against the upper side of the future kosour, while the other two sides show the cut lines. With proper dexterity, you can make cuts for steps immediately according to the template. If you had to deal with such work for the first time, for greater certainty it is better to make markup according to the template. After making sure that everything fits together, you can start sawing.
Triangles cut off from the upper edge of the kosour reduce the useful section of the beam. Because of this, only a part of the beam with whole fibers, located below the cutouts, has the bearing capacity. Therefore, the initial section of the kosour should be almost 2 times larger than that of the bowstring, with a similar load.
Compared with the bowstring, the price of the material for the kosour is higher, however this method speeds up the work. Bearing beams will be located under the steps, and not on the sides of them, so the entire width of the stairs will be useful. Choosing a kosour saves 10-20 cm of span. Someone chooses such a scheme for aesthetic reasons.
Kosour is usually cut from glued beams.Such material is more stable than a solid wood board, and not so dependent on moisture differences. Considering the considerable width of the board, this option is especially important. The second reason is the lack of lumber of this format on sale. More often boards of this section are made to order.
Risers
Stairs with risers are found as often as without them. Their presence depends on both the destination of the stairs and the design wishes of the owners of the house. With a march width of less than 1 meter, they do not affect the power of the structure and perform mainly decorative or auxiliary functions. With a larger width, they give additional stability to the tread, acting as a stiffener. The riser prevents it from bending and transfers the load to the steps located below.
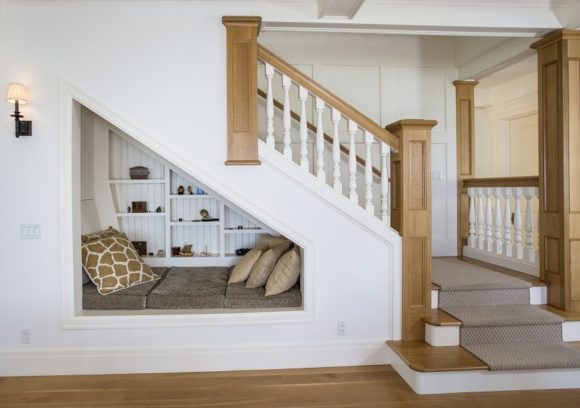
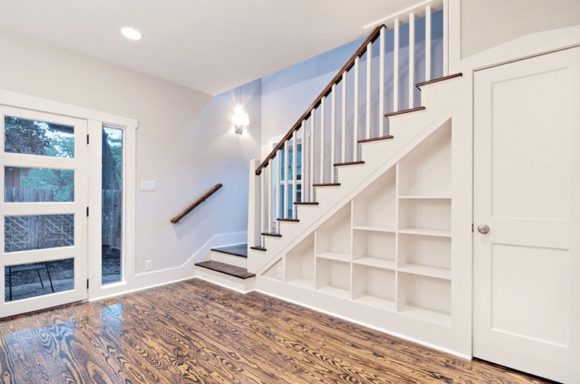
If you plan to make a closed pantry or closet under the stairs, filling between the steps will protect things inside from dust, spilled water and other debris. If you do not plan to separate the space under the stairs from the rest of the room, then the space between the steps is left open. This makes the stairs less visible.
Another factor that is taken into account is the influence of risers on the illumination of both the marches themselves and the premises in which they are installed. There should be natural light on the stairs, the inclined surface is traumatic, especially in an emergency. If the structure is in the living room between the window and the functional area - it is made open so as not to obscure the main area. In a separate space without windows, where the lighting penetrates only from neighboring rooms, do not fill.
Frieze steps
They do it below and above the march or from only one edge, but they may not be at all. Designed to expand the landing, when the space of the room it does not hurt. Moving them from the site does not change the height at which the person stands. Therefore, the tilt angle of the march will be higher, the number of ordinary steps - less, and the height of each - more.
To do frieze steps in a limited space is irrational. They are mainly found on large, wide stairs in public buildings. In a residential building, the question of compact design is usually a question. If it is open - it is better to think about the depth of the tread, the number of useful steps, reducing their height.
When calculating the strength, in addition to the mass of the structure and people, it is necessary to take into account the dynamic load that occurs when moving up the stairs. It exceeds the static by several times.
Materials
Separate parts of the stairs solve different problems, so the material from which they are made may differ. The steps are subject to the greatest wear, they need solid material. Spruce, popular in construction, is not very suitable for this purpose due to the fact that it has low hardness. For the same reason, linden, aspen, are unsuitable. However, risers and railings can be made from these varieties.
For steps and supporting beams (bowstring or kosour) it is better to use more durable material. Of the conifers, the most affordable option is pine, and even better - larch. You can use solid hardwoods: birch, beech, oak, ash, maple, etc. Each variety has its own characteristic texture, shade - these parameters mainly determine the choice of material. An important factor is the availability of the material and its price.
To make the details of the stairs to the second floor with your own hands, you need to find high-quality boards. Manufacturers usually sell lumber by grade, but this is not enough. The requirements for the details of the stairs are higher than for building materials, so you will have to sort out the material manually. Each board must be carefully inspected for defects and defects. Finished parts should not have cracks, tar pockets, knots or loose knots, uneasy, blue, rot, mold.
The tree inside the house is not subject to significant changes in temperature or precipitation.Wooden furniture of any species has been standing in homes and apartments for decades. The staircase in this regard is close to furniture, they are under the same roof in equal conditions. Therefore, resistance to decay is not the most important parameter for the design.
To protect the material from solar ultraviolet radiation and accidental ingress of liquid, processing with decorative compounds (varnishes, oils) will suffice. Most of them contain fungicidal additives that protect against decay. The wear resistance of the decorative coating is important, for this the compositions are applied in several thin layers with sequential drying.
In Siberia, there are large reserves of larch, and in the southern regions oak, beech, etc. are more common. If the material is available, but does not have the desired texture or shade, this issue can often be solved by brushing and tinting.
Project
Making a staircase “in place” without a project is a bad idea, it is likely to make a mistake, especially if a person is faced with this task for the first time. At a minimum, you need a paper project with an exact indication of the dimensions of the opening in which the structure will be placed. By doing this, you can avoid many mistakes, damage to the material, which ultimately reduces the installation time. For a corner staircase, the drawing must be done in three planes: a top view, a front view, and a side view.
Regulations
To calculate the design, you need to build on something. A beautiful staircase can be seen in the photo on the Internet, but to transfer it to your home you need to make sure that the design will go into the layout and nothing will interfere with it. Often you have to compromise between the design you like and the ease of use.
When moving up stairs in public buildings or high-rise buildings, you usually don’t have to think about where and how to put your foot. You do not even need to look under your feet, they themselves stand on the next step. This is the work of muscle memory that has developed over the years of life. It happened because earlier architects conducted research and experiments, studied the mechanics of human movement on stairs, and we have been used to using the results of their work since childhood.
With each step along the steps, a person moves his foot in two planes: forward and upward when climbing, or forward and downward when descending. If, when moving along a march, the sum of the movements of the leg in two dimensions is about 445 mm, such a ladder is considered convenient. This is due to the mechanics of movement of the musculoskeletal system. The reference value was determined and a standard was developed for public buildings and multi-storey residential buildings: step length - 295 mm, height - 150 mm.
Such proportions are convenient because they even take into account the interests of old people and children, but this is not the only acceptable option. In a country house, the requirements for convenience are set by the owner. According to SNIP (construction norms and rules), it is recommended to make staircase slopes in residential buildings from 26.4 to 45 degrees. If you are guided by the formula "height + depth = 445 mm", you can get the following values:
| Height mm | 120 | 130 | 140 | 150 | 160 | 170 | 180 | 190 | 200 |
| Depth mm | 325 | 315 | 305 | 295 | 285 | 275 | 265 | 255 | 245 |
| Gradient, hail. | 20,3 | 22,4 | 24,7 | 27 | 29,3 | 31,7 | 34,2 | 36,7 | 39,2 |
Sometimes the task is to maintain the depth and height of the step, but at the same time increase the slope. Then each subsequent tread is done with a protrusion of the front edge over the previous step. It is permissible to make it up to 30 mm - this will not affect the ease of movement. For example, with a size of 295x150 mm, adding a protrusion of 30 mm will add 2.5 degrees to the slope, increasing its value to 29.5. It is believed that the protrusion of 15-20 mm even improves the design.
When working on a project, the following recommendations should be considered:
- useful width of the flight of stairs with a turn - not less than 1000 mm;
- pad size - not less than the span width;
- the number of steps in one march - no more than 18 pcs .;
- minimum depth of running stages: near the axis - 100 mm, along the midline - 260 mm;
- railing height - not less than 900 mm;
- clearance between balusters - no more than 150 mm;
- height from steps / platform to the ceiling - at least 2 meters;
- step depth - at least 250 mm if the second floor is residential (200 mm - if non-residential);
- the height of the steps is the same with a tolerance of +/- 5 mm, while the height of the first and last is permissible to change within 20%.
3D-modeling
When a project on paper begins to be done by a person who has not previously worked with drawings, this may seem like a difficult task. Usually, you have to draw a few schemes, and more than once make additions and changes to them. Multiplying each scheme by 3 projections, we get a serious amount of work. Not many will want to spend time on this.
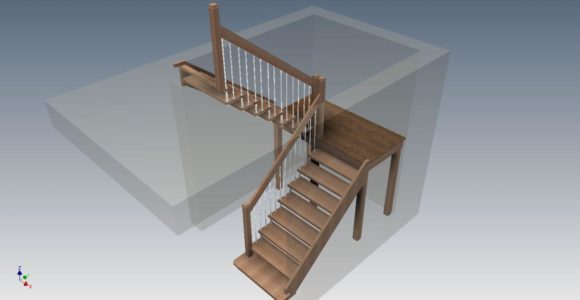
Designers and designers have long been using their projects 3D-modeling. This simplifies the work because you can make changes without having to start each drawing anew. There are many free editors for working with drawings and projects. There are also online versions of programs that do not even require installation. To start using them, just go to the site and watch a five-minute video tutorial.
Mounting
To install the designed staircase from pre-prepared parts, you will need a building level, a wooden mallet, a screwdriver (or screwdriver), self-tapping screws, several perforated corners and PVA furniture glue. In the scheme with kosoura, you can cope with the installation without assistants. If the march is on bowstrings - help of a partner will not be superfluous.
Installation begins with the installation of the level and fastening of the landing or running steps (depending on the project). The site with two or three corners (according to the location in the room) is attached to the wall, and the remaining corners are fixed to the support column (s). The column is made of timber with a cross-section of at least 100x100 mm and is installed on the final floor or on the prepared base. The top of the post should be above the level of the handrails / railing.
After installing the site, installation of marches begins, starting from the top. If they are on the kosoura, first mount the supporting beams. This is done with angles and screws or installation in prepared grooves. Then treads and risers are placed on them, which are fastened with pins, glue. On the front side of the stairs should not be self-tapping screws or other fasteners. If without them it does not work, screw fasteners from the inside or bottom.
In houses assembled from logs or beams, one should not forget about the shrinkage of the walls - the structure must have height adjustment. The easiest way to do this is by adding adjustable supports (jacks) under the support posts. In this case, there should be 4 columns, and fastening to the wall is done by sliding corners.
If the march is on strings, the installation process looks different. The design is pre-assembled on the floor or workbench. One bowstring is placed with its grooves up, the ends of the steps greased with glue are inserted into it, then the second bowstring is laid down with the grooves on top and joined. When everything is assembled, the parts are pulled together with straps or clamps. Allow the glue to dry, then complete the installation.
After completing the installation of marches, proceed to the railing. There are already supporting pillars on the intermediate site, it remains to make them at the beginning and end of the stairs. After installing the pillars, handrails are attached to them, then the installation of balusters begins. They are leaning on a bowstring or on a step, if the staircase is on the kosoura. It is worth considering that on the bowstring all balusters will be the same length, and in the second scheme - on each step there will be several balusters of different sizes.
You need to spend time on developing a project with a 90-degree turn of the march and installing a wooden staircase on the second floor with your own hands. But the task is feasible for those who set such a goal. Given the recommendations, make a detailed project with 3Dmodel, reducing the number of errors will be easier. Preparation of parts does not require serious skills in working with tools, it is enough to be able to work with a saw and sandpaper, and sometimes with a mallet and a chisel. Do not think long about the choice of material - you can take the one that is more accessible. Good oils and varnishes can give any tree the right shade.
Alas, no comments yet. Be the first!