
The completeness and harmony of any site gives the correct layout. Not the last role in this is played by the paths that adorn the territory and perform certain functions. They should correspond to the general style of the site, combined with buildings, flower beds. It’s convenient to walk along the paths in bad weather, they delight your eyes and add beauty to the site. You can make tracks with your own hands from improvised materials, showing imagination and economic savvy.
Content
Wooden walkways: practical and functional
In regions where there is no shortage of wood, wooden planks and log cuts are used to equip plots. The cost is determined by the species of wood selected by the processing methods. Wood is exposed to moisture, temperature changes, therefore, it is necessary to use additional processing of the material and impregnation to increase the operating life.
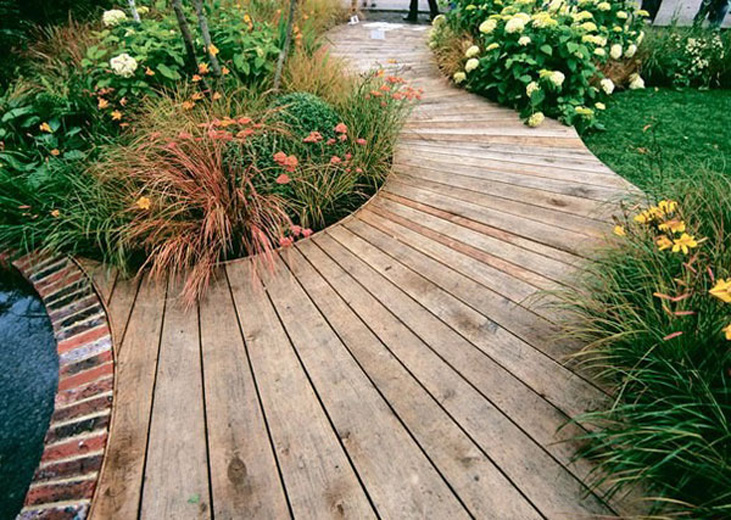
Wooden floorings are versatile and practical, go well with lawns, flower beds and flower beds. In areas decorated in a rustic style, such materials look best. Economical options:
- boards, bars remaining from construction work;
- cuts of trunks and thick branches of old trees from their site.
Covering from a terrace board, which is based on thermal wood or polymer materials, will cost more. For such sidewalks you will have to prepare the foundation, equip the logs.
The best wood is larch or oak, less prone to decay, destruction. Also use the wood of conifers (pine, spruce), aspen.
Wood flooring
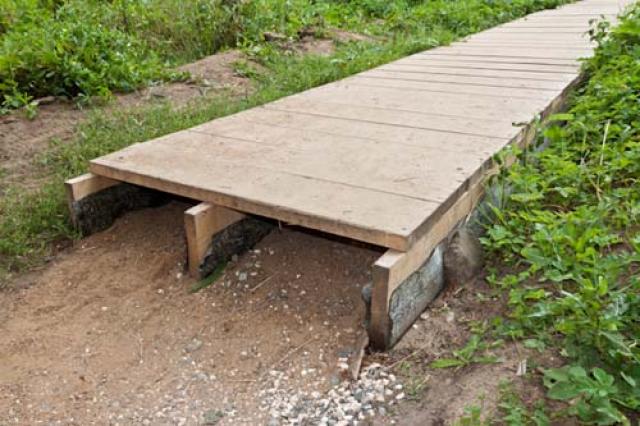
Sidewalks are equipped above the surface of the earth, forming bridges. Laying is done using lags that provide ventilation and longer service life of structures. The main stages of work:
- scheme planning;
- preparation of lags - bars and boards for flooring;
- removal of the turf and the upper part of the soil (approximately 25-30 cm);
- thorough ramming of the base;
- dusting with sand (thin layer) and crushed stone;
- processing of bars with waterproofing compounds, mastic for protection against moisture;
- processing boards with an antiseptic;
- laying of bars on crushed stone;
- mounting boards, fastening with screws or nails.
The width of the coating is 80-100 cm. With such dimensions, it is convenient to move around the flooring.
The nails should be completely “sunk” in the wood before the “hats”, not stick out. Sometimes flooring is done immediately on the ground, without lags. The wooden paths in the country look natural, beautiful, but the boards become unusable faster. The flooring on the logs is more durable, reliable and practical.
Digging tracks for the site
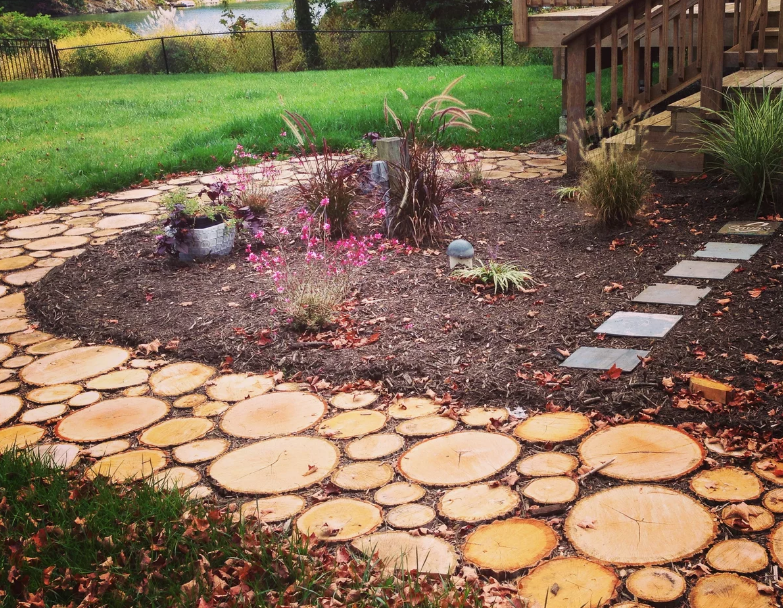
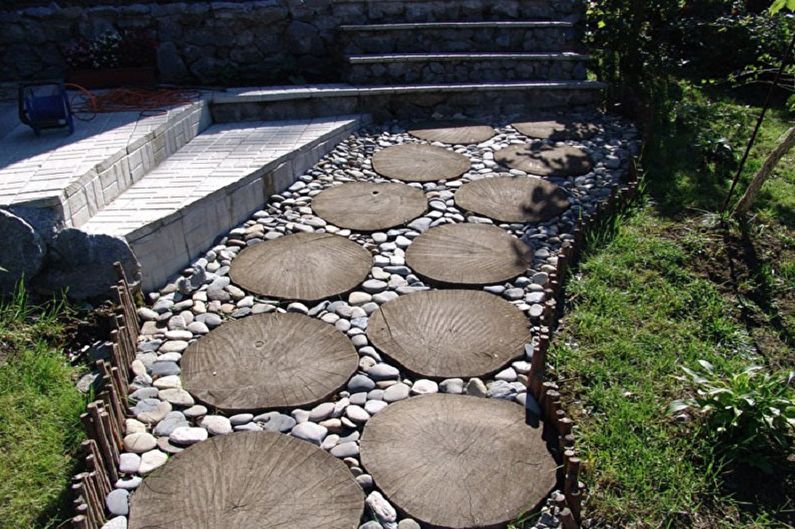
With this method, boards or log cuts are used. The material is dug into the ground, while it protrudes slightly or lies flush with the surface. An untreated tree will quickly rot, so the dies are treated with an antiseptic composition. The upper part is varnished.
The height of the cuts is 15-18 cm.Diameters should be approximately the same, and small saw cuts are placed between large logs. Work Stages:
- marking on the site;
- removal of the top layer of the earth;
- digging a small trench (calculated by the height of the dies, adding 10-12 cm);
- installation of waterproofing materials;
- backfill of crushed stone, gravel (10 cm);
- sand laying (5-8 cm);
- thoroughly compacting the base (the sand is slightly moistened several times with water);
- installation of dies (randomly or by ornament);
- ramming.
Align the saw cuts by level, achieving an even continuous coating. The voids are covered with rubble, sand, gravel, pebbles, sawdust. Saw logs can be dug up completely, can slightly rise above the ground.
It is easy to make wooden digging paths in the country from log cuts, from crushed stone, gravel. Combined coatings are more economical, but look no worse than completely wooden.
Work Stages:
- preparation of log cuts (skinning, impregnation with antiseptics);
- arrangement of the base (digging a shallow trench, backfilling gravel, laying a layer of sand, tamping);
- installation along the edges of the trench in a row of saw cuts;
- laying on top of a sand "cushion" of geotextiles;
- backfill, leveling.
Hemp leaves in its natural form or painted in different shades. If there are boards in the farm, then instead of log cuts along the contour they are used. Crushed stone or gravel is poured onto the prepared base, short dice-boards are laid on top.
They are placed across the base at the same distance from each other. The boards are slightly pressed into the gravel. These coatings are great for rustic areas.
When preparing any tracks, it is advisable to equip drainage systems near them. Drainage grooves provide drainage of excess water.
Instead of crushed stone or gravel, small pebbles are poured. The shade of pebbles is one-color or different, which will give the trail a special flavor.
Paths for stone plots
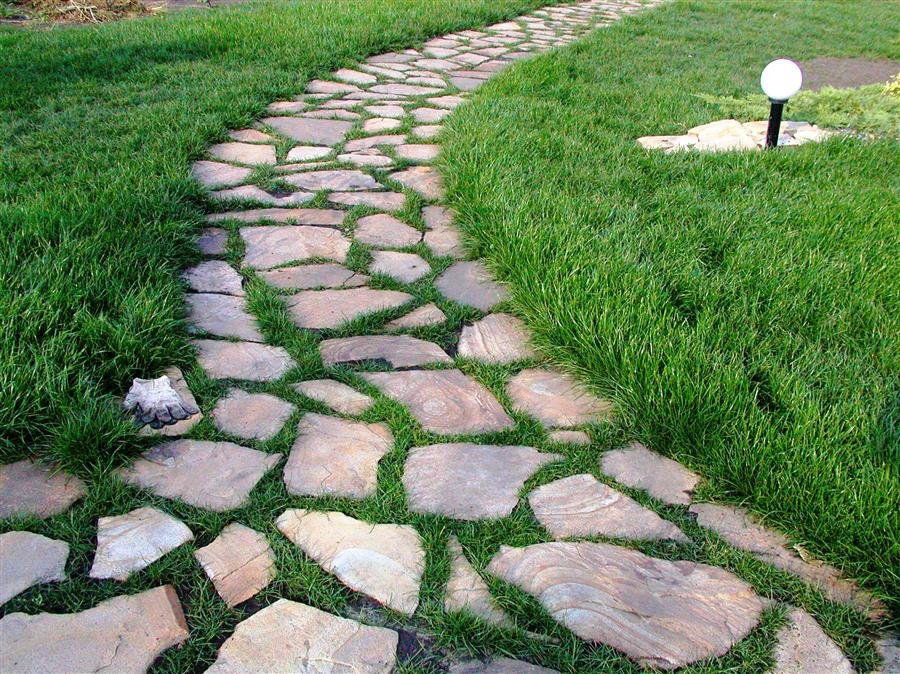
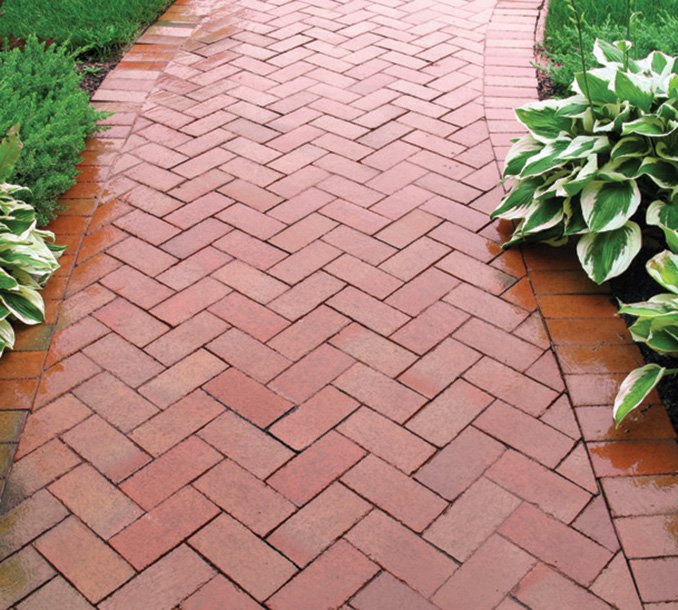
The traditional material for the arrangement of suburban areas is stone. The tracks from it are durable, beautiful, practical in operation. They fit perfectly into the landscape, creating interesting compositions with other buildings, flower beds, trees.
Elite estates are decorated with granite, basalt, marble, but these are expensive materials. The use of limestone, as well as materials imitating natural stone, will be cheaper. But for most sites, ordinary river stone is used, which is collected near ponds or streams. The photos of the sites on the Internet show different ways and design options for coatings.
Correctly laid out tracks will serve for a long time, while they are convenient, reliable. There are many styling options, so everyone chooses the most suitable materials and technologies.
Materials:
- granite;
- slate;
- limestone;
- sandstone;
- quartzite.
The shape distinguishes:
- paving stones (rectangles);
- cobblestones (rounded stones);
- flagstone (flat surface).

Stones of flat and chipped type are easy to stack; it is convenient to walk along such paths. "Minus" - the high cost of most materials.
Artificial stones are in demand, among which clinker is especially durable and durable.
Paving is performed with the mandatory preparation of the grounds. Since country paths do not have serious loads, they cost laying for the base of gravel, sand.
The use of natural stones
For all types of natural material, a trench and a quality foundation are first prepared. If thin stones (flagstone) are to be used, tampering is performed according to the maximum parameters so that the surface is solid, even.
Foundation preparation steps:
- designation of contours;
- digging a trench (depth - bayonet shovel);
- laying a layer of slag, gravel;
- laying a layer of wet sand, tamping.
After the "pillow" is ready, proceed to laying the base material. Technology:
- sand-cement laying;
- laying stone on concrete mortar;
- the use of geotextiles and laying on a sandy base.
The technology is chosen based on the availability of time, budget.
Laying with mortar
Stones are laid on a prepared sand base. Slightly press them into a layer of sand with a mallet. Then, the prepared sand-cement mortar is poured into the gaps between the stones.
Proportion: 3: 1. For convenience, the solution is poured into a large bag with a cut corner and then the crevices are already filled.
Concrete laying
The steps are similar to the first method, but the stone is laid on a concrete layer. A trench with a prepared base is poured with a layer of concrete, then stones are carefully placed. The stones are tapped with a mallet, achieving a flat surface
After some time, the materials and the solution adhere, a strong coating is obtained. When small gaps appear, they are closed from the bag with concrete mortar.
Installation of sand coatings using geotextiles
Recently, gardeners often equip garden coverings, using a special canvas. Work Stages:
- excavation of a trench along the contours;
- laying of crushed stone layer;
- laying of geotextiles, while the edges should protrude from the trench no less than half a meter;
- backfilling of another layer of rubble;
- tamper;
- tucking the edges of the material into the trench.
The reliable drainage "pillow" is ready. It remains only to pour sand on top (layer 15-20 cm), then gently spread the stones.
The material is pressed into a layer of sand, gaps sprinkled with sand. After completion of work, the design will undergo shrinkage within 2-3 weeks. At this time, they correct the stones, add sand, and compact.
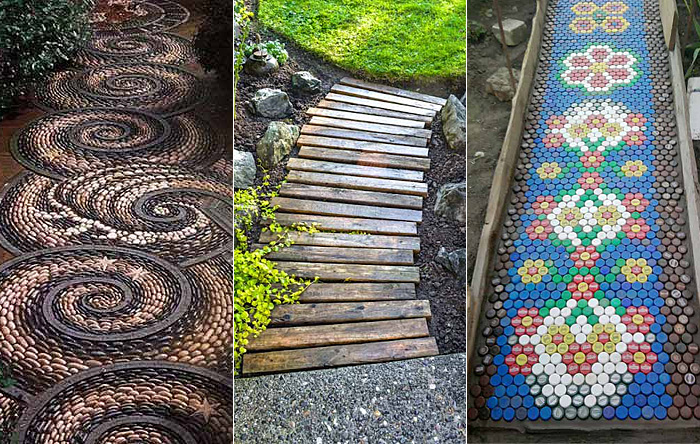
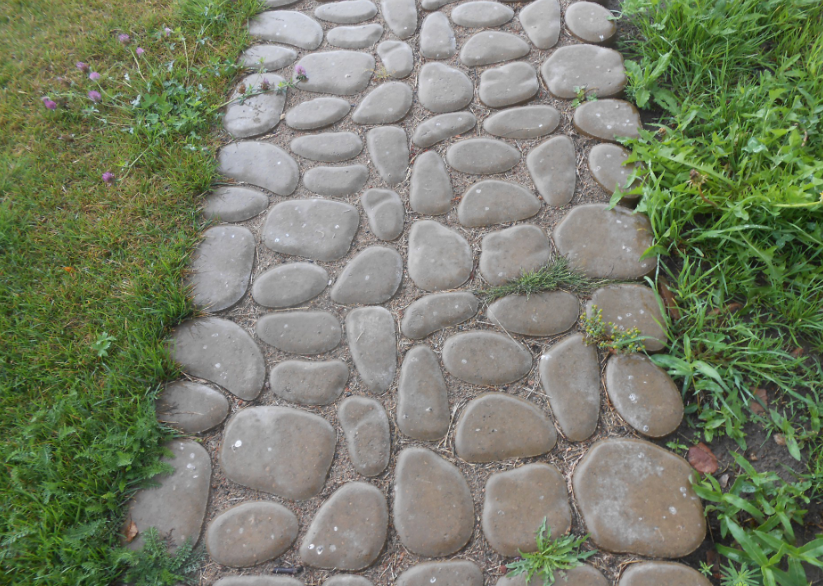
Arrangement of a pebble track
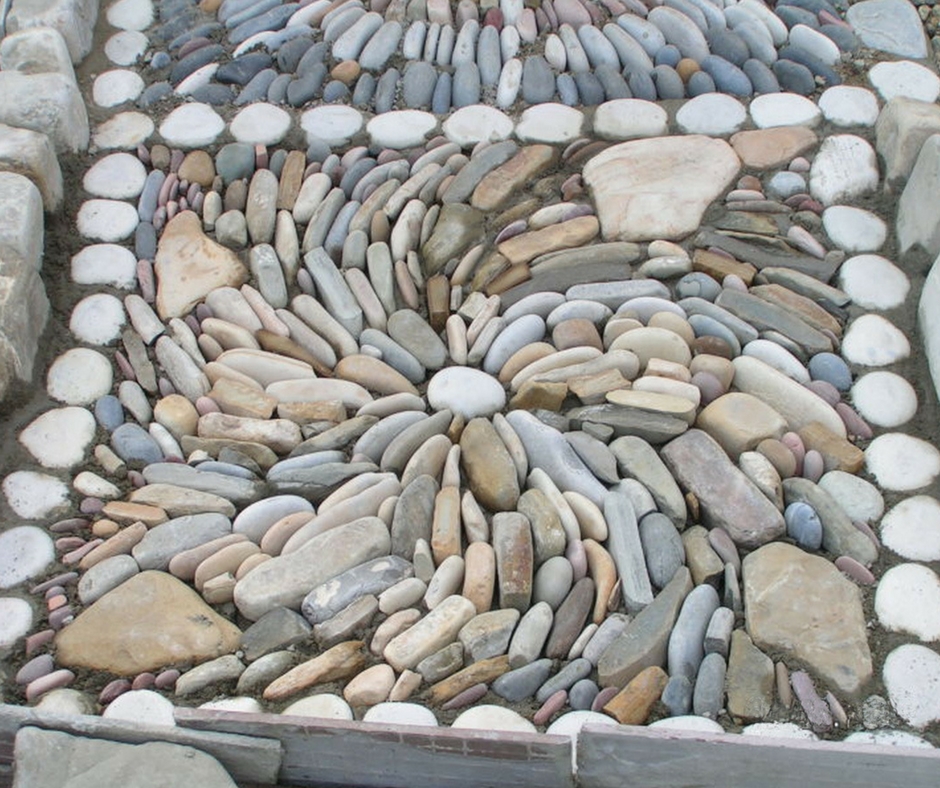
Spectacular and beautiful country paths made of river or sea pebbles. The styling technology is not particularly complicated, but accuracy and diligence will be required.
The "pluses" of such natural material are low cost, practicality. Pebble coatings look great in any areas, while for their arrangement the type of soil and the complexity of the relief does not matter. Stone of different shades is combined, creating patterns and ornaments that are interesting in the color palette.
It is advisable to use pebbles of large and medium sizes, as it is more difficult to work with small specimens.
When laying for the first time, it is better to make the tracks straight.
Work Stages:
- preparation of the base (trench, backfill of crushed stone, sand);
- preparation of the cement mixture: 3 buckets of sifted sand per bucket of cement, mix;
- pour a layer of 5-8 cm dry mixture onto compacted sand;
- gently moisten the solution with water;
- start laying pebbles, pushing the pebbles into the solution;
- level the surface with a mallet;
- moisturize the coating and cover with a tarp for 1-2 days.
After that, the surface of the track is moistened again, then curbs (large boulders) are set. For installation, cement mortar is used. After the hardening of the pebbles and the curb stones gives the coating the final shape with a brush.

Sometimes, special shapes are used to lay pebbles. Formwork is made of the bars - small rectangles, instead of a day they put dense polyethylene or tarpaulin. A layer of cement is poured, stones are laid out according to a pattern or randomly, give time for solidification. After the fragment is taken out of the mold and placed in the designated place on the future track. Thus, an even canvas is laid out from individual fragments.
Gravel Garden Path
It is easy to make a bulk coating, for which gravel is used. Such trails are great for dividing the site into zones, decorating the Japanese-style garden.
Bulk material has many advantages:
- low cost;
- the possibility of combining with other varieties of stones and materials;
- easy care;
- laying in any configurations;
- easy repair (adding a new portion of gravel),
But such coatings are suitable only where a constant intensive load is not planned (near arbors, flower beds, baths).
For the arrangement, various types of gravel are used:
- gravel (fractions up to 0.7 mm, gray color);
- small pebble;
- gravel (2.5-5 mm, multi-colored);
- shale shredded.
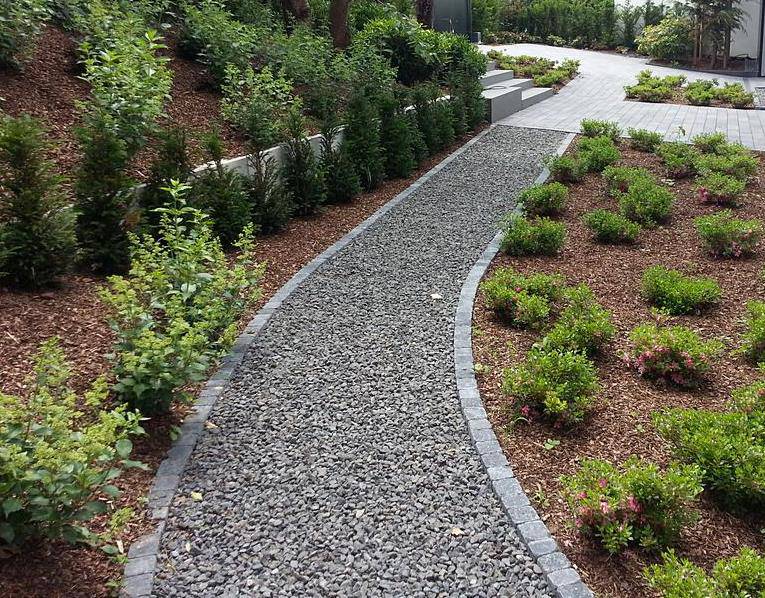
Preliminary preparations include marking, digging trenches, and preparing drainage. The width of the coating is not more than 1.2 meters, otherwise it will not be particularly stable.
For bulk paths, curbs are made using:
- a natural stone;
- bricks;
- posts or dies made of wood;
- special stone;
- plastic bottles.
Specialized stores offer metal tape borders. The height of the fencing is 4-7 cm. A wooden curb is necessarily treated with an antiseptic, dug into the ground. The stones are placed on the concrete mixture, bottles or tapes are instilled.
Work Stages:
- preparation of a pillow (use geotextiles, filled with clay and crushed stone, sand with crushed stone);
- dense tamping with obligatory moistening;
- exposure of the base 1-1.5 days;
- backfilling with gravel;
- rake leveling.
The thickness of the layer is determined visually, calculating from the amount of material and the size of the fractions.
Clay path for the garden
Pebble or gravel coatings can be originally designed using clay forms. The basis of the tracks is done traditionally, but figures or ornaments made of clay are added to some places.
Clay is poured into the prepared mold, allowed to solidify, and then laid out at the base of the track. Conventional gravel or pebble coatings acquire an unexpected flavor.
The use of artificial stone
Widely used in landscape design varieties of decorative stone. Paving slabs are in demand, having the same size and therefore easy to install.
The thickness of the tiles for garden coverings must be at least 2 cm.
Decorative stone is durable, can withstand significant loads, at a price cheaper than natural materials. The surface does not slip, while in stock - a huge number of different shades.
In addition to paving, apply polymer sand tiles, porcelain tiles, clinker.
Tile track
Lay the tiles on the prepared base, using cement or simply ramming it tightly in the sand. The second option is simple, but requires careful and accurate work.
Stages (laying without cement):
- marking the passage of the trail;
- trench preparation (depth is determined by the thickness of the tile: add 10-12 cm to the indicator);
- backfilling of a layer of crushed stone;
- sand filling, compaction;
- tile laying, leveling the coating level;
- cracks are covered with sand;
- installation of borders.
For alignment and compaction use a rubber mallet. Beginners can watch the sequence of work on the video.
Clinker track
Clinker is often used to design sites - a material obtained during the firing of highly plastic clays. It is resistant to temperature extremes, strong, durable.
Paving of tracks from it is carried out by analogy with paving slabs, laying brick on a base of sand or cement. When laying clinker, different techniques are used:
- parquet;
- herringbone;
- tape;
- in rows;
- ornaments.
On such coatings, gutters are necessarily laid out from the molded edges to drain moisture.
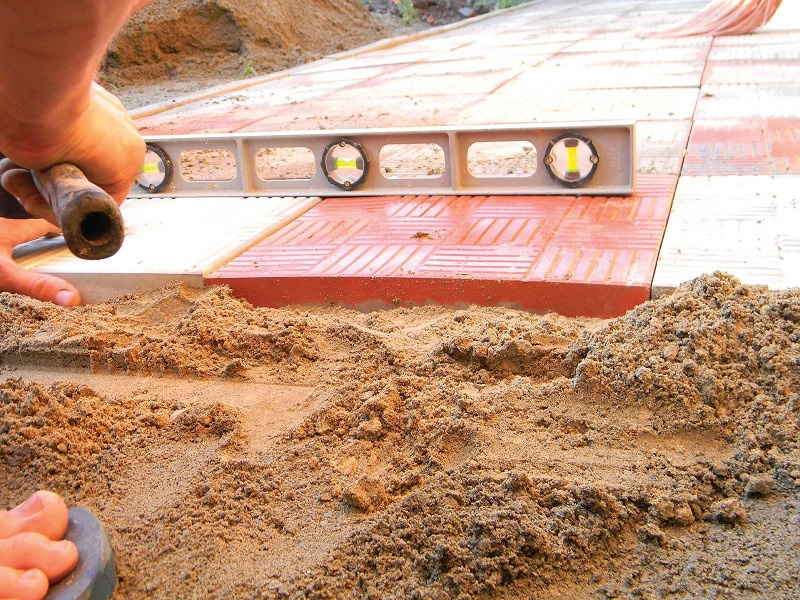
Arrangement of concrete paths at the cottage with your own hands
In the past, continuous coats of concrete were often made in the garden. Today, these faceless paths have been replaced by other structures - from concrete forms.
Benefits:
- durability;
- practicality;
- spectacular appearance;
- the ability to create "stone" coatings.
Forms are made of wood or buy polypropylene stencils. They are designed for about a thousand fillings, vary in size, configuration of jumpers.
Work Stages:
- coating marking;
- charting;
- trench preparation;
- bottom compaction, backfill of rubble or fine gravel;
- laying a layer of geotextiles;
- backfilling of the sand layer.
It is not recommended to use polyethylene for the bases, since then moisture will accumulate in the trench.
Mix the mortar for pouring the molds: cement - 1 part, sand - 3 parts. It is desirable to lubricate the form with machine oil, it will be easier to work with the solution.
Set the mold on the base, carefully pour the solution, leveling the surface. Using a trowel, remove excess, then wait 20-30 minutes. The solution "sets", the form is taken out and put in another place to fill the next portion.
To increase speed, it is recommended to use 2-3 stencils.
After installation, the gaps are filled with a mixture of cement and sand, so that the coating is even. Complete solidification takes 4-5 days. For best results, the surface is constantly moistened and covered with a tarp.
Instead of a cement mixture, sometimes soil is poured into the gaps and a lawn is sown. Get the original concrete track interspersed with green seams.
If desired, pigment dyes are added to the cement mixture. Coatings in which decorative elements are pressed look original:
- shells;
- pebbles;
- shards of glass;
- shards of tile.
Using purchased or home-made forms make straight, winding paths.
Alternative to stone and concrete: unusual materials for paths
Not everyone has the opportunity to equip coatings for transitions on the site of tile, stone. In this case, it is recommended to use improvised materials that, with the right choice and installation, are not inferior in strength and durability to traditional concrete or brick. On numerous photos on Internet portals, craftsmen spread their summer cottages.
Korya paths
Creation of paths from the bark of trees will not require significant financial expenses. First they make a trench, then they fill it with a sand layer and on top - a bark.
The role of borders is performed by planks or wooden dies. Such paths of measles located between the beds will serve more than one season.
Plastic bottle tracks
Putting garbage into business is not only economical, but also a useful event. For arranging an inexpensive coating, plastic bottles of any volume are suitable.
Work Stages:
- marking the future trail;
- digging grooves, depth - a little more than the height of the bottles;
- backfilling of a layer of sand to the bottom (10 cm);
- filling plastic containers with sand;
- installation of bottles upside down on the base;
- alignment of the coating (it is convenient to use a board or a wooden board);
- at the gaps between the containers pour a dry mixture of sand and cement (1: 5 ratio);
- watering the top of the watering can.
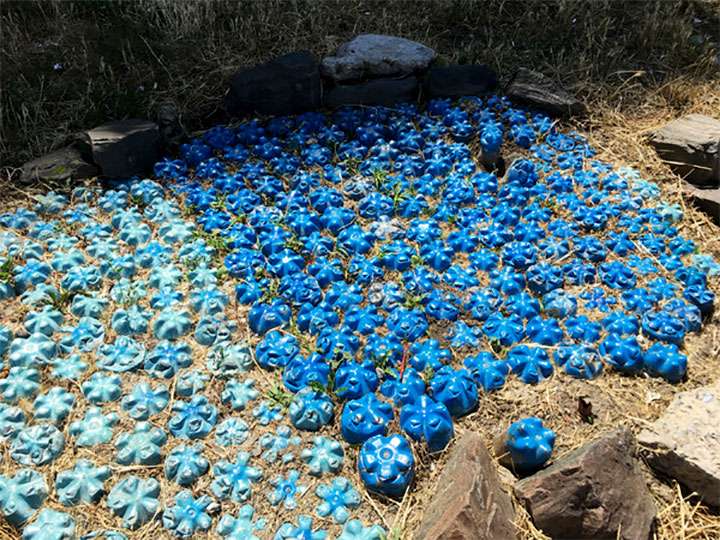
The tracks are given time to solidify the mixture. At the edges set a border of bottles or special tapes.
To get a color trail, the bottles are pre-painted. So lay out various patterns, drawings, ornaments.
Do-it-yourself paths in the country from plastic covers: economy option
In addition to bottles, plastic corks or caps are used for short paths. The laying technology is the same as with plastic containers, only the thickness of the cement layer will be less.
Arrangement of "sidewalks" from chipped tiles
Fragments of tiles can be "planted" on cement. The battle often remains after construction and finishing work, and if you show imagination, you can get the original mosaic coverings.
Another option: the use of tile combat in combination with concrete blocks or pebbles. Work will require accuracy and time, but the result will surely please.
Alas, no comments yet. Be the first!