
For year-round raising of chickens in a garden, a warmed house is needed. A thin-walled summer barn is not designed to maintain the required temperature for birds in the cold winter, for this you need a thick-walled capital construction.While construction companies produce assembly kits of small cribs, it is much easier to make a winter chicken house for 20 chickens with do-it-yourself materials.
Content
Winter housing requirements for poultry
The winter poultry room must meet the following requirements:
- foundation, floor and walls should be made of solid materials. This prevents rodents from spreading infectious diseases in feeders and protects the bird from stealing eggs and killing predator chicks;
- the room must be equipped with forced-air and exhaust ventilation to remove ammonia. Harmful gas, ammonia is released during the decomposition of chicken droppings and rotting litter;
- the room must be airtight. From drafts, chickens develop colds, chickens get sick and die;
- the thickness and thermal conductivity of the wall material must correspond to the climatic regime of the area. Thin walls freeze and become covered with moisture from the inside. High humidity leads to diseases of chickens;
- the room should provide a comfortable temperature for keeping birds. For this, heating systems are installed in it;
- for normal life and good egg production in the room should be artificial lighting.
Growing broiler chickens has its own specifics. It can be carried out in a regular insulated chicken coop, in which the following is additionally done:
- broiler chickens require a temperature of 26-33 degrees. For this, several additional heaters are installed in the room. For chickens of different ages, a different temperature is required, so the heating should be regulated;
- small chickens are raised under round-the-clock lighting. For this, additional lamps are installed in the brooder;
- broilers do not lay eggs, so if the room is intended only for raising chickens, nests are not installed in it;
- little space is needed for babies, so it is optimal to grow them in the same room with adult hens. So that an adult bird does not offend the chicks, a separate enclosure is enclosed for the kids.
Operating procedure
Before starting work, it is necessary to determine the installation location of the barn, the dimensions of the future premises, think over the construction technology, choose the construction of the foundation, walls, ceiling and roof, calculate and acquire the necessary material, prepare the necessary tool.
Location of the building on the site
The comfort, health and egg production of its inhabitants and the laboriousness of its maintenance, as well as the cost of the final product, depend on the place on which the house will be built. In addition, when planning the construction, it is necessary to take into account sanitary standards and the rules for placing structures on the site.
Placement Requirements:
- the room should be located on a flat, dry place. So that rain and melt water do not flood the house with a paddock, they are placed on a hill. If the soil is prone to waterlogging, drainage ditches are dug around the buildings;
- for good lighting, a walking yard is best located on the southeast side of the house;
- from the cold northerly winds, a high fence or a hedge is planted next to the chicken coop;
- the walking yard should be sufficient for the existing number of birds, well lit and have shaded areas;
- so that the noise from passing vehicles does not disturb the bird, we build a chicken coop in the depth of the site;
- according to sanitary standards, the distance from the chicken coop to the borders of the neighboring plot should be at least 4 meters, to the garden house at least 12 meters.
Room Dimensions
The size of the house depends on the purpose of keeping the bird, as well as its number and age. If the house contains several breeds of chickens, and the owners are breeding, then each breed needs a separate aviary. Breeding chickens and broiler rearing will also require additional space.
With the floor keeping of chickens on one square meter of the floor, you can place:
- chickens under the age of 1 month - 25 goals;
- chickens aged 30 to 60 days - 16 goals;
- young animals aged 60 to 140 days - 9 goals;
- adult hens and roosters, depending on the mass - 3-5 goals.
When keeping birds in multi-tiered cages, 10-11 chickens are placed on each square meter of cage. In addition to placing the chickens themselves, it is necessary to allocate space for roosts, nests, feeders and drinking bowls. Based on these calculations, the area of a do-it-yourself winter chicken house for 20 chickens should be 10-20 m2.
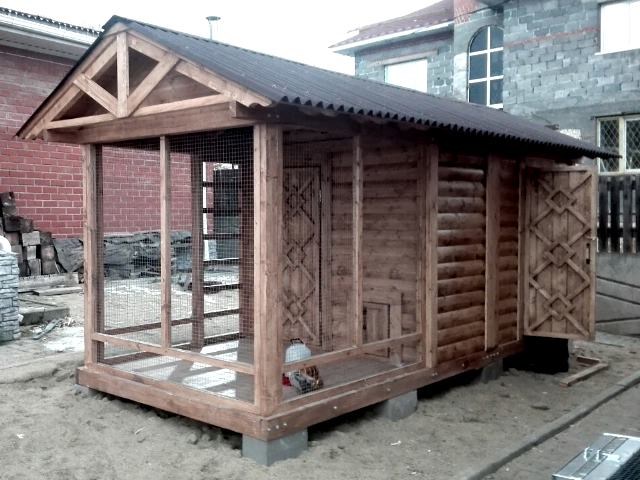
House Design Options
The choice of house design depends on the availability of materials, tools and preferences of the builder. The entire construction process can be divided into several stages. Details of the manufacturing options for the house are shown in our video and photo.
Foundation construction
The foundation is the basis of the entire structure and the key to its durability, therefore, special attention is paid to its construction to build a reliable structure. For the construction of a small house, these types of foundations are suitable:
- the strip foundation is the most reliable, suitable for the construction of walls of any materials, has a high cost. It is made of concrete and metal or plastic fittings;
- the column foundation is the easiest to manufacture and cheapest. For its manufacture, stones, old brick or concrete are used;
- the pile foundation is reliable and simple in design. It has a high cost, it is manufactured very quickly.
Walling
Walls - the main element of the structure, on which the internal temperature of the room depends. For the construction of a small house, the following wall options are used:
- frame walls. Their cost is very low, do not shrink, quickly erected. For their manufacture, a beam is needed, thick boards for racks, thin boards or special plywood for sheathing, roll insulation materials for insulation;
- log or timber walls. The cost of construction is average, wooden walls are very durable, they retain heat well. For the manufacture of a log house, logs or timber and a jute interventional sealant are required;
- walls made of bricks or foam blocks. The cost of construction depends on the availability of materials. As a rule, heavy brick walls are erected on a strip foundation. In the northern climate, brick walls require additional insulation.
Roof
On a small house a pitched or gable roof is installed. A shed roof is easier and faster to manufacture, it will require less material. When installing a gable roof at the top of the house, a spacious attic is formed where you can store hay and agricultural implements.From above, the roof is closed with rolled (roofing, ruberoid) or rigid (corrugated board, slate, metal tile) materials.
Necessary tools
The set of necessary tools depends entirely on the material used for construction. The minimum set includes:
- for marking works, roulette, becheva, pegs, square, level, hydraulic level, ruler are necessary;
- for carpentry (installation of a log house) requires an electric or gasoline saw, an ax, a powerful low-speed drill;
- for carpentry work (frame walls, roof, formwork) you need an electric jigsaw, a screwdriver, a circular saw;
- for excavation and concrete work, a concrete mixer, bayonet and shovel shovels, buckets for measuring volume, water containers, a wheelbarrow for soil removal are necessary;
- for roofing requires angle grinder (grinder), marker.
As a rule, most of the necessary tools are already in the household of the master. A separate missing power tool (low-speed powerful drill, concrete mixer) can be rented for a few days at the nearest rental point.
Insulation of the chicken coop
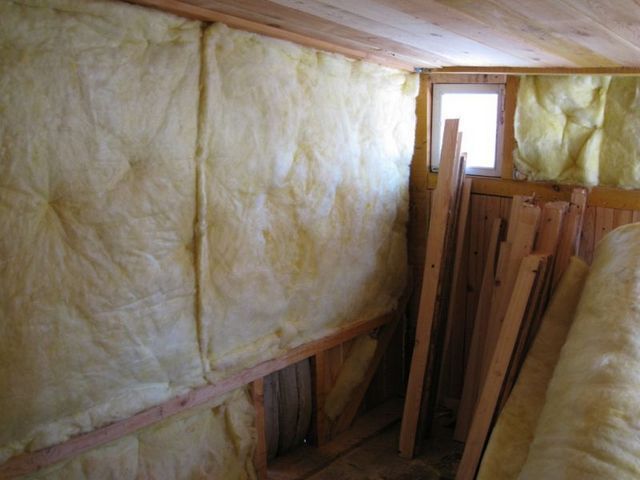
In the southern regions there is no need to erect a capital structure for chickens. For winter living, a light summer house is quite suitable. To preserve heat from the outside, all walls are covered with a layer of insulation. As insulation use sheet or roll mineral wool, polystyrene foam, polystyrene foam or heat and sound insulation boards. Insulation is fixed to the wooden walls of the shed with self-tapping screws through special washers. Outside, the thermal insulation is closed with a special clapboard.
An inexpensive option for insulation is the manufacture of a second wall and backfill between the two walls of the sawdust layer.
Making a chicken coop from a bar on a column foundation
Before you build a chicken coop, draw a drawing of the future structure, draw the internal arrangement of nests, ventilation, perches. To calculate the required wall material, each wall is individually drawn, the size of the opening for windows and door is calculated.
Foundation
The most economical option for the foundation is columnar. For its manufacture, red solid brick, sand, cement and water are required. The work is carried out according to the following algorithm:
- for marking in the corners of a future structure, wooden pegs are driven into the ground and connected with twine;
- A groove is made around the entire perimeter of the rope. The width of the groove is 20 cm, the depth is 15 cm;
- in the corners of the building dig holes for the pillars of the foundation. The depth of the pit is 70 cm, the size is 50 by 50 cm. Between the corner pits, after 1.5-2 meters, pits are dug to install internal poles;
- an extra rope is pulled onto pegs at a height of 25 cm above the soil level. Using the hydraulic level, the same rope tension is controlled at all angles;
- 5 cm of sand cushion are poured into the bottom of the pit. Next, lay 4 bricks and fix them with cement mortar (1 part of cement to 3 parts of sand). Subsequent layers of bricks are perpendicular to the previous one. The resulting void in the center of the column is filled with concrete. Laying of layers of bricks is carried out until the top of the column is not even with the top rope. If the top is a little lower, the missing few centimeters are supplemented with a layer of cement;
- using the same algorithm, the remaining columns are made;
- jumpers between the pillars are laid with brickwork;
- after completion of construction, the foundation is covered with a waterproofing layer from the inside and outside. The space between the soil and the foundation is covered with a mixture of sand and small gravel.
Walls
In the middle strip, wood walls are best kept warm. For the manufacture of a log house, a beam with a section of 15 by 15 cm is required. The following algorithm is used for work:
- two layers of roofing material are laid on the foundation posts for waterproofing;
- put the lower crown of the log house. In the corners, the beam is connected by a “half-tree” connection;
- before laying the second crown of the log house, lay a layer of inter-crown jute insulation.To the lower beam it is fixed with a furniture stapler;
- after laying the second crown with a low-speed drill, a vertical hole is made with a pen drill with a diameter of 25-30 mm. The upper crown is drilled through, the lower one is ½ height. A wooden nail-nail is hammered into the hole, thereby fastening the beam together;
- Then lay the interventional insulation and lay the third crown. After laying the third crown, a hole is made by drilling through the upper two timber through, and the lower, third, by ½. To compensate for the shrinkage of the bar when the wood dries, the nagle hat is recessed into the depths of the hole by 2-3 cm;
- in this way, lay the walls to a height of 180 cm, then the bars of the matrix and another crown are laid across the log house;
- frames with double-glazed windows are inserted into the window openings, and an insulated door is installed in the doorway.
Two to three months after construction, when the log house "settles", all the cracks caulk it. Wooden slats are stuffed on top of the slots.
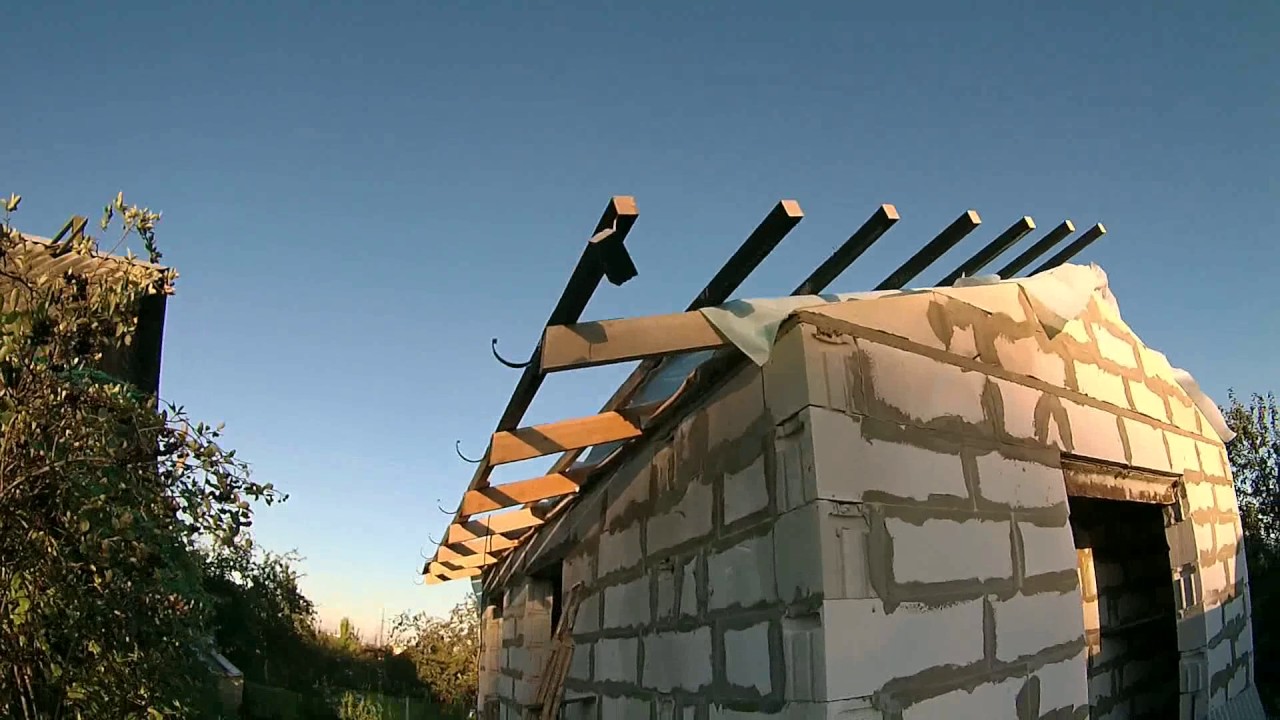
Roof
To get the required amount of space for winter storage of hay, the roof is made gable. For the manufacture of the roof, edged boards with a thickness of 50 and 25 mm are used, for the roof - metal sheets of corrugated board.
For the manufacture of the roof, the following algorithm is used:
- from boards 25 mm thick on the ground, a rafter template in the shape of the letter A is made;
- rafters are made from boards 50 mm thick according to the template. The number of rafters is calculated by the formula: log length / 1.5 meters +1;
- the rafters are installed on the log house after 1.5 meters and fixed with brackets. In order for the rafters to stand securely on the log beam, corner cuts are made in them;
- on the rafters with the help of nails horizontally fasten the boards of the crate;
- on top of the board, the crates are closed with sheets of corrugated board;
- pediments are sutured with trim boards 25 mm thick. In one pediment they make a door for laying hay.
Ceiling
To make the ceiling, 50 mm thick edged boards are placed on top of the matrices. A layer of vapor-insulating material is laid on top of the boards, and a layer of thermal insulation is covered. As a free thermal insulation, you can use sawdust or fallen leaves.
Floor
To make the floor of the house, a layer of earth 10 cm high is removed from the entire construction area. Next, a 5 cm thick sand cushion is poured and a concrete screed 5 cm high is made. In order to prevent the chickens from freezing in the winter, piles of sawdust and hay 10- 15 cm
Ventilation
During the breathing of chickens, as well as in the process of decomposition of litter and waste products, a lot of moisture is released. Excess moisture leads to poultry diseases. For removal of moisture in the house arrange forced-air and exhaust ventilation. In order not to catch chickens, it is placed away from nests and perches. To make ventilation, do the following:
- take two plumbing pipes with a diameter of 110 mm;
- holes in the roof and ceiling of the house are cut with a diameter of 110 mm;
- pipes are inserted into the holes. In order to prevent rainwater from entering the room, exhaust hoods are put on top of the pipes;
- the lower end of the exhaust pipe is installed 30 cm below the ceiling level, the lower end of the supply pipe is 50 cm above the floor level. If necessary, the pipe is increased to the required length;
- after installation, the pipes are fixed with screws;
- the hole in the ceiling is sealed with foam, in the roof with silicone sealant.
Chicken house lighting
In winter, daylight hours are very short. Therefore, to increase egg production in the evening and in the morning, additional illumination of the house is organized. To do this, an electric cable is brought to the chicken coop from the house, electrical wiring is done, lighting shades are installed. For safety reasons, shades are installed in explosion-proof design.
In order for the house to be lighter, the walls and the ceiling are painted with whitewash.
Heating
Hens actively lay eggs only at a comfortable room temperature.To maintain the temperature in the house during severe frosts, many heating options have been invented.
Electric heating systems
If the house is connected to an electric network, it is quite simple to organize a room heating. To do this, use the following electrical appliances:
- fan heaters (heat guns) - a good option for heating. During their operation, the fan heaters not only heat, but also mix the air, thereby supplying heat to all corners of the room. For fire safety, fan heaters are installed in a place inaccessible to birds. The disadvantage of heat guns is their absolute unsuitability for heating broiler chickens;
- oil radiators. Fireproof, great for heating chickens. Most models of oil coolers are equipped with a thermal relay, which turns them off when the set temperature is reached. This helps to save electricity;
- infrared heaters and lamps do not heat the air, but objects in the area affected by radiation. Heaters are hung under the ceiling and turned on as needed; bulbs are usually used in broiler enclosures;
- To maintain the temperature in day-old chickens, a home-made heater is used. To do this, a hole is made in the plastic cover of the can, into which the cartridge from the light bulb is inserted. Dry sand is poured into a liter jar and an electric bulb with a power of 90-100W is inserted. The cartridge is carefully screwed onto a sand-filled light bulb. When connected to electricity, a portable heater is obtained, around which the chickens are heated.
Gas heaters
To heat the air in the room, a gas infrared heater is installed, operating from a household gas cylinder. Modern appliances are very economical and the usual 50-liter bottle lasts for a very long time.
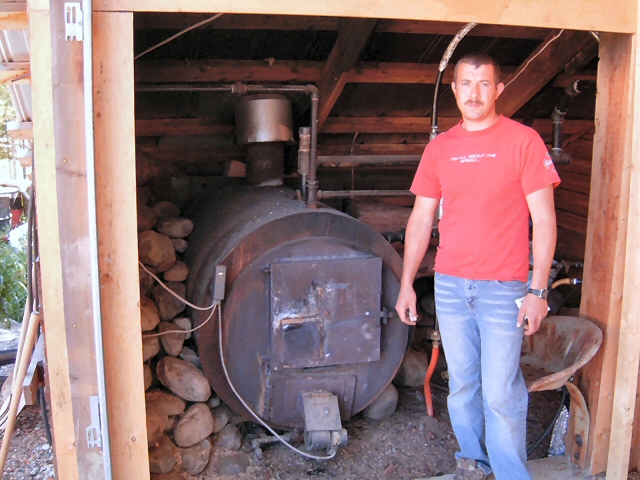
Stove heating
The most economical heating option is to install a small stove. The metal furnace heats up very quickly, gives a good temperature. Its disadvantage is the high cost and quick cooling after the termination of the furnace. The brick kiln heats up more slowly, but keeps the temperature much longer.
On the Internet you can find drawings of a small-sized brick furnace and make it on your own.
Biological room heating
To heat the room with heat from litter decomposition, it is necessary to fill the house with ten centimeters of sawdust in the fall. The litter is not cleaned throughout the winter, adding another 10 cm of sawdust every month. Sawdust mixed with litter decomposes during the winter, generating heat. In the spring, the rotted litter is taken out into a compost pile.
Battery heating
The most difficult and time-consuming to manufacture option is the installation of a heating boiler and battery system. An electric or gas boiler or a radiator installed in the stove is used as a heating element. Radiators hung on the walls evenly heat the entire volume of the room. As the heat carrier use water or antifreeze.
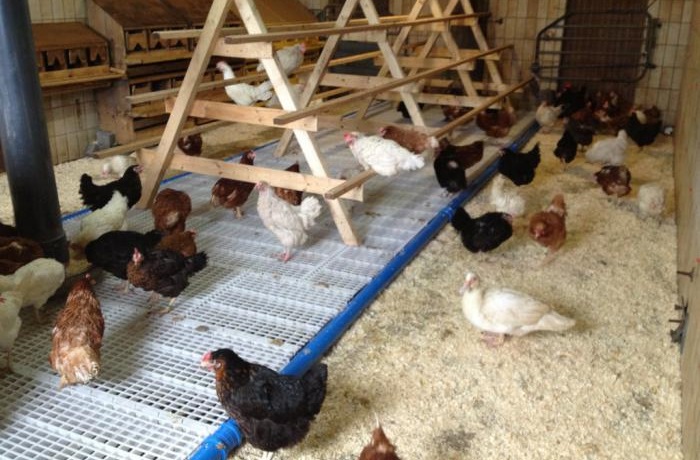
Making roosts
For a comfortable sleep, each chicken needs 25-30 cm of roost length. Therefore, for 20 chickens, the total length of all perch perches should be 6-7 meters.
As a material for perch take a bar with a section of 40 by 40 mm or a thick tree branch with a diameter of 35-40 mm. Ribs are rounded on a bar with a planer, bulging knots are removed on a branch. For the roost they choose a dead corner, in which drafts from the door and windows will not get the bird. Using retaining bars perches are attached to the wall of the chicken coop.

To reduce dampness, a sealed container for collecting liquid droppings is installed under the perch in the room. When filling the tank, it is cleaned.
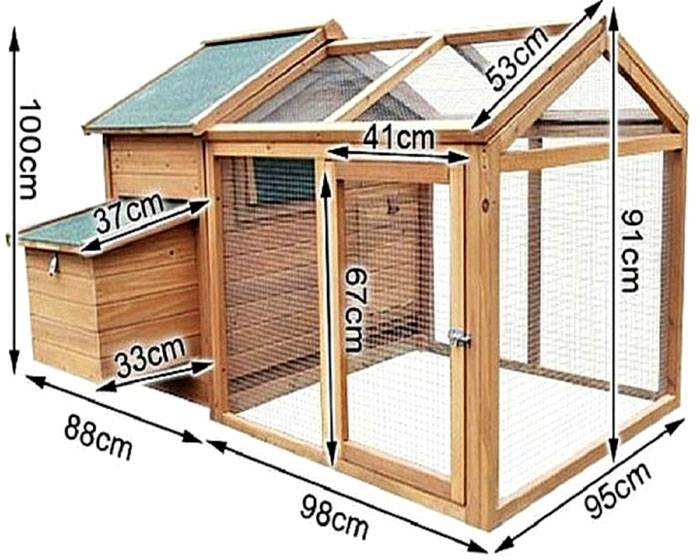
Nest device
Nests in the chicken coop are set on an elevation in a secluded place. For 20 chickens, 6-8 nests are installed. The nests themselves are a half-closed box measuring 30 * 40 centimeters. They make nests from thin boards or plywood.Before use, hay or sawdust is placed at the bottom of them. In order to make it more convenient for chickens to fall into a nest, a ladder is installed in front of it.
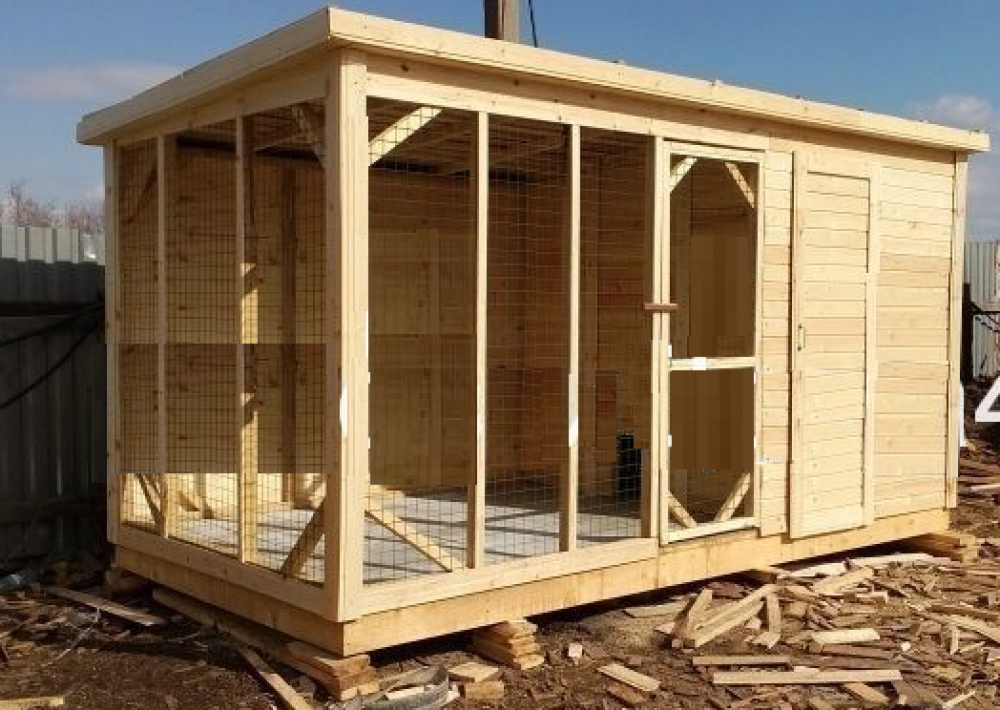
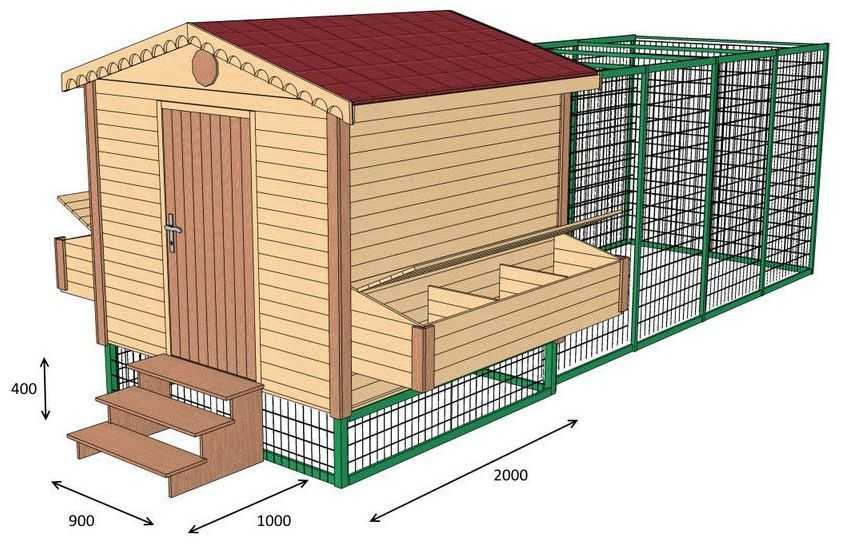
Walking for chickens
The presence of walking increases the egg production of chickens and protects against diseases. For each bird, at least 1 m2 of corral area is required, therefore, for 20 chickens the minimum area will be 20 m2. The shape of the plot can be arbitrary.
For the construction you will need:
- for pillars use metal pipes with a diameter of 50-100 mm, a square or rectangular metal profile or tree trunks;
- for horizontal supports - a metal profile or boards with a section of 50 to 100 mm;
- for a gate - boards or a square metal profile with a section of 20 by 20 mm;
- galvanized or plastic mesh;
- knitting wire or plastic ties, nails or bolts, hinges, constipation.
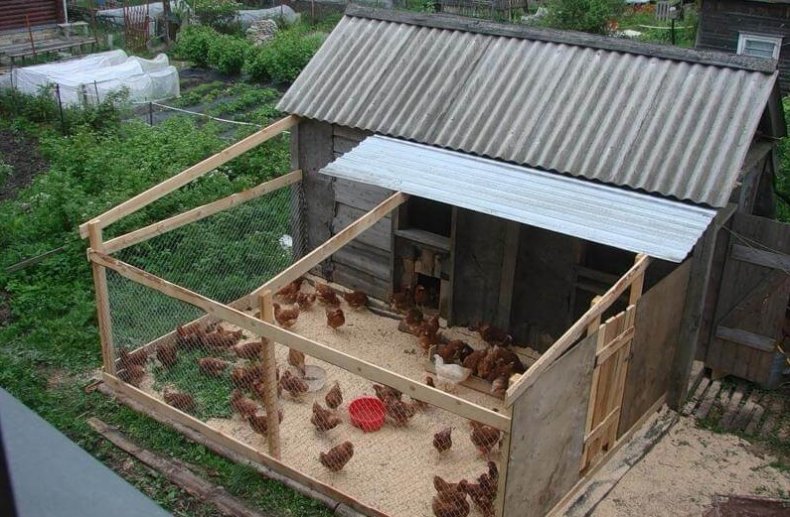
The following algorithm is used to make a pen for chickens:
- For walking use a place closed from winds and noise. So that the soil is always a dry place for walking choose on a hill. If necessary, the site is terminated. To protect the birds from the sun, low bushes or trees are planted on a walk;
- building debris, stones, broken glass, etc. are removed from the selected site If necessary, grass lawn is sown;
- pegs are hammered into the corners of the future walking range, twine is pulled on them;
- according to the drawing, two pegs are hammered in place of the future gate, outlining the place for the gate posts;
- using a garden drill in the soil, pits are made with a diameter of 15-20 cm and a depth of 40-50 cm;
- pipes are cut into pieces. The length of each is equal to the length of the acquired mesh (1.5-2 m) plus 50 cm, then the anticorrosion composition is applied to the pipes;
- pipes are installed vertically in pits. The space between the walls of the pit and the pipe is poured with concrete. After pouring, the verticality of the columns is checked by plumb;
- between the corner posts after 1.5-2 m establish intermediate support posts;
- after concrete hardens at a height of 20 cm from the bottom and top of the posts on the outside of the walking range, a metal square profile with a cross section of 20 by 20 mm is welded or bolted to them;
- the netting is unwound and fixed to a horizontal profile with a knitting wire or plastic ties;
- the wicket is made of a square profile and fastened to hinges to supporting posts by welding.
Before use, wooden poles are impregnated with antiseptic solutions several times, horizontal bars are pinned to them with nails. For fastening the mesh, small cloves or a knitting wire are used.
It is not easy to make a house for year-round living of chickens physically, but it is quite feasible for a healthy man. For this, the chickens living in comfortable climatic conditions will thank the hosts with fresh eggs.
Alas, no comments yet. Be the first!