

What you can’t imagine if you have imagination and “golden” hands. Creative owners of private homes try to artificially decorate their possessions, while not spending a lot of money. Yes, and this is useless! You can make an excellent weather vane from wood scraps, building materials, and at least just plastic bottles that often remain after construction and are wastefully disposed of as unnecessary.
Content
Plastic bottle vane

Such a product may have several different versions.
Option number 1
For work it is necessary to prepare the following materials:
- directly a plastic bottle that will serve as the basis;
- metal wire with a diameter of 1-2 mm;
- as a hinge, you can use a large bead, it is desirable that it is not round, but has a flattened shape;
- a block of wood that we will use as a fastener;
- you will also need auxiliary tools: for example, scissors, which will be required to cut plastic.
Before starting work, we prepare the bottle by cutting the bottom and neck to get a cylinder. And of course, it’s worth removing all the labels so that the product looks neat. We glow the wire to get a neat hole in the plastic and pierce our workpiece perpendicular to the side plane. Leave a centimeter away from the edges. The upper edge of the wire must be carefully bent so that the weather does not fall apart. We insert the lower edge of the wire into the bar two centimeters, previously placing a bead on it so that the weather vane does not touch the bar and can move freely under the influence of air masses. It is better to fix the finished product to the highest point of the roof to provide a good overview and the absence of wind obstacles.
If you want to diversify the design a bit, you can make it in the form of a sail by simply cutting out two half-legs on both sides symmetrically with respect to the holes for the spoke. Or use a third of the cylinder and a wire structure resembling the letter “L”. The wire will be mounted in holes at the edge of the cylinder.
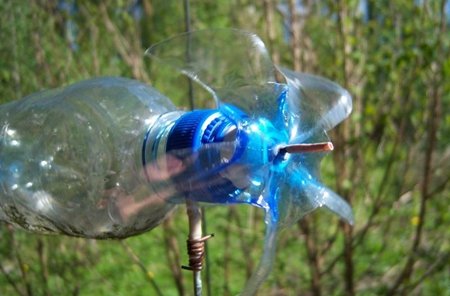
Option number 2
This weather vane will not be mounted on the roof of the house, and in any place convenient for you, since the whole structure will be placed on a stick, the material for which you can choose any, depending on availability or desire.
For work it is necessary to prepare the following materials:
- 2 liter plastic bottle;
- a stick for attaching a weather vane (it should be about 1.5 meters long with a thickness of 2 centimeters in diameter);
- marker - for marking;
- drawing paper;
- acrylic paints to give the weather vane an unusual look, and a brush;
- knife;
- hammer and small nails.
Also, before starting work, it is necessary to remove all the labels and choose a pattern that will decorate the weather vane. Place the selected image in outline on paper and cut it out. This will be a template, the contours of which, using a marker, are placed on the bottle, retreating a centimeter from the edges. Next, repeat the outline of the template several times with the same distance between them, moving further down the bottle. Now, with the help of a knife, we make incisions along the resulting contours without touching the central part. We bend the cut out and color the silhouettes with acrylic paints. It is necessary to wait until the paint has completely dried before continuing work, so as not to spoil the already done.We pass to the mount. At the bottom of the bottle you need to make a hole, after which you need to put it on a stick so that the neck is at the bottom. We drive in a nail so that it passes into the hole made on the bottle and enters the stick, towering half a centimeter above it. Now all that remains is to choose a place for the future weather vane and drive our stick there.
Sometimes wind turbines are used to drive moles and rodents away from cultivated plants or trees with their noise.
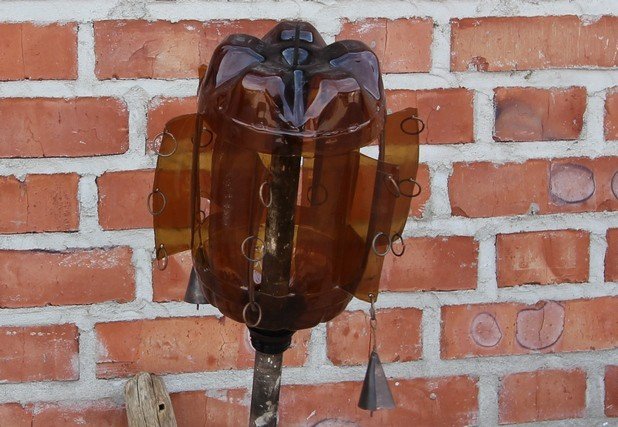
Option number 3
A weather vane can be suspended, for example, by a tree branch.
For work it is necessary to prepare the following materials:
- 2 liter plastic bottle;
- thick paper;
- marker;
- knife for working with plastic;
- wire for fastening with a diameter of 2 mm;
- beads that will work with hinges.
Cooking template on paper. Its length should correspond to the circumference of the plastic bottle. On it, we draw and cut into rectangles the future "windows" with an equal distance between them. Transfer their contours using a marker on the bottle. Next, you need to open these rectangles. Why with a knife, carefully cut out three sides and bend it 30-40about. Now, to fix it in the chosen place, in the center of the cork, glowing, we pass the wire. She will serve as an axis. We place beads on it, bend the ends.
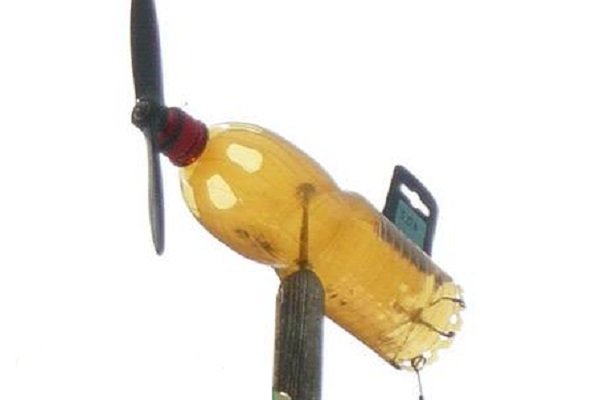
Option number 4
For work it is necessary to prepare the following materials:
- two plastic bottles;
- wire - the axis of the structure;
- metal rod - fastening;
- hinge.
Cut the propeller from the bottom of one bottle. To do this, carefully cut the bottom of the bottle so that each protrusion has a continuation and a narrowed end. This clipping resembles a flower. From the second bottle we need a body. Cut the bottom, leaving the neck with a lid. This design is the future flyugar. Using a red-hot wire, we make a hole in the center of the propeller and fly-gun, connecting them. This will be the axis of the structure. Between them it is necessary to fix the hinge so that the propeller can rotate freely. Next, perpendicular to the axis in the lid of the vane bottle, make a hole. We install a metal rod in it. It will serve as a fixture. It remains to fix the weather vane on the roof.
Plastic cup vane
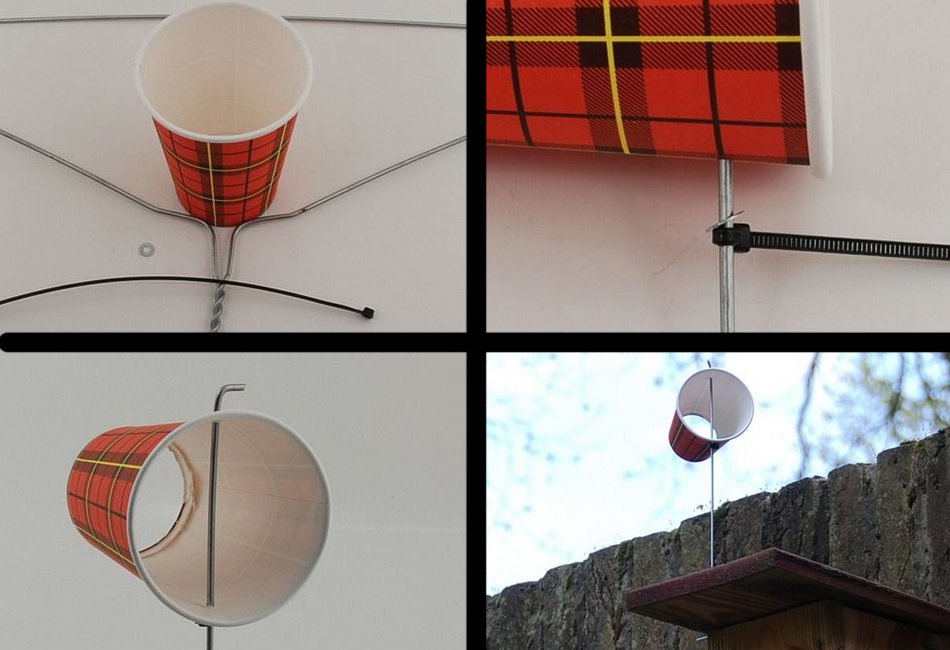
To determine the wind or as fun for children, you can make a weather vane even from a plastic cup.
This process is quite simple, but you only need a cup, a flagellum, a wire with a diameter of 1.5 mm and a flat support washer, which will provide articulation.
At the cup, cut out the bottom to get a cylinder. Next, we make two holes into which we penetrate the wire. We bend its upper end. We put a washer on the lower end and fix the flagellum.
Plywood weather vane
It is likely that after the repair you still have scraps of plywood, from which you can also make an excellent weather vane.
For work it is necessary to prepare the following materials:
- plywood;
- a nail (self-tapping screws can be used);
- three flat beads that can be strung on a nail;
- glue for plywood;
- wooden block.
Do not forget that plywood can lose its properties under the influence of precipitation. Therefore, before starting work, coat it with special protective paint.
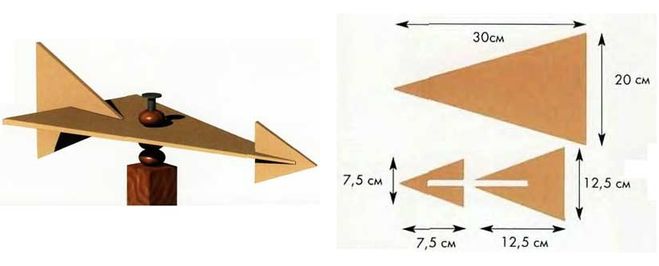
We cut out three equilateral triangles from plywood. The first will be the basis - its overall dimensions are 30x20 cm. In it, in the center we drill a hole that will be needed to fix the finished weather vane on the bar. The hole in diameter should correspond to the nail. The second triangle needs to be cut less - 12.5x12.5 cm (dimensions), and in it, from the top of the top with a jigsaw, cut the rectangle to about the middle. Its width should be equal to the thickness of the plywood used. The third one is even smaller, with dimensions of 7.5x7.5 cm. In it, we similarly cut out a rectangle, but only from the side of the base.We connect the triangles as follows: the largest is the base, we glue the middle triangle to it, using the cut rectangle as a place for fastening. It should turn out the tail of the fly. Then we glue the “nose”, a detail for which is a smaller triangle.
Insert a nail with a bead strung on it into the hole on the large triangle. We put on two more beads from the bottom. And drive a nail into a wooden block. It remains only to fix the structure on the roof and you can determine the direction and strength of the wind.
Video tutorial on creating a weather vane from tools at hand
//www.youtube.com/watch?feature=player_embedded&v=mmZFQMB9OaA
Alas, no comments yet. Be the first!