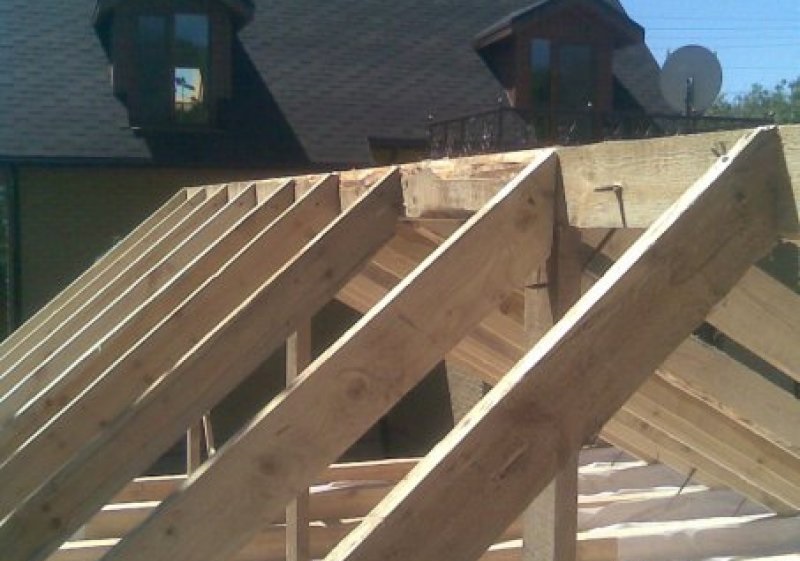
Today, the roofs of country houses can have almost any shape. Moreover, almost all of them can be created with their own hands, however, similar designs are combined with the fact that the installation of the rafter system is a mandatory part of the work. This question causes a lot of difficulties, therefore, in this article we will present the design features of the roof truss system, indicate the rules and nuances of performing a full list of works on its construction.
Content
The construction begins with Mauerlat
Mauerlat is the first thing to think about when it is planned to install rafters. It is the base on which the rafter legs transmit part of the load. In addition, this design is designed to evenly distribute the weight of the roof over the top of the walls of the house.
As a rule, a Mauerlat is a log or a beam, which is laid around the perimeter of the external walls. It is worth saying that this is not the only option for arranging the bases for rafters, but other methods are much more expensive.
When installing the rafter system, it is the Mauerlat that allows you to achieve the necessary parameters of the base for the roof with minimal cost, therefore this technology has become widespread in suburban construction.

Mauerlat can be treated with various impregnations, but moisture can still cause a decrease in its life. In order to prevent this situation, apply waterproofing, which is usually made of roofing material, laid under the beam in a couple of layers.
Before installing the rafter system, you need to prepare a place for installing the Mauerlat. Usually the basis for it is a reinforced belt with a slight indent from the wall of the house. In the role of Mauerlat, you can use a bar impregnated with antiseptics, a cross section of 10x15 cm. It is better if the wood is hardwood.
First, a timber is laid out along the perimeter of the roof between the gables. Here you need to make sure that all the elements of the roof base are at the same distance, and their position should be checked by level.
Roof trimming can only be done after the base of the timber is securely fixed. For this, several methods can be used today, however, the most popular are anchor bolts, which are fastened in a reinforced belt during its pouring. For mounting in the timber, holes are drilled to fix the Mauerlat using nuts and washers on the anchors.

With independent construction it is not easy to achieve the verticality of anchors poured with concrete. This problem is solved simply: when the rafter system is installed, it is necessary to lay a long board along the group of bolts, and set their position using a square.
After the concrete has gained the proper strength, a Mauerlat is installed. In order to avoid distortions during this procedure, it is recommended to use stands from small boards located under the entire beam. They are taken out one at a time.
What are the types of rafters
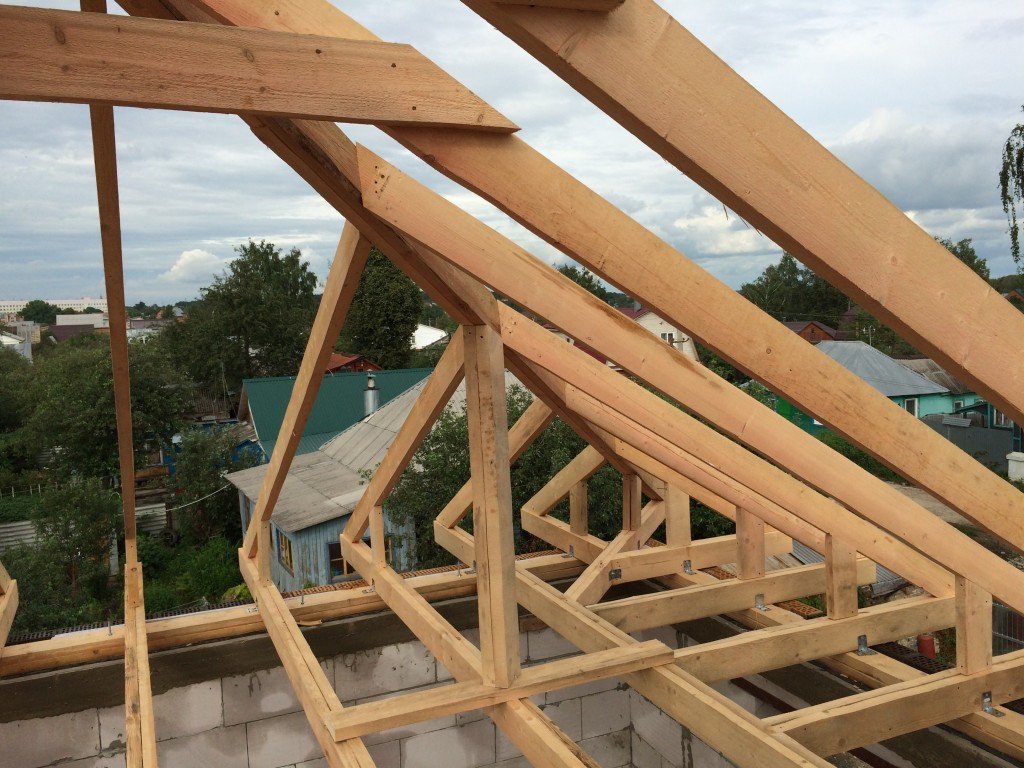
Before the installation of the rafters begins, you should already decide on their type. In fact, there are only two options - overhead and hanging. The task of the rafters is to retain all the elements of the roof.If we are talking about a small building, then it is enough to use simple rafters, however, to overlap long rooms, already use trusses, which are formed through the use of various additional elements.
Installation of the rafter system is carried out in accordance with the slope of the roof, the expected load from snow and wind, and also takes into account the type of roofing and the function of the attic.
Hanging rafters are a structure that rests only on two points, for example, on the walls of the building, and intermediate supports are not used. It is obvious that in the case when the angle of inclination of the slopes is less than 45 degrees, the horizontal component of the force transmitted to the walls will be more vertical, which means that certain measures will need to be taken. Usually, a way to level such an effect is developed even before the rafters are installed. The easiest option is puffs that connect the rafters. It can be both wooden elements and metal structures. The location of such amplifiers depends on the purpose of the attic. For example, if you need to create an attic, then the puffs are at the base of the rafter legs, and in other cases they can be higher.

The higher the puff will be, the more durable it should be. The same point must be considered when choosing a method of connecting with rafters.
When installing the rafter system of the lay type, a third fulcrum is required, which is usually a stand mounted under the ridge. The peculiarity of this design is that it can be used only where there is a central load-bearing wall or some reliable supports passing under the ridge. Otherwise, its use is impractical.
Installation Preparation
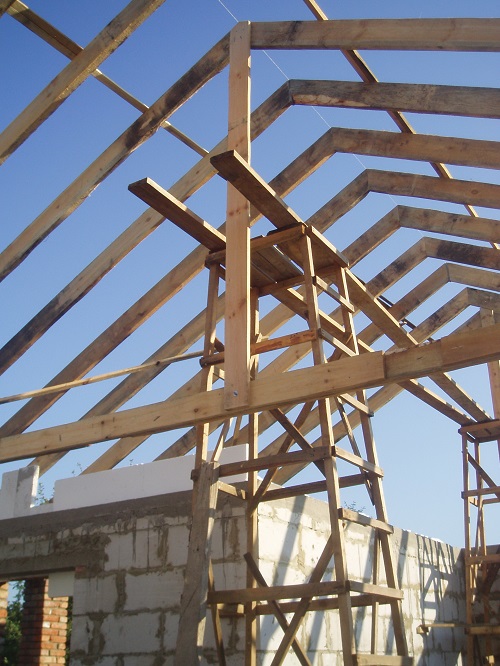
Before you make a rafter, you need to stock up on everything you need to perform work at heights. Of course, someone will say that 3-5 meters separating the roof of a country house from the ground is not the biggest problem, but it’s worth considering that you will need to lift and store tools and structural elements. Scaffolding is best suited for this purpose, but we must not forget about individual insurance, especially when the roof of a two-story house is raftered.
During the preparation, you need to take care of the creation of drawings of the roof structure. Even if you plan only a gable roof for a small country house, the drawing will avoid any errors. Needless to say, even a team of professionals will not undertake to build more massive and complex structures without a project.
The manufacture of rafters
For the role of rafters, a beam with a section of 50x200 is usually selected, but before the installation of the rafter system, a number of calculations are necessary. First of all, it will be necessary to calculate the degree of influence of the wind load, assess the possible amount of snow on the roof in winter and also include it in the calculations.
The installation technology is quite simple, and includes the following steps:
- Rise. With the help of scaffolding, prepared timber rises to the roof.
- The lower ends of the legs are cut so as to turn the Mauerlat into a stable support. Each element is marked with a marker so that there is no confusion during the installation process.
- The lower ends are set in place and fixed with nails.
- The connection of the rafters in the ridge is carried out so that their parts overlap, forming a single plane. To do this, you need to perform a tie, and then fix the structure with nails.
The cutting at the junction of the upper part of the rafters is as follows:
- First, the elements are applied to each other, after which the markup is made. Then half the thickness of the beam is cut along the marked contour.
- The next stage is already carried out on the ground, for which a template is created on the basis of one pair, which allows connecting the other rafters in the same way.
- When all the elements are prepared, then the two extreme pairs are mounted, after which a thread is stretched between them, allowing you to observe the selected level.
- Before you make a rafter, a Mauerlat is marked, which allows you to keep the distance between the structural elements constant. Typically, the system step is selected within 1 m.
- In the event that there is a deviation of height from that which is set by the stretched thread, it is better to adjust it by lining small flat boards under the rafter legs.
- In order for the resulting "triangles" to be arranged vertically, it is necessary to observe the same distance between their upper parts as between the lower ones. To do this, it is enough to use a board on which marks made on the Mauerlat are transferred.
- If the installation of rafters of a hanging type is carried out with a significant distance between the walls, it is recommended to use puffs. Lightly loaded structures can be connected by a jumper near the top. The resulting element is called a ridge node.
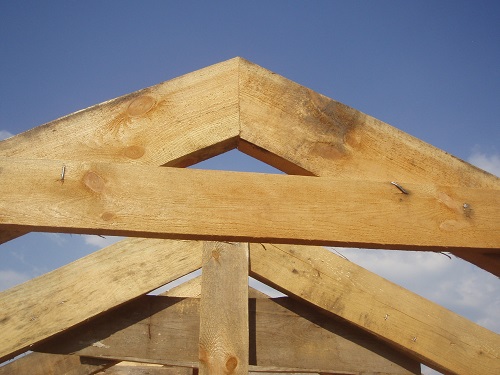
Tightening can be performed from several boards interconnected. Such a jumper is strong enough, and also has the required length. Installation of the rafter system can be carried out using nails of studs and bolts. The distance between puffs is controlled in the same way as between the upper parts of the rafters.

A long puff can bend under its own weight, so you need to use a board to connect this element and the ridge of the rafter pair.
Creation of eaves overhangs
Eaves light is a very important element of any roof, however it is performed after the installation of rafters is completed. To obtain an overhang, it will be necessary to increase the rafter leg through the use of a board (filly).
In order for the eaves overhang to divert melt and rain water from the house and protect the walls from getting wet, a departure of at least 40 cm will be required, and its best is more than half a meter in length. A filly is a board that can be even thinner than a rafter leg. It is fixed with a small clearance on the nails, and the ends protruding from the other side are better to bend.

If possible, then it is necessary to consider the creation of a cornice overhang before making a rafter. In this case, it becomes possible to implement another option - to use a longer beam for the rafters, which will make it possible to carry it out in the role of an eaves overhang.
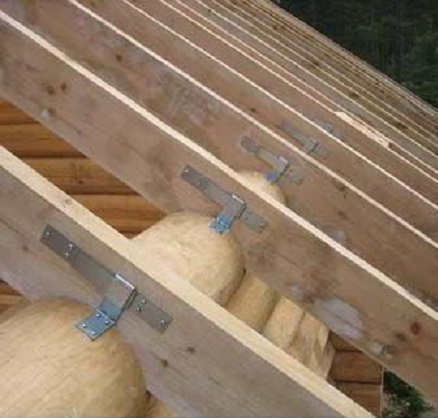
Rafter legs, which were fixed on nails, after completion of all work can no longer be transferred to a temporary, but to a permanent mount. For this, the so-called shink, which is a strip of metal, is suitable. She can wrap the beam, and secure the ends with screws or nails. Such fastening will help keep the roof in place even when the wind is very strong.
Anyone who knows how to install the rafters correctly can recommend another method. This is a wire fixed on the inside of the walls. Typically, for such purposes, a steel wire of 4..6 mm diameter is used, tied to metal ruffs clogged in the wall.
Rafters made of logs
The creation of rafter structures of this type is made from a barked forest with a diameter of 18 cm. It is desirable that the logs themselves be smooth, without curvature, rot and wormholes. Minor irregularities are eliminated by processing the ax on the cord.
The advantage of this approach is that there is no need to splicing the rafters along the length, since the size of the logs is usually enough. The maximum length of roundwood can reach 6.5 m. When the spans are large, the team is tightened with several logs.Braces and racks are made of scraps, however, short logs can be suitable for this role. Marking is best done according to a template made of metal or plywood. When the marking is completed, the cutting points are created, which must be cleaned with an ax.
Calculation of the cross section of rafters
Splicing rafters in length is not the only difficult moment, since even their cross-section will need to be calculated. In the general case, there are three reasons that affect the cross-section of the beam:
- Load. Here we are talking about the weight of the future roof and the mass of the snow cap.
- Span size. The larger the span, the more durable the beam will be required.
- Slope angle.
Before you make a rafter, you need to carefully analyze the information about the construction and climatic conditions in the region, since the classic version may not always be suitable. The most common situation is the use of a slope of at least 30 degrees and a pitch of more than 1.2 m.
This article described how to make a rafter system, and also examined those moments that cause the greatest difficulties. If necessary, it can be used as a reference material.



Alas, no comments yet. Be the first!