The roof of ondulin today attracts many developers and homeowners. This is not surprising, since the material is durable with a small weight of the corrugated sheet. If you also opted for this roofing material, then our article will have real practical benefit. The instruction by which we propose to lay ondulin, notes the most important points and considers every detail associated with the laying of the proposed finish.
Choosing such a flooring for yourself, there is no doubt in the reliability of the future roof, which will last for more than a decade. There is no difference in which climate region the building is located and for what purpose it is intended. Ondulin can be considered a universal roofing material.
Content
The device of the ondulin roof
If you plan to do the work on your own, then it is quite possible to do it with the efforts of only one person. This is facilitated by the light weight of the sheets of ondulin and the ease of processing of this material.
Ondulin roof can become a reliable protection not only at home or cottage. It can cover the bathhouse, gazebo and other outbuildings.

The most tangible advantage of a roof made of this material (when compared with other finish coatings) is that ondulin can be laid directly on the existing roof. There are clear economic and other advantages, since the costs of dismantling the old coating are eliminated. The interior of the building does not open even for a short time, so do not worry about how they will be affected by the environment and precipitation.
The question of how to stack ondulin is not difficult to perform. First of all, getting started, it is necessary to thoroughly study the rules of the installation instructions for ondulin, which is attached to the set of material and its components.
The instruction, as a document, gives the right to receive warranty obligations from the manufacturer or supplier of the ondulin material. For this reason, it must be preserved and in no case can be lost.

The main condition that the manufacturer puts forward as a guarantee for his product is compliance with the specified list of requirements and rules necessary for the installation of the ondulin roof.
If you are interested in cheap ondulin, then take into account the fact that warranty obligations apply only to that material that is original and is purchased from official representatives, as well as partners of the same manufacturer.
When deciding how to fix the ondulin - with your own hands or to seek the help of professional roofers, it is necessary to take special responsibility to comply with the following rules for installing the finish coating of this material.
Installation Rules for Ondulin Coating
Mount the ondulin on the crate, which is arranged in steps selected depending on the slope of the roof slope.
- When installing this roofing material, there is a need for movement along the coating sheets. It is important to remember that you can only step on those areas that protrude (waves) and do not stand in the deepening places located between them.
- Ondulin should be laid only at air temperature above the zero mark (plus).In case of urgent need, you can extremely carefully install at an air temperature of at least -5 degrees. At lower temperatures, work with this material is prohibited. The roof of ondulin is also not mounted at an air temperature of more than 30 degrees.
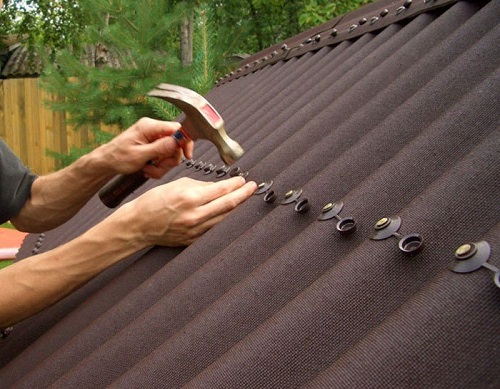
- To the question of how to fix ondulin to crate, there is one answer - using special roofing nails. When special nails are used for the ondulin roof, according to the technology, the sheet must be fastened with 20 nails (no more, no less). So the fastening of each sheet should be made. Such a requirement is included in the category of warranty. If not adhered to, then ondulin may suffer as a result of gusty winds. It is advisable to follow this process, especially when hired workers do the roofing. It is important that specialists adhere to all the rules of installation work on the device of this finish coating.
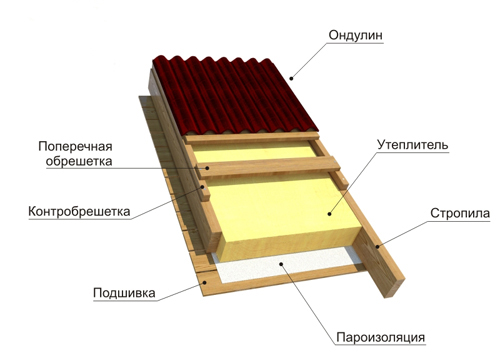
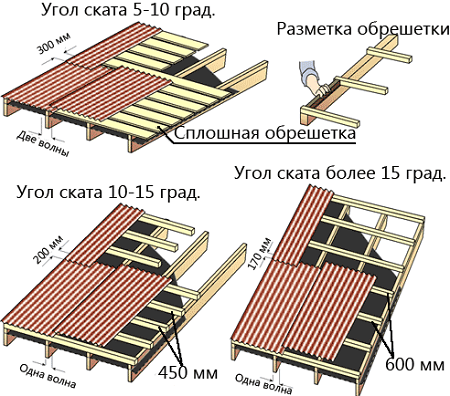
- Before laying ondulin, it is necessary to make a crate. It is made of wooden bars having a section of 4x6 cm. The step size of the crate is determined depending on the slope of the roof slope:
- less than 10 degrees - make a continuous flooring of boards;
- 10-15 degrees - the step of the crate should be no more than 45 cm;
- more than 15 degrees - the step of the crate is provided no more than 61 cm.

The device of the crate begins after they make the substrate for the ondulin. In this capacity, the Ondutis vapor barrier lining film recommended by the manufacturer is used.
- The technology of laying the ondulin roof does not allow the overlap of 4 sheets to be in one corner, since deformation of the edges of the sheets of the roofing material may occur.
- Working directly with the material is not difficult, since ondulin is light in weight and good flexibility. However, if you do not have experience, you can, using these properties, stretch the sheet to the desired position in a curved manner.

Fastened visually correctly, it will look even for some time, but over time, a roofing with similar stretches can go in waves.
Therefore, in order for the ondulin roof to be made qualitatively, it is necessary to take into account the linearity of the horizontal and vertical joints of the ondulin sheets over the entire surface of the finish coating. It is also important to avoid stretching the sheets. Before fixing the ondulin with nails, you need to make sure that the material lies completely evenly.

It is necessary to lay the material so that the overhang of the sheets of ondulin from the cornice is no more than 7 centimeters.
- Ondulin calculation, which should hang from the roof, is done based on the installation instructions for this roofing. If the overhang is too long, then it will bend, and if too short, then debris will fall under the roof and rain and snow will break through.
- It is important, laying ondulin, to correctly calculate the step of the crate. If this is done incorrectly, then ultimately the installation work will be reduced to zero and the work will have to either be completely redone or repair the roof much earlier than the scheduled time.
To make such a repair is quite difficult, since it is difficult to remove the damaged ondulin without violating the integrity of the entire coating, consisting of individual sheets. Therefore, you should not even deviate slightly from the instructions for its guessing.
It is worth weighing in advance whether it is worth jeopardizing the longevity of the ondulin roof, as well as the right to guarantee it, neglecting the ability to immediately correct the error during installation.
Video editing ondulin
Laying roofing from ondulin
Now we will consider the instruction that you must adhere to when laying the ondulin material.
- As in the case of the crate, the overlap of the sheets of ondulin will be determined by the slope of the roof slope.For example, if it is in the range of 5-10 degrees, then the size of the lateral overlap of the ondulin sheets is two waves, and the overlap along the length of the sheet is 30 cm. When the slope of the ramp is 10-15 degrees, the lateral overlap is made in one wave, and the overlap 20 cm in length. With a slope of the roof slope of more than 15 degrees, the lateral overlap will also be one wave, and the overlap in length is 17 cm.
According to the instructions, the ondulin is laid so that, depending on the angle of the roof, the sheets are mounted with an overlap in length within 17-30 cm.
- The bars of the crate under the ondulin are placed with a step, which is determined in accordance with the previously considered rules. To crate was parallel, use a wooden conductor, which is a block of wood of the required length.
- Before starting installation work, it is necessary to calculate ondulin. For this, marking of the sheets is done, according to which the sheets will be cut into pieces of the required size. Marking should be done carefully and clearly using a template in the form of a cropped sheet and colored pencil.

It is better to cut ondulin during installation work using a hacksaw on a tree having a small tooth size. The canvas must be lubricated periodically, otherwise the tool may get stuck in the material. You can also use hand and circular power saws
- Before starting work on the device for overlapping, the ondulin is raised to the roof. Even one person can do such work, since a sheet of material weighs just over 6 kg.
- Before you start laying roofing material, you should clearly understand the order of work. Mount ondulin, starting from the edge of the ramp, which is located on the side opposite to the prevailing direction of the winds. The second row begins with laying half the sheet with the goal of creating in the corner of the overlap in 3, not 4 sheets. Adhering to this method can significantly simplify the laying of the finishing material.
- Fixing ondulin, nails should be nailed at the ends of the sheets in each wave, as well as on both edges of the lateral overlaps. They are also nailed in the middle of the sheets through a single wave. Each sheet of roofing material must be attached with 20 nails.
- When a roofing endova ondulin is arranged, then special elements that are produced by the same company should be used. For its installation, it is necessary to lay additional bars of the crate.
- Similarly to the valleys, the ondulin skate is also arranged using ridge ondulin elements. They begin to be mounted on the leeward side with an overlap of elements of at least 12.5 cm. Nails are driven into all waves of sheets joined to the roof of the ondulin skate, as well as into the battens for this purpose.
- The forceps are formed using a special forceps ondulin element. It bends and attaches with one edge to the side waves of the outermost sheets, and the second - to the gable board. Sometimes, when the forceps are installed, the ondulin ridge element can be used.
- The edge of the roof joins the wall and is formed using the same elements that are used in the device of the endova ondulin. Joints are treated with silicone sealant.
- End roof joints with chimney and ventilation pipes, as well as walls are sealed using a covering apron. Its fastening to the sheets of ondulin is performed on each wave. Sealing is also carried out using sealant.
- When venting pipes or ducts through the roofing are arranged, special outputs are used. Their base is attached to each wave of the ondulin sheet, and the top of them is mounted with an overlap on top of the base.
To provide access to the roof, as well as to illuminate the attic, dormer or roof windows are provided. They are attached with an overlap on the underlying sheet.The sheet of ondulin, which is located above, is also laid with an overlap over the dormer.


Alas, no comments yet. Be the first!