
In order for the rafter system to be built with your own hands, you need to carefully think through all the stages of work. Decide on the type of future roof, choose the right material and draw up a work plan. Depending on the chosen roof shape, the type of rafter system is also determined, after which you can proceed to the design stage of the entire system as a whole, taking into account the peculiarities of the roof structure. When the individual elements are ready and fixed, you can begin the installation of the entire rafter system.
To build a rafter with your own hands, you need to take quite a few steps. But if you do everything in order, then there should be no problems with the construction of rafters. Let us carefully consider all the main stages of the rafters.
Content
The determining factor in the construction of rafters is the shape (type) of the roof
If you decide to install the rafters for the roof with your own hands, then first of all, you need to determine the type of roof. Indeed, for different types of roofs, different rafters are necessary, so this point must be taken into account.
To more clearly imagine what shape of the roof I would like to see, we can use modern technologies, for example, computer modeling. Here, depending on the software package, you can visually create exactly the shape of the roof that you need. At the same time, visually place all the elements of the future system exactly where they should be.
The variety of shapes and sizes of roofs in today's realities can really amaze the imagination of any homeowner. And for each type of roof you need your own rafter system.
For example, pent roofs are most often used for utility rooms, such as a bathhouse or stable, as well as for a wood shed. For such buildings, you should not hire expensive specialists, you can easily erect such rafters with your own hands, saving a significant amount of money and building materials. But for private urban or country houses, the use of a roof structure of this type is not very practical. For them, they use a variety of types of roofs, and such a variety can not but rejoice.
The most popular today is a broken roof. This trend came to Russia from the west and firmly entrenched in the construction. However, you can build any roof, because all modern types, in terms of their practicality and functions, are few that differ from each other.

Having decided on the type of roof (gable, hip, broken), you definitely need to think about the roofing material, which should reliably protect the roof in any weather conditions. In this case, the weight of the roofing materials should be taken into account. When covering the roof with light materials, such as, for example, ondulin, the rafter system can be much lighter than when using heavy ceramic tiles.
What material should be used for rafters?

If rafters are made for the roof with their own hands, then the most common material in recent years is considered to be coniferous trees.Such wood species are very easy to process, while at the price this material is quite affordable, unlike others intended for the same purposes.
Under the rafters, a beam is usually used, the width of which should be from 10 to 15 centimeters, and the thickness may not be very large (within 5 centimeters).
Depending on the length of future rafters, as well as on the angle of their installation, it is necessary to select the appropriate length of the beam.
It is best to take only the beam that has already been matured for the construction of the rafters. When the roof is erected, such a beam will not change its geometry, and the roof of the house will reliably maintain its shape.
Types and types of the most popular rafter systems
All rafter systems, regardless of their type and size, are primarily a combination of beams, fasteners and other elements whose responsibilities include the correct distribution of loads on the entire roof surface. An important role in this is played by the correct installation of the rafter system with your own hands, when all the loads that may appear in the future are taken into account. The reliability of the roof under construction will depend on how well the entire architecture of the rafter system is calculated.
It just seems that designing during the construction of the roof is not at all necessary, in fact, without developing an accurate and correct design your roof will not be safe enough, which means that you will have to turn to professionals and use only high-quality materials to install the roof.
Basically, all rafter systems are divided into two main types: hanging and layered. One of the most common systems are layered rafters.

Difference layered from other systems is that the rafters abut when mounted in a bar, which is most often located along the entire perimeter. As for the central part, an ordinary ridge run is used in this place, and for the strength to be even better, the entire rafter system is supported by beams.
In the second embodiment, apply hanging rafters., This is such a system in which, if necessary, additional elements are installed in the structure (racks) so that the load is optimally distributed throughout the roof.
Do-it-yourself rafters are installed using more reliable and modern materials, such as studs, metal plates and various mounting angles. Previously, exclusively steel nails and staples were used to fasten all structural elements.
The main elements of the rafter systems
It is worth saying that the rafters are part of the supporting structure of the roof. If we consider, for example, layered rafters, then they consist of the following elements:
- rafter legs (bars that are located along the slopes);
- runs;
- lying down;
- struts;
- racks.
As for the rafter legs, one of the most important parts in all elements of the roof, their main function is to protect the roof from deflections that can form under the influence of snow. The remaining elements are aimed at supporting and removing the load from the rest of the roof, at its even distribution on the walls, as well as on the supporting posts.
The roof rafters are most often used if the structure assumes the presence of vertical columns, but the distance between them must be less than eight meters.
Such relatively small spans are covered with rafter legs, which are preferably located at a distance from each other from 800 to 1200 centimeters.
To achieve the optimal step size of the installed rafter legs, you need to carry out all the necessary calculations.To ensure that the structure is strong enough, you can also use a system of additional racks that will rest on the beds, and also, if necessary, support the run.

Thus, the installation of rafters with their own hands should be performed so that the upper ends of the rafters abut against the girders, and where the lower part of the rafters is located, in the Mauerlat. Mauerlat should be attached to the upper edge of the wall. Mauerlat is an important part of the rafter system; he redistributes part of the load from the rafters to the walls.
In order for the rafter legs to be very stable, it is necessary to build a rafter frame.
We design a rafter system
When designing rafter systems, it is necessary to take into account the type of roof, since each type of roof must have its own rafter system. After all, it is obvious that the rafter structure of the hip roof will significantly differ from the attic (broken). Therefore, embodying the plan, these important factors must be taken into account.
But still, some rules for the installation and design of various types of roofs can be considered universal.
When developing the roof structure itself and its rafter system, it is necessary to take into account some factors, which are given below:
If roof insulation is required, then you need to think through the stages of installation work so that the work is subsequently carried out quickly, as conveniently and easily as possible.
When laying the insulation, it is necessary to think over an important step when the rafter legs will be mounted.
It is necessary to take into account the future weight of the roof and, in accordance with this, calculate the power of such a structure as a rafter leg.
In order for the wood to be strong enough, several factors must be taken into account. These are the conditions in which the wood was harvested, the place of its storage, and also drying.
When choosing wood, it is better that these are resinous beams. After all, everyone has long known that resin is a natural antiseptic, which means it will reliably preserve wood, and the service life of the rafters will be longer.
If rafters are made for a hip roof, then they should be of different sections.
The most durable rafters for the roof with their own hands are installed in those places where there is a connection of several bars.
With particular care, you should choose a bar that will be used on the end rafters. After all, the joint between the planes very often becomes a problem place, since it is the least durable and can leak quite often.
How to protect the beam and why do it?
Before you begin the process of such important tasks as roof trimming with your own hands and laying waterproofing material, you must definitely consider issues related to protecting the timber from fire and various insects. I must say that the protection of ceilings from fire is even prescribed in some SNiP for roofs of various types.

The timber is impregnated with special substances, antipyretics (these substances are designed to reduce the combustibility of the material), and it is also necessary to treat with antiseptics (this type of substance prevents rotting of wood). Such measures must be taken long before the rafter system is finally installed. In this case, it is possible to treat all areas in sequence, but paying particular attention to those that may be subsequently damaged. Particular attention should be paid to the joints.
In order to apply protective compounds, it is recommended to use a brush. It should be wide enough, and the pile in this brush should be long. When applying substances, it is necessary to wear special glasses to protect the eyes, and also use a respirator.
It is recommended to process the wood more than once, and apply the substance in two layers. Before applying, let the wood dry.In this case, the tree is better impregnated, the action of the protective compounds will last for a longer time.
Proceed with the installation of the rafter system, of course, it is only necessary when the entire bar is completely dry and the antiseptics are firmly absorbed.
DIY rafter installation
Let's analyze the approximate installation scheme of the rafter structure.
First you need to lay the Mauerlat - a beam on which the rafter system will be held almost completely. Mauerlat must be laid on top of the walls around the perimeter of the entire room, special fastenings should be installed in it at a distance of no more than 120 cm.
To improve waterproofing, a layer of roofing material is placed under the Mauerlat, and you can also use other materials of waterproofing properties.
The beam must be laid next to the studs. Then mark the places where the holes will be. After the holes have been drilled, it is necessary to thread the studs into the Mauerlat, but so that the stud protrudes slightly and the protrusion is small (several millimeters). Then the Mauerlat must be fixed with nuts and washers.
When the Mauerlat is already finally installed, you can proceed to the next step, namely, attaching the rafters to the Mauerlat.
The rafter leg must be set in a certain position and fixed to the Mauerlat using brackets made of galvanized steel. To do this, prepare the screws and staples.
The bracket is needed in order to prevent, in which case, the displacement of the rafters placed along the Mauerlat. A bracket is also needed to prevent displacements.
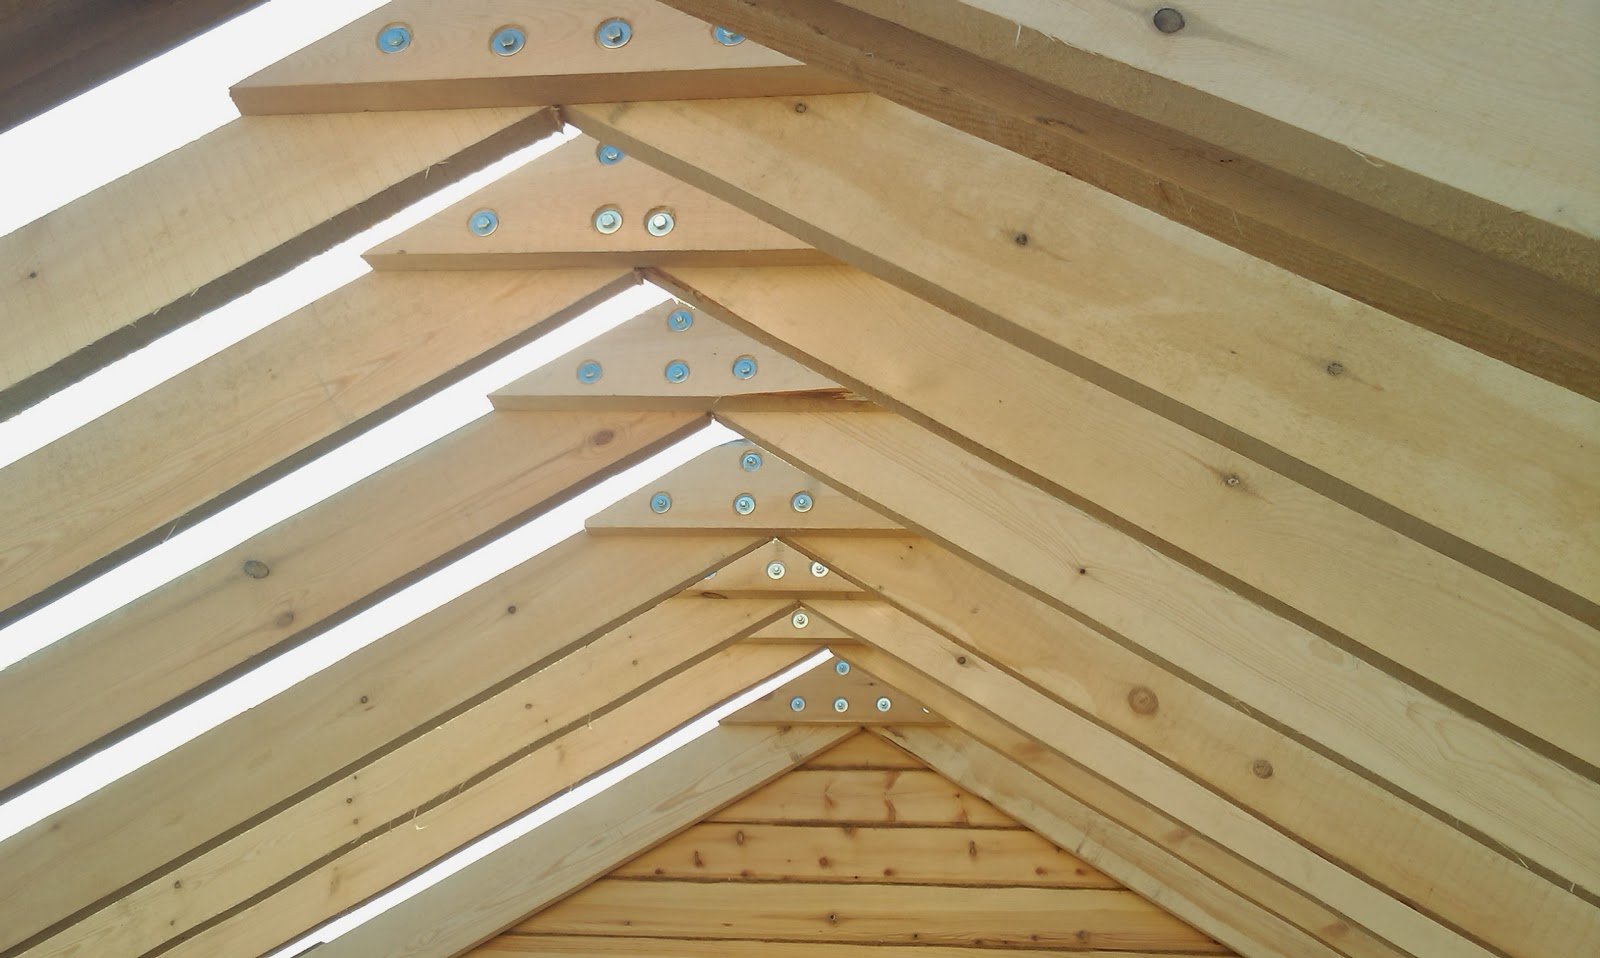
Similarly, using brackets, the rafters with the ridge part of the roof are fixed.

To further strengthen the ridge part of the roof, as well as its fastening, this can be done with the help of a rail, which can connect the opposite rafters into something similar to the letter “A”.
To reliably connect the rafters to each other, you can also use studs. Moreover, they should be at least about 8 millimeters if ondulin or other lightweight materials are used as roofing material. If it is supposed to cover the roof with ceramic tiles, then of course the studs should be much longer, at least 10, or even 12 millimeters.
To prevent displacement of rafters within the same mount, it is better to use two studs at once.
Sometimes, a situation may occur when the elongation of the beam is required. In this case, the bars should be overlapped, but with especially strong studs, and the diameter of these studs should be at least 10 millimeters.
How to properly fix the rafters to the Mauerlat
Sometimes it may happen that the length of the rafters may be insufficient. This can happen if, for example, they erect a roof of the so-called T-shape. In this case, in order to prevent, and it is best to exclude completely sagging of the roof in length, due to rainfall or under its own weight, then it is necessary to significantly strengthen the roof so that this does not happen.
There are two ways to fix the problem: install in the rafter system, in its middle, a run that will more evenly distribute the load. Or use another method, namely, to install additional beams of the transverse type, as well as spacers that will distribute the entire load quite efficiently.
In this case, the second method is more practical, and today it is used quite often in the construction of attic roofs.
When the entire installation of the rafter system with your own hands is already completed, it is necessary to trim all the rafters that are on the roof throughout the level of the cornice. And then you can begin, if necessary, to waterproofing work.
So go for it! Creating a rafter system with your own hands, you gain invaluable experience, self-esteem and significant savings in the cost of building your home.
Alas, no comments yet. Be the first!