
A sloping roof is one of the options for gable structures, which is different in that it allows you to get much more free space on the attic floor. The advantage of this technology turns into some difficulties when a rafter system of a sloping roof is being built. Below we will talk about how to choose and build the "skeleton" that holds the roof structure.
Content
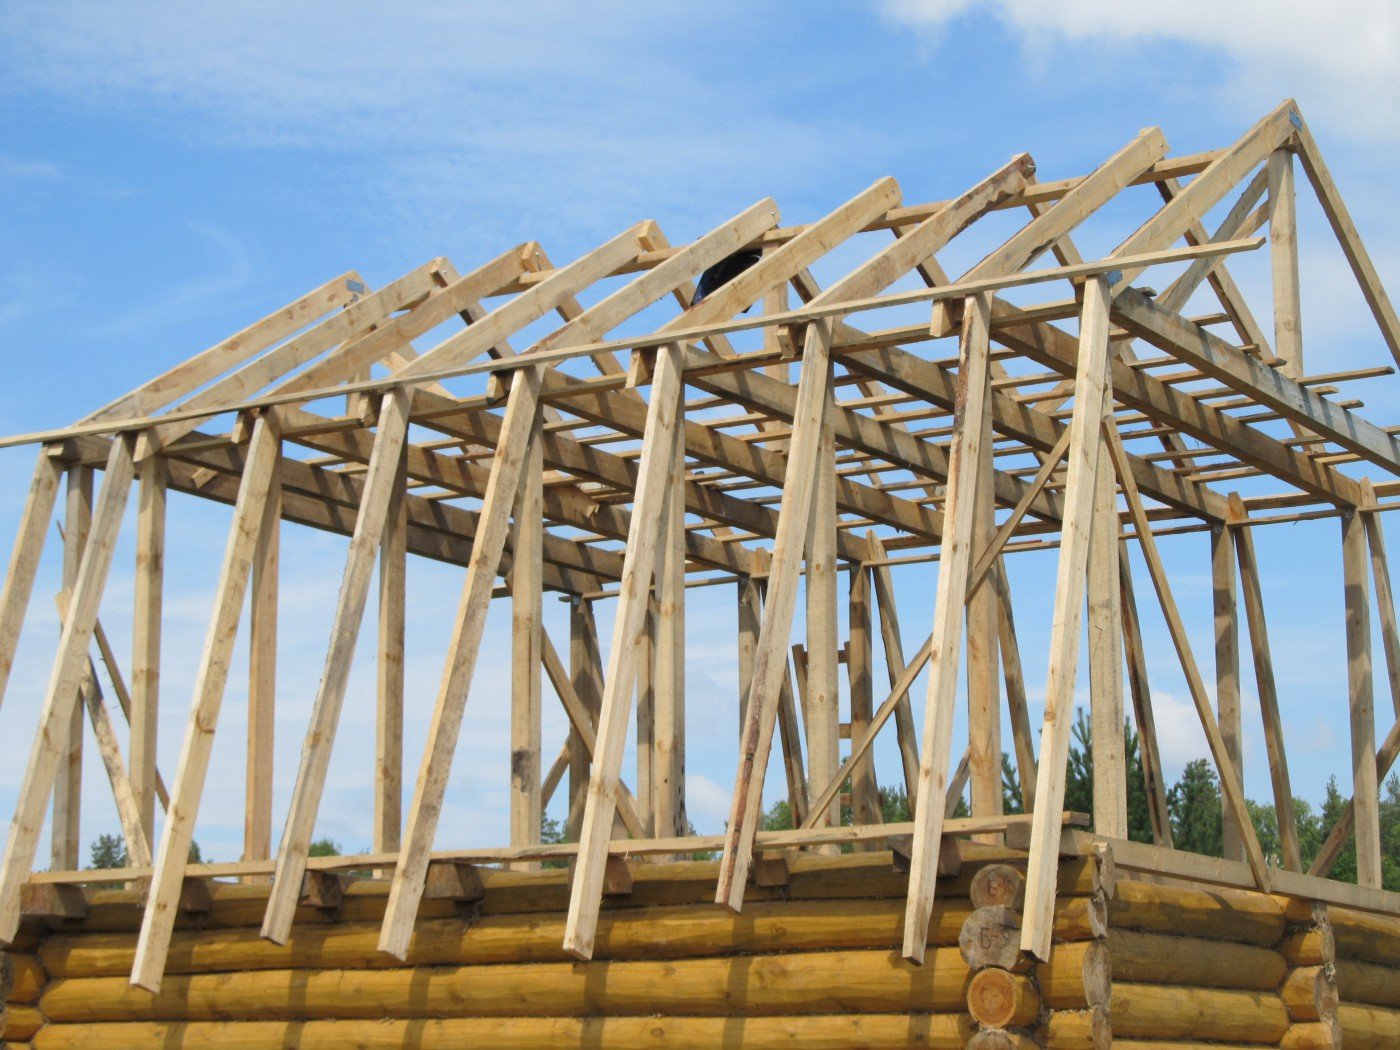
Sloping roof construction

The main difference of this type of roofs is that, as a kind of gable structures, they have 4 slopes. An increase in the number of slopes is achieved due to their kink, which allows you to greatly expand the inner space of the attic and get a high ceiling in the attic. Most modern country houses are being built with the expectation of creating a residential attic, so the relevance of the sloping roof is quite high.
In fact, a sloping roof can have a more complex shape, but in this case, the technology of its construction will be different.
It should be noted that the complexity of building such a structure is higher than the usual gable roof, but it pays off. Instead of a small but cozy room in the attic, you get a room that is not inferior in size to the rooms of the first floor.
Types of rafter systems
To create a sloping roof, the attic of which will be residential, it is best to use layered rafters. There are other types of similar elements, however, in this case, they are not the best option.
The most common way to create an attic is the following algorithm. First, floor beams are laid. On top of them is a temporary flooring that will replace scaffolding. Then a structure is created from the racks connected by the beams of the attic floor. The resulting U-shaped elements intersect at the upper corners with two runs. This is a beam that acts as a support for rafters. In addition to the two side runs, a ridge run is also carried out, which is located in the center of the beams, which form the basis for creating the attic ceiling. It is held on special racks and serves as a support for the upper part of the lay rafters.
The design of the lower slopes depends on their angle of inclination and the expected load. If the rafters that are used to create them cannot provide the proper level of strength, braces are installed. These are supporting elements that support the rafter leg at the site of maximum deflection.
The use of floor beams as a support makes sense only if it comes to a wooden building. Today there is an alternative option - houses built using reinforced concrete. They have reliable overlap, however, in this case, a special technology for installing support racks will be required. For them, they lay a bed - a beam lying on top of a reinforced concrete slab and acting as the base for the vertical elements of the rafter system.

The thickness of the beam for the ceiling beams of the attic is selected after calculating the loads acting on the upper slopes of the roof. Here you need to consider both the weight of the racks and the mass of the ridge run. Sometimes experts create roofs without using a run, but this path is the most dangerous, because the whole structure loses its spatial rigidity.You can use the method, but only if there are accurate calculations of the ridge node formed by the rafters of the upper slopes.
The most optimal option is to create a design involving the use of a ridge beam. If you decide to do without it, be prepared that a large amount of snow or even a strong wind will break through the roof, after which an expensive repair will be required.
To build an attic using a frame is very convenient. Since the “skeleton” is first created, and then the rafter legs are installed on top of it. Even a layman can handle such work, but it all depends on the size of the structure, since the larger the roof, the more difficult it is to build.
Fixing rafters together
One of the main tasks facing a specialist in building design is reliability. Numerous calculations allow you to bypass possible pitfalls and choose the correct section of the rafters, but you also need to properly fix these elements.
You can fix the roof rafters using:
- Hairpin. In this case, it is assumed that the rafters in the upper part are joined end-to-end, and are held at the expense of two overlays of metal or waterproof plywood connected by studs.
- Nails In the case when it comes to connecting the upper part of the rafters, it is better to use special brackets. This is a simple, reliable and inexpensive method that allows you to fasten the upper parts of the rafter legs.
- Nail plates. Strips or plates made of galvanized steel and having special stamped teeth are excellent for mounting wooden structures. Such fasteners have a tooth height of 8 mm, and the number of rows of “nails” depends on the size of the element.
Mounting locations are selected based on calculations. Usually it is a ridge, side runs, Mauerlat and floor beams. Depending on the method of attachment used, the rafter structure may be spacer or non-abutment. Its type determines how the rafters are connected with the Mauerlat and with the ridge run.
If you do not intend to use a spreader, then the cuttings on the rafter's foot are made so that they are suitable for supporting on a horizontal plane. In this case, the compensation of the longitudinal forces should be compensated by the use of crossbars or pair contractions.
Mauerlat installation

The weight of the attic roof is quite large. It includes not only the mass of the rafter system, but also the weight of the insulation, roofing and elements located on the roof surface. Obviously, this load must be evenly distributed over the surface of the walls. For this, we need a Mauerlat, which allows you to evenly distribute the load on the surface of the walls. The second task that the support beam solves is to protect the building from outward forces. Those. those that could cause the walls to tip over. In this case, this point is not so relevant, but you also need to remember about it.
The installation method of the Mauerlat depends on the design of the house. For example, if the building is made of logs or timber, then the supporting beam is mounted on top of the logs. To do this, you can use:
- nagely;
- staples;
- metal corners;
- galvanized wire.
Galvanized wire is one of the inexpensive options, and such a fixation is not difficult. The wire is well suited for masonry materials and has proven effective in practice. This installation method assumes that it is embedded in the wall several rows of masonry below the top of the wall, and its length is selected so that it allows the Mauerlat to be fixed. The number of wire fasteners is selected in accordance with the number of rafters resting on the beam.
Staples can also be used not only for wooden walls, but also in the case when the latter are folded from masonry material. For their use, it is necessary to fix wooden blocks in advance in the masonry. Despite all its simplicity, this method is relevant to this day, therefore it is widely used in the construction of wooden structures.

Mauerlat can also be fixed with studs or anchors. This case is usually used when the walls are not made of wood. In order to provide a reliable foundation for a heavy roof, a special reinforced belt is created over the wall, and a supporting beam is already attached to it. A reinforced belt is a reinforced concrete structure that is created right on the spot. For this, formwork is installed, reinforcement and concrete pouring are performed. In the process of preparatory work, anchors are placed that will act as fasteners. After the concrete has gained strength, only a part of the length of the anchors will protrude above the surface of the material, and the second will be held firmly by artificial stone.
Choosing a concrete brand for creating a reinforced belt is possible only after consultation with a specialist. A higher grade of concrete has greater strength, but its cost is higher, and problems with laying can occur.
After the concrete has solidified in the Mauerlat, holes are made in those places where anchors will have to pass through it, and then the beam is put in place and anchors are fixed.
Attaching rafters to the Mauerlat
For the roof to last for a long time, the elements of the rafter system must be fixed correctly. Not only the durability of the structure, but also its behavior in strong winds, snowfalls and temperature extremes depends on the chosen method. The “skeleton” of the roof itself is in motion, since it is affected by changes in humidity and temperature, which, with a large extent of the elements, give significant shifts that cause stress in the structure. The consequence of this phenomenon can be shifts and displacements, which means that the strength of the roof can be severely damaged if you use a rigid fixation of the elements.
In practice, both rigid and movable mounts are used. The choice of a particular option depends on the type of roof and its features. The first option involves the complete exclusion of any mutual movements of structural elements, therefore, apply:
- corners and hem base support block;
- gash on the rafter leg.
Installation itself can be done using nails, wire or staples. A hem support block is used in conjunction with corners to avoid lateral displacements of the structural member. The second installation method is used at least. In this case, the nails are hammered at an angle and should intersect inside the Mauerlat, after which another one is driven from above. A rigid rafter mount is one of the most reliable options. Both types of joints can be further enhanced by the use of wire or anchors.
In order for the rafters to be tilted the same across the roof, a template can be made that avoids taking measurements during installation.
Pairing with several degrees of freedom is created using special fasteners. In this case, several options are possible:
- Creation washed down. In the Mauerlat, a gash is performed, in which the rafter foot must be laid. Fastening can be carried out with the help of several nails located at an angle, one nail hammered vertically, or a metal plate.
- Release rafters beyond the walls and the use of mounting plates.
- The use of "sleigh". Slides are elements that provide a structural element with mobility within certain limits.

Each of the options described above allows you to mount the nodes of the rafter roof so that their elements rest in the Mauerlat, but have some freedom and can move in order to compensate for the emerging stresses. A sliding joint is used in various types of buildings, but it is of particular interest for wooden houses, since they are prone to shrinkage, and rigid fixation of the roof structure will lead to its destruction. Movable fasteners provide some freedom to the walls and gables, so they easily adapt to shrinkage.
Wood protection
The roof has a lifespan of tens of years, but different things can happen during this time. For example, water will get on the rafter structure, which will lead to its accelerated wear. Of course, waterproofing is a sufficient guarantee, but experts recommend the use of additional protection for wood.
Any wood is like a sponge, which easily absorbs moisture, and not only in its pure form, but also from the air. This problem has been known for centuries and the same amount of time has been developing methods to circumvent it. The tree can be protected from external influences through the use of various coatings, but they only create a film on the surface.
The most promising option is volumetric impregnation, due to which substances penetrate into the wood. Typically, antiseptic formulations including various biocides are selected for this role. Application can be made in several ways:
- Using a paint brush. This option is one of the most suitable, because it allows you to process all the elements with the necessary care, and the consumption of components will be minimal. The only problem is that it will take a lot of time for such work.
When using the first method, it is best to apply the mixture in 2 stages, the gap between which should be selected taking into account the characteristics of the impregnation.
- Wood surfaces can be sprayed. In this case, the antiseptic does not penetrate as deeply as in the first case.
- Immersion in the solution. This technology is not the best option when it comes to sufficiently large elements of rafter structures, but you need to remember about it, because this method provides the highest quality impregnation.

Antiseptics are made from sodium fluoride or its silicofluoride variety. They are aqueous solutions of one of these substances, but there may also be compositions based on copper sulfate, clay or bitumen pastes.
The most common among oil-based antiseptics is creosote, which is obtained from wood or coal tar, but such a substance is toxic and is not suitable for the rafter system.
Any biocidal preparations that impregnate the roof truss structures are dangerous for humans, therefore, they must be applied using special glasses, a respirator and gloves.
An antiseptic can be made independently on the basis of solutions of copper sulfate or sodium salts, or you can buy a ready-made mixture. In the second case, you can immediately get a comprehensive solution that not only protects the tree from rot, but also prevents it from catching fire.
Above, we examined the features of creating a rafter system for a sloping roof and described in detail all the stages. Of course, this technology is not too simple, but if you have certain skills and a ready-made project, you can still build a roof.
Alas, no comments yet. Be the first!