
Parapets are most often installed on flat roofs, but they can also be found on their pitched varieties. In some cases, such constructions are assumed to be the technology of the device of a certain type of roof, and in others they are needed only to ensure the safe movement of people when performing repairs or cleaning slopes. There was a junction of the roof to the parapet on any flat roof, but not everyone knows the device. In this article we will talk about parapets and the features of their creation in various situations.
Content
What is a parapet

In fact, it is a continuation of the wall, however, as mentioned above, options are possible. The creation of such structures is regulated by the requirements of SNiP, according to which parapets are mandatory for any building with a roof slope of up to 12 percent at a height of more than 10 meters. Obviously, this category includes most of the modern residential buildings being built in large cities, and suburban housing, on the contrary, needs a fence only in exceptional cases.

The use of fencing on a pitched roof will significantly simplify various work. For example, if repairs are needed, then the parapet will be additional insurance, however, you need to ensure that it is in good condition, since rust can gradually spoil the metal to such an extent that it can no longer withstand the weight of a person.
According to the same SNiP for pitched roofs, the use of fences is provided at a height of more than 7 m. Such fences are performed in accordance with GOST 25772. The parapet can be created using the following materials:
- Concrete blocks. Usually, light varieties of this material are used here. These are compositions obtained using cement binders, sand and aggregate. Their main difference from the so-called heavy concrete is that the aggregate here has a low density. There are also various types of porous concrete, where low weight is achieved due to the large volume of air bubbles inside the material.
- Monolithic reinforced concrete. If the blocks can boast that they are lightweight, and it is not difficult to lay them down with a certain skill, then the second option is the lot of those who use special equipment in the construction process and focus on reliability and durability. By monolithic technology, you can get a design of any type and shape, and the strength characteristics will be very high. The roof parapet is created as follows: the formwork is installed, reinforcement is carried out with steel bars, and then liquid concrete is poured.
- Brick. Masonry materials of this type have shown themselves well when operating in difficult conditions. Of course, the parapet will be somewhat heavier than the construction of concrete blocks, but this is offset by very high strength, as well as reliability and durability.
- Metal fences are also found, however, the difference here is that the parapet is not made solid, but in the form of racks connected to longitudinal rods. This variety is used on pitched roofs, and on flat.
The minimum construction height starts at 20 cm, but the maximum can reach 1.2 m. This parameter is selected taking into account the purpose of the roof. For example, the minimum height may be due to the need to create an additional waterproofing carpet, which will go to the surface of the side 25 cm or more.
The parapet is protected from the rain with metal aprons. This compensates for the destructive effect and extends the life of the structure. As an alternative to the galvanized metal sheet, a metal profile, copper or concrete slab can be used.
Below we will consider several types of joins for different parapets, which will allow you to understand in more detail how joins are created.
Roof parapet 200 mm
In this case, between the protruding part of the longitudinal wall and the roof, a rim of heat-insulating plates, for example ISOVER, is laid. They are glued to the concrete base using a special composition, and should fit snugly against the vertical wall. Next, a layer of roofing material is laid. Roll coating is in several layers. The bottom is a reinforcement that extends 2 m from the parapet. Above it is the main layer. They both go to the top of the concrete wall along the inclined side of the insulation and break off only at its edge. The third layer is represented by the same roofing material, however, its lower edge is only 35-50 cm away from the beginning of the rise formed by the ISOVER layer. The upper part of the parapet is protected by a metal element, which is fixed by using special dowels, for example, 3.7x70 mm. On the bottom of the metal apron, crutches with a pitch of 600 mm are located on the roof side.
450 mm high parapet

For flat roofs, such solutions are also used. In this case, there is also a three-layer protection and a layer of insulation, but the location of these elements is somewhat different. The first thing to note is the height of the insulation layer, which is even less than when the height of the parapet on a flat roof is only 200 mm. If in the above example the layer of triangular section with the upper part touched the horizontal part of the concrete ledge, then here it barely makes up a third of the height.
The situation is similar with the first two layers of the roofing carpet. They are completed on the insulation material, only in contact with the concrete wall. Only the third layer comes under the apron, which, as in the first example, extends 35-50 cm towards the center of the roof. The metal apron has also undergone certain changes. Now it has only small protruding parts and does not close the entire parapet on the roof, but its upper part. Fixing is done with two dowels, however there is one more difference.
For roofs of this type, special metal fences are used, which are installed on top of the concrete side. The height of the side itself is 450 cm, however, together with the fence, it reaches already 600 mm. The design is created using crutches made of steel strip, which, as for the 200 mm side, come in increments of 600 mm.
The fence used here is much inferior in strength to that which is mounted on pitched roofs according to SNiP. Usually, vertical racks embedded in concrete are used on a flat roof, and on the slopes, on the contrary, they mount solid sides that can support a person’s weight, because they greatly simplify snow removal in winter and maintenance of the structure.
Abutment to a wall 600 mm high
In this case, you will need to use not only a standard apron, but also an additional reinforcing element, which will be located on the back of the concrete side. Its task is to protect a fragment of the roof covering that goes on the side. The abutment is based on the same technology that was described above, but there are a number of differences. The first of them begins with the fact that additional layers of the roofing carpet enter the parapet only 250 mm, and the apron is located higher. A metal strip is mounted around the perimeter of the glued roll material, which fixes the lower part of the protective structure made of thin galvanized steel.Above is a layer of sealant and another element of the apron.
Side wall abutment
I must say that the device technology of this node is very different from that used in the device of the options described above. In a first approximation, it resembles an adjunction to a wall 60 cm high, however, there are several differences. For example, the number of puffs of roofing, which are less than when arranging longitudinal nodes. This is due to the fact that there is no need to reinforce the valley, which means that one less layer of rolled materials is required.
Adherence of the roof to the parapet on the end wall is performed using ISOVER material, which is located along the joint line. The best option is to use a layer having a triangular section, since in this case it does not cause difficulties with the laying of the rolled material, and the water at the junction is almost not delayed.
On flat roofs, the adjacency issue cannot be closed, since there are many options for the device and pitched roofs that will adjoin the wall. Here, first of all, it is worth remembering about a variety of outbuildings, as well as verandas, awnings and other structures. For example, a gazebo built near the house can play the role of a winter garden, but in this case it should be insulated and have sufficient protection from the cold and bad weather. Obviously, the ideal option would be one of the varieties of pitched roofs.
Such structures usually have a height less than a country house or cottage, so the issue of adjacency remains relevant in this case.
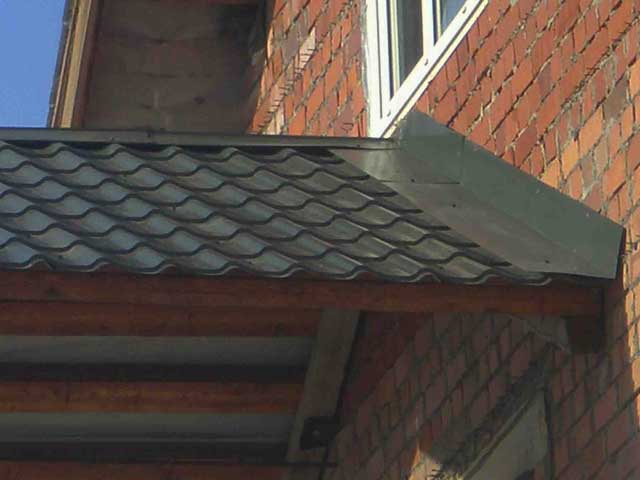
Joining of a roof from a metal profile
The use of any type of metal coating requires a special approach to the installation of the junction. Such work seems simple, especially if you observe the actions of a specialist, but for a beginner, the implementation of such operations will not be the best beginning of a construction career, since here you need to know exactly what and how to do, as well as have experience.
The first stage of work is to clean the wall of debris that has accumulated here while the house is standing. Twigs, dust, spray and everything on the wall must be removed. This is important because a simple method of joining involves the use of a sealant, and it is best combined with a clean surface.
The device of the junction of the roof to the parapet begins after you make sure that the layer of waterproofing material laid before installing the roof covering over the rafters reliably protects the junction. The sheets themselves should go at least 15-20 cm on the walls, and at least 15 cm on each other.
Waterproofing in this case plays the role of additional protection, since the main task will be solved by the abutment bar, which is a L-shaped element fixed at two points. In the lower part, where there is contact with the metal sheets covering the roof, it is recommended to use special gaskets. It is also necessary to make sure that the service life of these materials will be no less than that of those that form a protective layer on the entire roof.

The second point of attachment is the wall, and it needs to be given the lion's share of your attention. No matter how reliably the self-tapping screw fixing the metal sheet is tightened, there will always remain a small gap, which will become an excellent road for water. Of course, modern building technologies can eliminate this problem. It is enough to use a special gel sealant, which is poured into the gap between the abutment plate and the wall.
An alternative way is to gouge the recesses under the protective apron. This makes it possible to simplify the work somewhat and perform them even without the use of sealant, but bulky equipment will need to be delivered to the roof and a line should be laid to feed it with electricity.
Such junctions consist of two elements.The first is a roofing sheet, on top of which there is a corner decorative strip. Between them have a corrugated self-adhesive tape that acts as a sealant. A protective apron recessed into the wall is placed above the decorative strip.
Above, you told how the device for connecting the roof to the parapet for various types of roofs and materials is made, so such work will not cause you any difficulties. Of course, the consultation of the supplier of the material will not hurt, since different installation methods can be used for different types of surfaced sheets.
Alas, no comments yet. Be the first!