
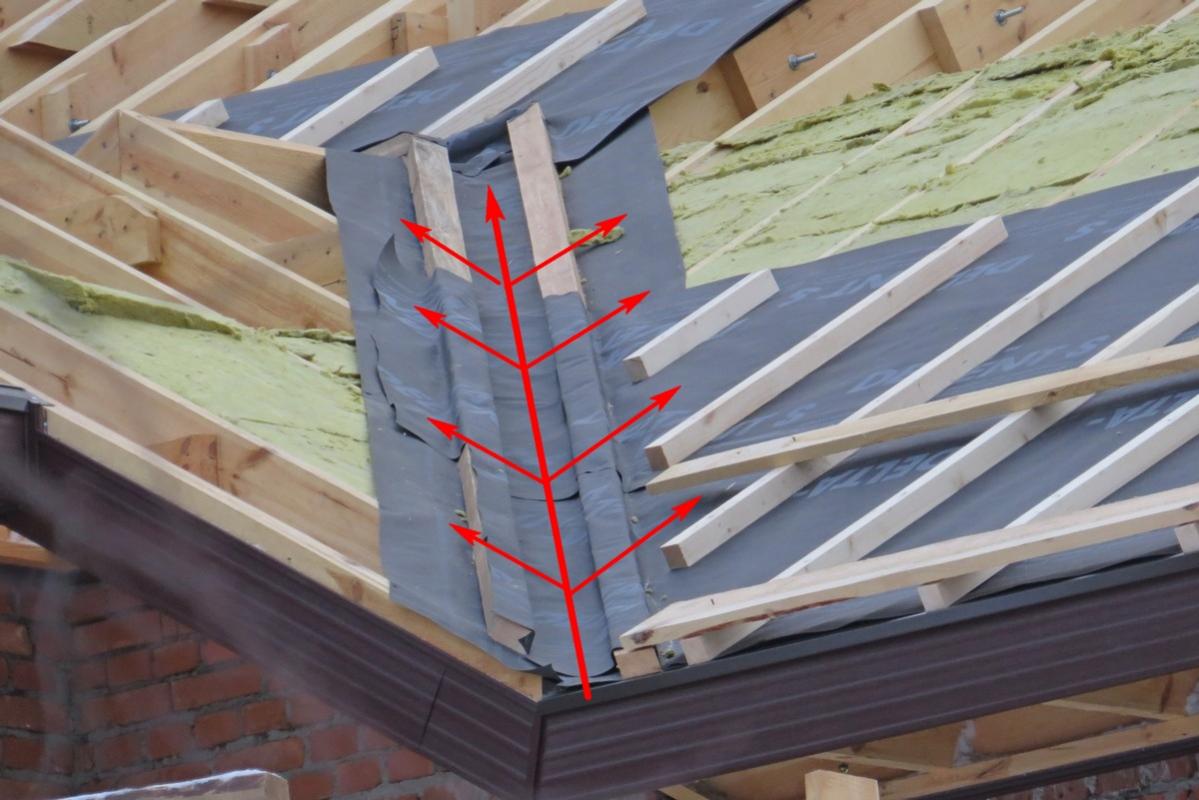
In the place where one roof slope adjoins another, an upper and lower valley are established. The lower endova is mounted in this node on a continuous crate, while the lower edge is laid over the entire cornice strip. During installation, a self-adhesive porous sealant is used between the lower endova strip and the sheets of roofing material for a better abutment of the roof.

The main difficulty is the device of the rafter system of the valley. First of all, it is a reliable waterproofing, since the maximum load of the roofing planes falls on it. The system must exactly match the drawing. If the valley is formed by the conjugation of the main slope and the mezzanine plane, then the device of the valley roof will require special attention. After the installation of the rafters is completed, the roof covering is laid and displayed on the inner corners, while using two lining layers with an overlap on each other.
After the installation of the roofing is done to give the roof completeness and aesthetics, the upper valley is installed. It is attached in increments of 3-5 cm to the top of the wave. Endov nodes must be isolated; for this, a sealing tape will be used to connect the endows.
Endov device should be made according to the following rules:
- make sure that the sealing tape for the junction of the ends is mounted correctly, gaps for small debris and water were left, there are no mechanical damage to the waterproofing layer and tears.
- the installation of the valley must be supplemented by a crate.
- End slats are mounted on mounted drippers, then when the endow begins on the eaves.
- prepare the required number of end rails and mount them with an overlap from bottom to top. The lower bar should be cut below the cornice line.
- installation of a valley allows installation along flanges of a valley of a valley. According to the marking, it is necessary to trim the roofing material bordering the valley.
- self-tapping screws are used for fastening, which are twisted into regular places. They tightly press the roofing material to the plank of the valley.
- strengthen the screws at a distance of less than 25 cm from the axis of the valley are not permissible.
- during laying, all cuts are aligned with a rubber mallet.
- the upper endova is mounted with an overlap of 10 cm.
Content
Endova on a T-shaped roof
After completion of construction, they proceed to the design of the roof. The multi-slope roof configuration is quite difficult to install. Here, the joints of the slopes that form the valleys should be clearly worked out and additional bars for strengthening should be installed in these places. In order for the roof ridge to be positioned at the required angle, the slope of the valley angle is changed. This technology allows you to build a roof of various shapes and sizes.
On the end rafter, they are laid for the strength of the board with a continuous flooring. So the superdiffusion membrane is laid on such a floor. Steam will erode through the ventilation gap. Under this membrane, no clearance is needed. The valley element is mounted below the roofing.
Roof ridge assembly
The installation of the roof ridge and ridge planks should be performed only when all the tiles are laid, and the end planks are mounted. For better abutment, if necessary, it is recommended to fix the seal. Fastening is done with self-tapping screws through a single wave of overlap.
The fastening of the ridge module starts from the end of the cornice, heading to the other end. The ridge sheet is fixed with four nails, and the next is laid in a 10 cm overlap on the previous one.
The last row of tiles is brought to the ridge line. Through the ridge, the protruding part is bent, and then, on the opposite slope, it is fixed. Specialists recommend forming skate elements using a heat building hair dryer.
Snow Retention Assembly

This node is mounted in two stages. To begin with, the snow retainer is fixed with a self-tapping screw or a nail. The screw or nail head, as well as the mounting hole itself, must be sealed with bitumen mastic. Snow retention is necessary to prevent the accumulation of snow in undesirable places. For example, they are installed above the entrance to the building, they are also necessary to protect the gutters. Under the second transverse step of the metal roof, a snow retainer is installed. At the top of each profile wave, a support bar is attached between the sheet of roofing material and the upper edge of the snow retainer. To mount the snow retainer directly to the crate, long screws should be used. At the top of every second wave of the profile, the lower edge of the snow retainer is fixed. in this node of the roof it is possible to install not only a bar of a snow retainer, but also a tubular snow retainer.
Laying the valley with the double weave method
In order to make the installation of the valley, a board with a width of 20-25 cm, a waterproofing membrane, which is mounted on plywood with increased moisture resistance or oriented - a chipboard by means of fixing nails, will be required. The attachment points are sealed with bitumen mastic. This method is used if the slopes of the slopes that form the valley are equal. Such a valley device involves comparing the angle with a board. As a protective layer, a waterproofing membrane is used.
Roof abutment unit
To close the node connecting the roof slope to the wall using special strips. According to the installation technology, they are attached to the upper point of the profile wave, as well as to the side of the adjacent wall. The length of the overlap of the slats should be 100 mm. Additional sealing is performed with silicone mastic, or a sealing tape is used to connect the endows.
By a traditional technological solution, attaching the roof to the wall, both side and front, provides for the preparation of walls in the walls and niches along the entire length of the abutment, as well as the installation of aprons made of galvanized steel. Installing aprons without gates and a niche by tightly pressing against the wall will not be able to provide the necessary adjacency, and therefore over time the node leaks. Firstly, the walls are not so smooth that you can press the apron against them. Secondly, in the sun the apron heats up and moves away from the wall due to thermal expansion.

If you mount the upper part of the apron in a shtroba or a niche, this can solve the problem. Therefore, when installing the apron, it is recommended that the upper part be made at least 10 cm high. And if the installation takes place in a shtroba, then it will be necessary to seal it with a cement-sand mortar.
The apron is fastened with nails to wooden pre-antiseptic corks, which are previously laid in the wall during the erection of brickwork.
If the apron is secured with a second triangular bar, then the knot will be practically not wet.
Also make and nodes of adjacencies of roofs to ventilation shafts and chimneys. Brick pipes are lined on all sides with aprons made of machined black sheet or galvanized steel. The side and lower parts of the apron are laid on top of the roof itself. The aprons are covered with a masonry layer on top. In tubes, the installation of wooden corks is not allowed, but because the apron is mounted on a lying fold.
If the roof is made of piece materials, such as ondulin, slate, then the size of the frontal and lateral overlap of adjacent roofing sheets should be as recommended by the manufacturer. If the size of the overlap is increased, this will lead to an overspending of the roofing material, and if reduced, to leakage of the roof. Small overlaps create a blown joint where rain water or snow will fall.
The elements of the aprons are overlapped lengthwise in the direction of the slope of the water. The overlap should be at least 10 cm. In order to make the knot more reliable, the aprons are docked with a lying fold.
Please note that the free overhang should be as recommended by the manufacturer. Too short overhang will not be able to provide water drainage from the roof. A long overhang will drain water well, but can be bent or cut off by snow sliding down from the roof.

The technology of mounting the roof in places of the valley from the ridge to the cornice involves the following work. An additional board is mounted in each endow. From the bottom up, the laths of the endow are installed (overlap 20-30 cm). The lower bar is trimmed slightly below the cornice line. Under the ridge and under the flanges of the valleys, a sealant is installed. Between the axial line of the valley and the sheets of roofing material there must be a gap of 6-10 cm on both sides. If the sheets were cut, then self-tapping screws are fixed at a distance of 1-1.5 cm. When fastening the endow and the sheet of roofing material with a self-tapping screw, a distance of 25 cm from the axis of the endow should be adhered. If the roof structure was assembled correctly, then in the places of fastening, the sheets of roofing material will touch the board on which the valley is located.
The design of the roof may involve a device of a valley, which will begin and end on roof slopes. An example would be the arrangement of dormers. In this case, an additional board must be laid under the valley. The sheet of roofing material is trimmed so that the cut level is 2 cm higher than the exit of the valley. Under the front and side walls of the dormer window, cuts are made in the sheet. A sealant is mounted along the walls, and the eaves overhang of the window is covered with a bar. Further, the installation of the valley implies the installation of its slats, which are trimmed by the exit to the ramp and along the ledge. The edge that goes to the slope should be pretty tight against the roofing material. Since the minimum slope of the roof is at least 11%, the upper edge of the valley is formed manually to achieve a tight fit. If the endow needs to be extended, then an overlap of 20-30 cm is made. You can fix the junction of the endows with self-tapping screws and sealant. additionally install a seal for flanging the valley. For this, a sealing tape is used for the junction of the endows.
Alas, no comments yet. Be the first!